
[Kubernetes] K3s Split Brain 트러블슈팅 - 2. 원인 분석
TL;DR
이번 글의 목표는 K3s Split Brain의 정확한 발생 메커니즘 규명이다.
- 배경: Part 1에서 Split Brain 상황을 복기했으나, 독립 클러스터 생성 메커니즘·etcd 데이터 보존 여부 등의 의문이 남음
- 분석: K3s v1.27.9 소스 코드에서 데이터스토어 선택 로직(
assignManagedDriver())과 etcd 기동 로직을 추적 - 재현: 5개의 실험으로 etcd 데이터 유무와 플래그 조합별 동작을 검증
- 결론: Split Brain은 “etcd 데이터 소실 +
--server플래그 누락”이 동시에 충족될 때 발생. K3s가 경고 없이 SQLite 모드로 새 단독 클러스터를 생성 - 핵심 안전장치: 컨트롤 플레인 노드의 systemd unit에
--server플래그를 항상 유지
문제: 이전 글에서 여전히 남은 질문
Part 1에서 K3s 컨트롤 플레인 노드 재조인 과정에서 발생한 Split Brain의 발견과 해결 과정을 복기했다. 요약하면 다음과 같다.
- 삼중화 컨트롤 플레인(cp-node-a, cp-node-b, cp-node-c) 중 cp-node-c의 하드웨어를 수리한 뒤,
k3s server를--server플래그 없이 실행 - cp-node-c가 기존 클러스터와 독립적인 단독 클러스터를 구성 (Split Brain)
- K3s 데이터 완전 제거 후
--server플래그를 명시하여 재조인하여 해결
Part 1의 복구 당시에는 빠르게 해결하는 데 집중했고, 정확한 원인 분석은 이후로 미루어 두었다. 이 글은 복구 이후 시간을 두고 다시 이 문제를 분석한 결과를 정리한 것이다.
당시 남았던 의문을 다시 돌이켜 본다.
- 정확히 어떤 메커니즘으로 독립 클러스터가 생성되었는가?
- etcd 데이터가 보존된 것인가, 사라진 것인가? — 분리된 클러스터에서 AGE가 19h이고,
etcd역할이 없고, 다른 노드가 보이지 않는다. - etcd 멤버가 자동 제거된 것인가,
kubectl delete node에 의한 것인가? - systemd unit에 플래그가 남아 있었는가?
이 글에서는 K3s v1.27.9 소스 코드 분석과 재현 실험을 통해 이 질문들에 답한다. K3s 데이터스토어, etcd/Raft 합의 알고리즘, Split Brain의 개념과 보호 메커니즘 등의 배경지식은 Part 1의 “배경지식” 섹션을 참고한다.
K3s 소스 코드 분석
K3s v1.27.9+k3s1의 소스 코드에서, k3s server 실행 시 데이터스토어 선택과 etcd 기동 로직을 추적한다.
호출 흐름
k3s server 실행부터 데이터스토어 결정까지의 호출 체인은 다음과 같다.
호출 체인 전문
main()                                               cmd/server/main.go
  └─ server.Run()                                    pkg/cli/server/server.go
      └─ server.StartServer()                        pkg/server/server.go
          └─ control.Server()                        pkg/daemons/control/server.go
              └─ prepare()
                  ├─ cluster.Bootstrap()             pkg/cluster/bootstrap.go
                  │   └─ assignManagedDriver()  ★    pkg/cluster/managed.go
                  └─ cluster.Start()                 pkg/cluster/cluster.go
                      └─ c.start()
                          └─ ETCD.Start()       ★    pkg/etcd/etcd.go
핵심 분기점은 두 곳이다.
assignManagedDriver(): etcd를 쓸지 SQLite를 쓸지 결정ETCD.Start(): etcd를 쓰기로 한 경우, 기존 멤버 복귀 / 새 클러스터 생성 / 조인 중 하나를 선택
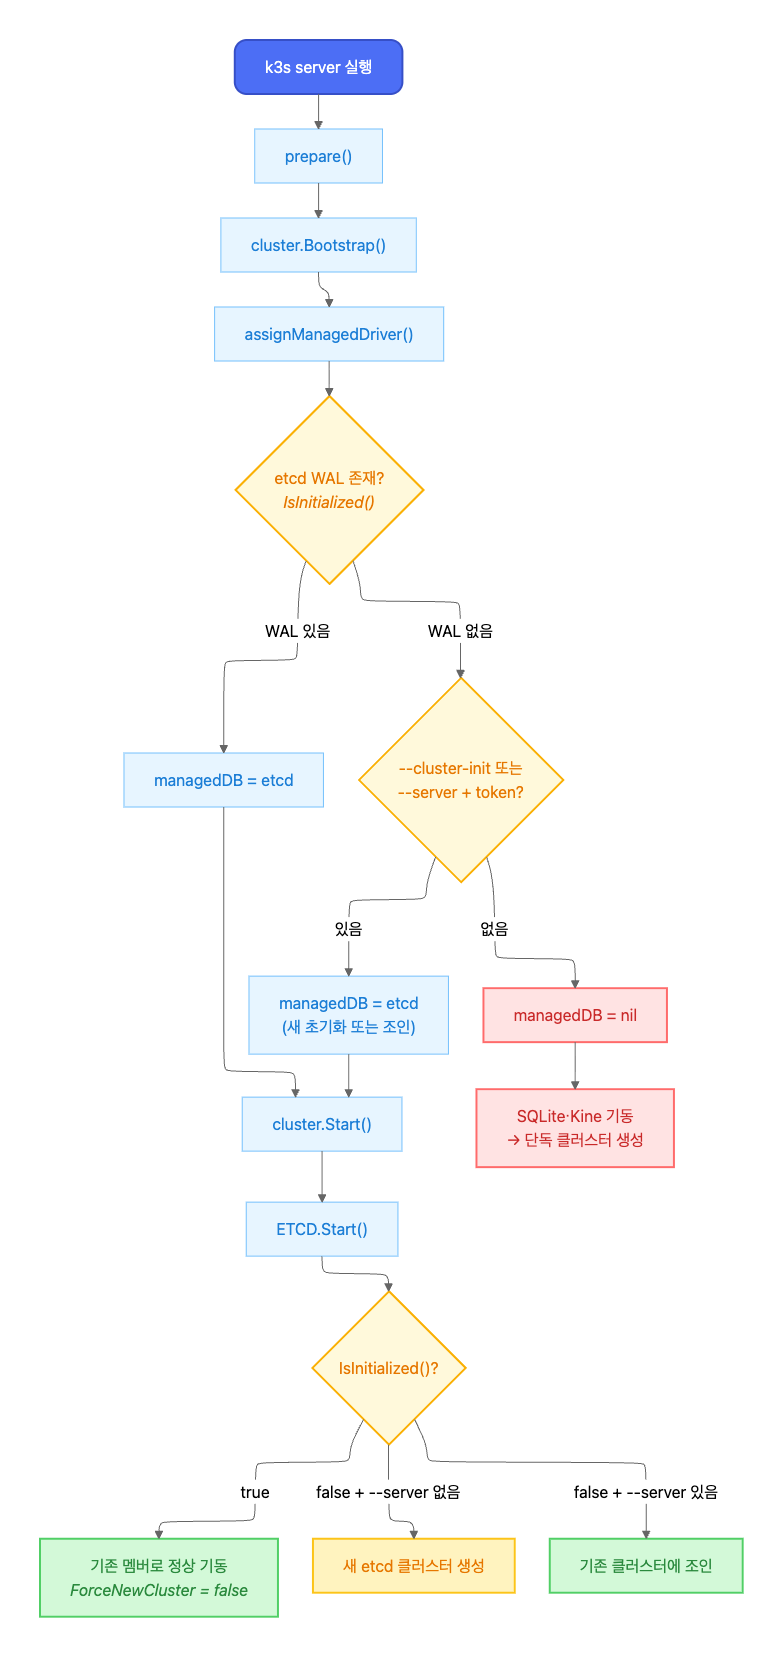
빨간 경로(managedDB = nil → SQLite)가 Part 1에서 발생한 Split Brain 경로다.
데이터스토어 선택: etcd vs SQLite
K3s가 어떤 데이터스토어를 사용할지는 assignManagedDriver()에서 결정된다.
assignManagedDriver() 코드 (핵심 로직만 발췌)
// pkg/cluster/managed.go — assignManagedDriver()
func (c *Cluster) assignManagedDriver(ctx context.Context) error {
    // 1단계: 디스크에 초기화된 DB가 있는지 확인
    for _, driver := range managed.Registered() {
        if ok, _ := driver.IsInitialized(); ok {
            c.managedDB = driver  // etcd WAL 존재 → etcd 사용
            return nil
        }
    }

    // 2단계: 초기화 또는 조인 요청이 있는지 확인
    if c.config.Datastore.Endpoint == "" &&
       (c.config.ClusterInit || (c.config.Token != "" && c.config.JoinURL != "")) {
        c.managedDB = managed.Default()  // --cluster-init 또는 --server+token
    }

    return nil  // 어느 것도 아니면 managedDB = nil → SQLite
}
IsInitialized()는 etcd WAL 디렉토리의 존재 여부만 확인한다.
IsInitialized() 코드 (핵심 로직만 발췌)
// pkg/etcd/etcd.go — IsInitialized()
func (e *ETCD) IsInitialized() (bool, error) {
    dir := walDir(e.config)  // <datadir>/db/etcd/member/wal
    if s, err := os.Stat(dir); err == nil && s.IsDir() {
        return true, nil
    }
    // ...
}
| 조건 | managedDB | 데이터스토어 |
|---|---|---|
| etcd WAL 디렉토리 존재 | etcd driver | embedded etcd |
WAL 없음 + --cluster-init 또는 --server+token |
etcd driver | embedded etcd (새 초기화 또는 조인) |
| WAL 없음 + 플래그 없음 | nil | SQLite |
etcd 기동 로직
managedDB가 etcd로 설정된 경우, ETCD.Start()에서 기동 방식을 결정한다.
ETCD.Start() 코드 (핵심 로직만 발췌)
// pkg/etcd/etcd.go — Start()
func (e *ETCD) Start(ctx context.Context, clientAccessInfo *clientaccess.Info) error {
    isInitialized, _ := e.IsInitialized()

    if isInitialized {
        opt, _ := executor.CurrentETCDOptions()
        logrus.Infof("Starting etcd for existing cluster member")
        return e.cluster(ctx, false, opt)  // ForceNewCluster = false
    }

    if clientAccessInfo == nil {  // --server 없음
        return e.newCluster(ctx, false)    // 새 클러스터 생성
    }

    // --server 있음 → join 시도
    go func() { e.join(ctx, clientAccessInfo) }()
    return nil
}
핵심은 etcd 데이터가 이미 존재하면(isInitialized = true), --server 플래그 유무와 관계없이 기존 멤버로서 정상 기동한다는 것이다. ForceNewCluster는 false다.
etcd 멤버 제거 메커니즘
member_controller.go의 onRemove 핸들러는, Kubernetes Node 오브젝트가 삭제될 때 etcd 멤버도 함께 제거한다.
onRemove() 코드 (핵심 로직만 발췌)
// pkg/etcd/member_controller.go — onRemove()
func (e *etcdMemberHandler) onRemove(key string, node *v1.Node) (*v1.Node, error) {
    // Node 삭제 이벤트 → etcd RemovePeer 호출
    return node, e.etcd.RemovePeer(e.ctx, name, address, true)
}
즉, kubectl delete node cp-node-c를 실행하면 Kubernetes Node 오브젝트 삭제와 함께 etcd 멤버도 제거된다.
소스 코드 분석 요약
코드에서 확인한 사실은 아래와 같다.
- etcd 데이터가 있으면 force-new-cluster를 하지 않는다.
--server없이k3s server를 실행해도, etcd WAL이 존재하면 기존 멤버로서 정상 기동한다. - etcd 데이터가 없고 플래그도 없으면 SQLite로 간다.
assignManagedDriver에서managedDB = nil→ SQLite 모드 → 새 단독 클러스터 생성. - etcd 멤버 자동 제거 로직은 Node 삭제 이벤트에 의해 트리거된다. 응답 없는 멤버를 시간 기반으로 자동 제거하는 로직은 투표 멤버(non-learner)에 대해서는 확인되지 않았다.
이 분석은 Part 1에서 관찰된 증상(AGE 19h, etcd 역할 부재, 다른 노드 부재)이 etcd 데이터가 없는 상태에서 SQLite 모드로 기동된 경우와 일치한다는 점을 시사한다. 하드웨어 수리 과정에서 etcd 데이터가 사라졌을 가능성이 있다.
재현 실험
소스 코드 분석 결과에서 확인한 시사점을 바탕으로, 재현 실험으로 검증한다. 이후 5개의 실험을 순서대로 진행하는데, 각 실험의 역할은 다음과 같다.
- 실험 1-2 (환경 구성): 단독 CP(SQLite) 클러스터를 구성한 뒤 삼중화(etcd)로 전환하여, Part 1의 운영 환경을 재현한다.
- 실험 3 (전제 조건 확인): systemd unit에서
--server플래그를 제거한 뒤에도 etcd 데이터가 있으면 정상 동작하는지 확인한다. “플래그가 빠진 상태를 인지하지 못하고 운영하는” 시나리오가 성립하는지를 검증하는 단계이다. - 실험 4 (핵심 재현): etcd 데이터 유무에 따라 동일한 명령(
k3s server, 플래그 없음)이 “정상 복귀”와 “Split Brain”이라는 정반대의 결과를 만드는지 확인한다. 이 글의 핵심 실험이다. - 실험 5 (부가 검증): etcd 멤버 자동 제거 여부,
kubectl delete node에 의한 제거, 정상 재조인 절차를 검증한다.
실험 환경
| 항목 | 사양 |
|---|---|
| 가상화 | Vagrant + VirtualBox (Ubuntu 22.04, bento/ubuntu-22.04) |
| K3s 버전 | v1.27.9+k3s1 |
| 네트워크 | VirtualBox Host-Only (192.168.56.0/24) |
| 최종 구성 | CP 3대 (cp-1, cp-2, cp-3) + Worker 2대 (w-1, w-2) |
| 노드 사양 | 각 2 vCPU / 2GB RAM |
Vagrantfile
# -*- mode: ruby -*-
# vi: set ft=ruby :

# =============================================================
# K3s Split Brain 재현 실험 환경
# K3s version: v1.27.9+k3s1
# Base OS:     Ubuntu 22.04 (Jammy)
#
# bento/ 박스 사용: ubuntu/jammy64는 x86 전용이라
# Apple Silicon(ARM) Mac에서 실행 불가.
# bento/ 시리즈는 multi-arch를 지원한다.
# =============================================================

K3S_VERSION  = "v1.27.9+k3s1"
BOX_IMAGE    = "bento/ubuntu-22.04"
NETWORK_PREFIX = "192.168.56"

# ── 노드 정의 ──────────────────────────────────────────────
NODES = [
  { name: "cp-1", ip: "#{NETWORK_PREFIX}.11", role: "server", cpus: 2, memory: 2048 },
  { name: "cp-2", ip: "#{NETWORK_PREFIX}.12", role: "server", cpus: 2, memory: 2048 },
  { name: "cp-3", ip: "#{NETWORK_PREFIX}.13", role: "server", cpus: 2, memory: 2048 },
  { name: "w-1",  ip: "#{NETWORK_PREFIX}.21", role: "agent",  cpus: 2, memory: 2048 },
  { name: "w-2",  ip: "#{NETWORK_PREFIX}.22", role: "agent",  cpus: 2, memory: 2048 },
]

# /etc/hosts 엔트리 생성
HOSTS_ENTRIES = NODES.map { |n| "#{n[:ip]}  #{n[:name]}" }.join("\n")

Vagrant.configure("2") do |config|
  NODES.each do |node|
    config.vm.define node[:name] do |vm_config|
      vm_config.vm.box = BOX_IMAGE
      vm_config.vm.hostname = node[:name]
      vm_config.vm.network "private_network", ip: node[:ip] # Host-Only 네트워크 사용

      # VirtualBox provider 설정
      vm_config.vm.provider "virtualbox" do |vb|
        vb.name   = "k3s-splitbrain-#{node[:name]}"
        vb.cpus   = node[:cpus]
        vb.memory = node[:memory]
        vb.linked_clone = true
      end

      # ── 공통 프로비저닝 ─────────────────────────────────
      vm_config.vm.provision "shell", name: "common", inline: <<~SHELL
        set -euo pipefail

        # /etc/hosts 상호 등록
        grep -q "cp-1" /etc/hosts || cat >> /etc/hosts <<'EOF'
        # ---- k3s split-brain lab ----
        #{HOSTS_ENTRIES}
        EOF

        # 기본 패키지
        export DEBIAN_FRONTEND=noninteractive
        apt-get update -qq
        apt-get install -y -qq curl jq net-tools > /dev/null

        # K3s 설치 스크립트 다운로드 (설치는 하지 않음)
        curl -sfL https://get.k3s.io -o /usr/local/bin/k3s-install.sh
        chmod +x /usr/local/bin/k3s-install.sh

        # etcdctl 설치 (서버 노드에서 디버깅용)
        if [ ! -f /usr/local/bin/etcdctl ]; then
          ETCD_VER="v3.5.11"
          ARCH=$(dpkg --print-architecture)
          curl -sL "https://github.com/etcd-io/etcd/releases/download/${ETCD_VER}/etcd-${ETCD_VER}-linux-${ARCH}.tar.gz" \
            | tar xz --strip-components=1 -C /usr/local/bin/ "etcd-${ETCD_VER}-linux-${ARCH}/etcdctl"
        fi

        echo "[✓] Common provisioning done on $(hostname)"
      SHELL
    end
  end
end
vagrant up 프로비저닝 결과
~/study/k8s-practice/k3s-split-brain  vagrant up                 ok | 3s | 13:44:01
Bringing machine 'cp-1' up with 'virtualbox' provider...
Bringing machine 'cp-2' up with 'virtualbox' provider...
Bringing machine 'cp-3' up with 'virtualbox' provider...
Bringing machine 'w-1' up with 'virtualbox' provider...
Bringing machine 'w-2' up with 'virtualbox' provider...
==> cp-1: Box 'bento/ubuntu-22.04' could not be found. Attempting to find and install...
    cp-1: Box Provider: virtualbox
    cp-1: Box Version: >= 0
==> cp-1: Loading metadata for box 'bento/ubuntu-22.04'
    cp-1: URL: https://vagrantcloud.com/api/v2/vagrant/bento/ubuntu-22.04
==> cp-1: Adding box 'bento/ubuntu-22.04' (v202510.26.0) for provider: virtualbox (arm64)
    cp-1: Downloading: https://vagrantcloud.com/bento/boxes/ubuntu-22.04/versions/202510.26.0/providers/virtualbox/arm64/vagrant.box
==> cp-1: Successfully added box 'bento/ubuntu-22.04' (v202510.26.0) for 'virtualbox (arm64)'!
==> cp-1: Preparing master VM for linked clones...
    cp-1: This is a one time operation. Once the master VM is prepared,
    cp-1: it will be used as a base for linked clones, making the creation
    cp-1: of new VMs take milliseconds on a modern system.
==> cp-1: Importing base box 'bento/ubuntu-22.04'...
==> cp-1: Cloning VM...
==> cp-1: Matching MAC address for NAT networking...
==> cp-1: Checking if box 'bento/ubuntu-22.04' version '202510.26.0' is up to date...
==> cp-1: Setting the name of the VM: k3s-splitbrain-cp-1
==> cp-1: Clearing any previously set network interfaces...
==> cp-1: Preparing network interfaces based on configuration...
    cp-1: Adapter 1: nat
    cp-1: Adapter 2: hostonly
==> cp-1: Forwarding ports...
    cp-1: 22 (guest) => 2222 (host) (adapter 1)
==> cp-1: Running 'pre-boot' VM customizations...
==> cp-1: Booting VM...
==> cp-1: Waiting for machine to boot. This may take a few minutes...
    cp-1: SSH address: 127.0.0.1:2222
    cp-1: SSH username: vagrant
    cp-1: SSH auth method: private key
    cp-1: Warning: Connection reset. Retrying...
    cp-1: Warning: Remote connection disconnect. Retrying...
    cp-1:
    cp-1: Vagrant insecure key detected. Vagrant will automatically replace
    cp-1: this with a newly generated keypair for better security.
    cp-1:
    cp-1: Inserting generated public key within guest...
    cp-1: Removing insecure key from the guest if it's present...
    cp-1: Key inserted! Disconnecting and reconnecting using new SSH key...
==> cp-1: Machine booted and ready!
==> cp-1: Checking for guest additions in VM...
==> cp-1: Setting hostname...
==> cp-1: Configuring and enabling network interfaces...
==> cp-1: Mounting shared folders...
    cp-1: /Users/eraser/study/k8s-practice/k3s-split-brain => /vagrant
==> cp-1: Running provisioner: common (shell)...
    cp-1: Running: script: common
    cp-1: [✓] Common provisioning done on cp-1
==> cp-2: Box 'bento/ubuntu-22.04' could not be found. Attempting to find and install...
    cp-2: Box Provider: virtualbox
    cp-2: Box Version: >= 0
==> cp-2: Loading metadata for box 'bento/ubuntu-22.04'
    cp-2: URL: https://vagrantcloud.com/api/v2/vagrant/bento/ubuntu-22.04
==> cp-2: Adding box 'bento/ubuntu-22.04' (v202510.26.0) for provider: virtualbox (arm64)
==> cp-2: Cloning VM...
==> cp-2: Matching MAC address for NAT networking...
==> cp-2: Checking if box 'bento/ubuntu-22.04' version '202510.26.0' is up to date...
==> cp-2: Setting the name of the VM: k3s-splitbrain-cp-2
==> cp-2: Fixed port collision for 22 => 2222. Now on port 2200.
==> cp-2: Clearing any previously set network interfaces...
==> cp-2: Preparing network interfaces based on configuration...
    cp-2: Adapter 1: nat
    cp-2: Adapter 2: hostonly
==> cp-2: Forwarding ports...
    cp-2: 22 (guest) => 2200 (host) (adapter 1)
==> cp-2: Running 'pre-boot' VM customizations...
==> cp-2: Booting VM...
==> cp-2: Waiting for machine to boot. This may take a few minutes...
    cp-2: SSH address: 127.0.0.1:2200
    cp-2: SSH username: vagrant
    cp-2: SSH auth method: private key
    cp-2: Warning: Connection reset. Retrying...
    cp-2: Warning: Remote connection disconnect. Retrying...
    cp-2:
    cp-2: Vagrant insecure key detected. Vagrant will automatically replace
    cp-2: this with a newly generated keypair for better security.
    cp-2:
    cp-2: Inserting generated public key within guest...
    cp-2: Removing insecure key from the guest if it's present...
    cp-2: Key inserted! Disconnecting and reconnecting using new SSH key...
==> cp-2: Machine booted and ready!
==> cp-2: Checking for guest additions in VM...
==> cp-2: Setting hostname...
==> cp-2: Configuring and enabling network interfaces...
==> cp-2: Mounting shared folders...
    cp-2: /Users/eraser/study/k8s-practice/k3s-split-brain => /vagrant
==> cp-2: Running provisioner: common (shell)...
    cp-2: Running: script: common
    cp-2: [✓] Common provisioning done on cp-2
==> cp-3: Box 'bento/ubuntu-22.04' could not be found. Attempting to find and install...
    cp-3: Box Provider: virtualbox
    cp-3: Box Version: >= 0
==> cp-3: Loading metadata for box 'bento/ubuntu-22.04'
    cp-3: URL: https://vagrantcloud.com/api/v2/vagrant/bento/ubuntu-22.04
==> cp-3: Adding box 'bento/ubuntu-22.04' (v202510.26.0) for provider: virtualbox (arm64)
==> cp-3: Cloning VM...
==> cp-3: Matching MAC address for NAT networking...
==> cp-3: Checking if box 'bento/ubuntu-22.04' version '202510.26.0' is up to date...
==> cp-3: Setting the name of the VM: k3s-splitbrain-cp-3
==> cp-3: Fixed port collision for 22 => 2222. Now on port 2201.
==> cp-3: Clearing any previously set network interfaces...
==> cp-3: Preparing network interfaces based on configuration...
    cp-3: Adapter 1: nat
    cp-3: Adapter 2: hostonly
==> cp-3: Forwarding ports...
    cp-3: 22 (guest) => 2201 (host) (adapter 1)
==> cp-3: Running 'pre-boot' VM customizations...
==> cp-3: Booting VM...
==> cp-3: Waiting for machine to boot. This may take a few minutes...
    cp-3: SSH address: 127.0.0.1:2201
    cp-3: SSH username: vagrant
    cp-3: SSH auth method: private key
    cp-3: Warning: Connection reset. Retrying...
    cp-3:
    cp-3: Vagrant insecure key detected. Vagrant will automatically replace
    cp-3: this with a newly generated keypair for better security.
    cp-3:
    cp-3: Inserting generated public key within guest...
    cp-3: Removing insecure key from the guest if it's present...
    cp-3: Key inserted! Disconnecting and reconnecting using new SSH key...
==> cp-3: Machine booted and ready!
==> cp-3: Checking for guest additions in VM...
==> cp-3: Setting hostname...
==> cp-3: Configuring and enabling network interfaces...
==> cp-3: Mounting shared folders...
    cp-3: /Users/eraser/study/k8s-practice/k3s-split-brain => /vagrant
==> cp-3: Running provisioner: common (shell)...
    cp-3: Running: script: common
    cp-3: [✓] Common provisioning done on cp-3
==> w-1: Box 'bento/ubuntu-22.04' could not be found. Attempting to find and install...
    w-1: Box Provider: virtualbox
    w-1: Box Version: >= 0
==> w-1: Loading metadata for box 'bento/ubuntu-22.04'
    w-1: URL: https://vagrantcloud.com/api/v2/vagrant/bento/ubuntu-22.04
==> w-1: Adding box 'bento/ubuntu-22.04' (v202510.26.0) for provider: virtualbox (arm64)
==> w-1: Cloning VM...
==> w-1: Matching MAC address for NAT networking...
==> w-1: Checking if box 'bento/ubuntu-22.04' version '202510.26.0' is up to date...
==> w-1: Setting the name of the VM: k3s-splitbrain-w-1
==> w-1: Fixed port collision for 22 => 2222. Now on port 2202.
==> w-1: Clearing any previously set network interfaces...
==> w-1: Preparing network interfaces based on configuration...
    w-1: Adapter 1: nat
    w-1: Adapter 2: hostonly
==> w-1: Forwarding ports...
    w-1: 22 (guest) => 2202 (host) (adapter 1)
==> w-1: Running 'pre-boot' VM customizations...
==> w-1: Booting VM...
==> w-1: Waiting for machine to boot. This may take a few minutes...
    w-1: SSH address: 127.0.0.1:2202
    w-1: SSH username: vagrant
    w-1: SSH auth method: private key
    w-1: Warning: Connection reset. Retrying...
    w-1:
    w-1: Vagrant insecure key detected. Vagrant will automatically replace
    w-1: this with a newly generated keypair for better security.
    w-1:
    w-1: Inserting generated public key within guest...
    w-1: Removing insecure key from the guest if it's present...
    w-1: Key inserted! Disconnecting and reconnecting using new SSH key...
==> w-1: Machine booted and ready!
==> w-1: Checking for guest additions in VM...
==> w-1: Setting hostname...
==> w-1: Configuring and enabling network interfaces...
==> w-1: Mounting shared folders...
    w-1: /Users/eraser/study/k8s-practice/k3s-split-brain => /vagrant
==> w-1: Running provisioner: common (shell)...
    w-1: Running: script: common
    w-1: [✓] Common provisioning done on w-1
==> w-2: Box 'bento/ubuntu-22.04' could not be found. Attempting to find and install...
    w-2: Box Provider: virtualbox
    w-2: Box Version: >= 0
==> w-2: Loading metadata for box 'bento/ubuntu-22.04'
    w-2: URL: https://vagrantcloud.com/api/v2/vagrant/bento/ubuntu-22.04
==> w-2: Adding box 'bento/ubuntu-22.04' (v202510.26.0) for provider: virtualbox (arm64)
==> w-2: Cloning VM...
==> w-2: Matching MAC address for NAT networking...
==> w-2: Checking if box 'bento/ubuntu-22.04' version '202510.26.0' is up to date...
==> w-2: Setting the name of the VM: k3s-splitbrain-w-2
==> w-2: Fixed port collision for 22 => 2222. Now on port 2203.
==> w-2: Clearing any previously set network interfaces...
==> w-2: Preparing network interfaces based on configuration...
    w-2: Adapter 1: nat
    w-2: Adapter 2: hostonly
==> w-2: Forwarding ports...
    w-2: 22 (guest) => 2203 (host) (adapter 1)
==> w-2: Running 'pre-boot' VM customizations...
==> w-2: Booting VM...
==> w-2: Waiting for machine to boot. This may take a few minutes...
    w-2: SSH address: 127.0.0.1:2203
    w-2: SSH username: vagrant
    w-2: SSH auth method: private key
    w-2: Warning: Connection reset. Retrying...
    w-2: Warning: Remote connection disconnect. Retrying...
    w-2:
    w-2: Vagrant insecure key detected. Vagrant will automatically replace
    w-2: this with a newly generated keypair for better security.
    w-2:
    w-2: Inserting generated public key within guest...
    w-2: Removing insecure key from the guest if it's present...
    w-2: Key inserted! Disconnecting and reconnecting using new SSH key...
==> w-2: Machine booted and ready!
==> w-2: Checking for guest additions in VM...
==> w-2: Setting hostname...
==> w-2: Configuring and enabling network interfaces...
==> w-2: Mounting shared folders...
    w-2: /Users/eraser/study/k8s-practice/k3s-split-brain => /vagrant
==> w-2: Running provisioner: common (shell)...
    w-2: Running: script: common
    w-2: [✓] Common provisioning done on w-2
실험 1: 단독 CP
목적
단독 컨트롤 플레인(SQLite) 클러스터를 구성하고, 워커 노드를 조인하여 기본 클러스터를 만든다. 이후 실험 2에서 삼중화로 전환할 베이스라인이다.
절차
1) cp-1 접속 후 K3s server 설치 (SQLite 단독 모드).
vagrant ssh cp-1
K3s의 kubeconfig(/etc/rancher/k3s/k3s.yaml)는 root만 읽을 수 있으므로, 이후 kubectl 명령은 root로 실행한다.
sudo su -
INSTALL_K3S_VERSION="v1.27.9+k3s1" \
  INSTALL_K3S_EXEC="server --node-ip 192.168.56.11 --advertise-address 192.168.56.11 --tls-san 192.168.56.11" \
  /usr/local/bin/k3s-install.sh
설치 로그
[INFO]  Using v1.27.9+k3s1 as release
[INFO]  Downloading hash https://github.com/k3s-io/k3s/releases/download/v1.27.9+k3s1/sha256sum-arm64.txt
[INFO]  Downloading binary https://github.com/k3s-io/k3s/releases/download/v1.27.9+k3s1/k3s-arm64
[INFO]  Verifying binary download
[INFO]  Installing k3s to /usr/local/bin/k3s
[INFO]  Skipping installation of SELinux RPM
[INFO]  Creating /usr/local/bin/kubectl symlink to k3s
[INFO]  Creating /usr/local/bin/crictl symlink to k3s
[INFO]  Creating /usr/local/bin/ctr symlink to k3s
[INFO]  Creating killall script /usr/local/bin/k3s-killall.sh
[INFO]  Creating uninstall script /usr/local/bin/k3s-uninstall.sh
[INFO]  env: Creating environment file /etc/systemd/system/k3s.service.env
[INFO]  systemd: Creating service file /etc/systemd/system/k3s.service
[INFO]  systemd: Enabling k3s unit
Created symlink /etc/systemd/system/multi-user.target.wants/k3s.service → /etc/systemd/system/k3s.service.
[INFO]  systemd: Starting k3s
설치 완료 후 확인:
--cluster-init 없이 설치했으므로 ROLES에 etcd가 없다. 데이터스토어도 확인한다.
kubectl get nodes -o wide
NAME   STATUS   ROLES                  AGE    VERSION        INTERNAL-IP     EXTERNAL-IP   OS-IMAGE             KERNEL-VERSION       CONTAINER-RUNTIME
cp-1   Ready    control-plane,master   114s   v1.27.9+k3s1   192.168.56.11   <none>        Ubuntu 22.04.5 LTS   5.15.0-160-generic   containerd://1.7.11-k3s2.27
ls -al /var/lib/rancher/k3s/server/db/
ls -al /var/lib/rancher/k3s/server/db/etcd/
# /var/lib/rancher/k3s/server/db/
drwx------ 2 root root    4096 Feb 22 04:51 etcd
-rw-r--r-- 1 root root 3895296 Feb 22 04:56 state.db
-rw-r--r-- 1 root root   32768 Feb 22 04:57 state.db-shm
-rw-r--r-- 1 root root 4400192 Feb 22 04:57 state.db-wal

# /var/lib/rancher/k3s/server/db/etcd/
-rw------- 1 root root   13 Feb 22 04:51 name
state.db(SQLite)가 존재한다. etcd/ 디렉토리도 있지만, name 파일만 있고 member/ 서브디렉토리가 없다. K3s는 SQLite 모드에서도 etcd/ 디렉토리와 name 파일을 생성하지만, etcd가 실제로 기동되려면 etcd/member/wal/이 존재해야 한다. 즉, 현재는 SQLite 단독 모드이다.
systemctl cat k3s
systemctl cat k3s 전문
# /etc/systemd/system/k3s.service
[Unit]
Description=Lightweight Kubernetes
Documentation=https://k3s.io
Wants=network-online.target
After=network-online.target

[Install]
WantedBy=multi-user.target

[Service]
Type=notify
EnvironmentFile=-/etc/default/%N
EnvironmentFile=-/etc/sysconfig/%N
EnvironmentFile=-/etc/systemd/system/k3s.service.env
KillMode=process
Delegate=yes
User=root
# Having non-zero Limit*s causes performance problems due to accounting overhead
# in the kernel. We recommend using cgroups to do container-local accounting.
LimitNOFILE=1048576
LimitNPROC=infinity
LimitCORE=infinity
TasksMax=infinity
TimeoutStartSec=0
Restart=always
RestartSec=5s
ExecStartPre=-/sbin/modprobe br_netfilter
ExecStartPre=-/sbin/modprobe overlay
ExecStart=/usr/local/bin/k3s \
    server \
        '--node-ip' \
        '192.168.56.11' \
        '--advertise-address' \
        '192.168.56.11' \
        '--tls-san' \
        '192.168.56.11' \
ExecStart에 설치 시 지정한 플래그만 기록되어 있다. --cluster-init이나 --server는 없다. 이 상태가 실험 2에서 삼중화 전환의 출발점이 된다.
2) cp-1에서 토큰 확인.
cat /var/lib/rancher/k3s/server/node-token
3) w-1 접속. 위에서 확인한 토큰으로 agent 조인.
# w-1에서 실행 (root)
INSTALL_K3S_VERSION="v1.27.9+k3s1" \
  INSTALL_K3S_EXEC="agent --server https://192.168.56.11:6443 --node-ip 192.168.56.21" \
  K3S_TOKEN="<2)에서 확인한 토큰>" \
  /usr/local/bin/k3s-install.sh
설치 로그
[INFO]  Using v1.27.9+k3s1 as release
[INFO]  Downloading hash https://github.com/k3s-io/k3s/releases/download/v1.27.9+k3s1/sha256sum-arm64.txt
[INFO]  Downloading binary https://github.com/k3s-io/k3s/releases/download/v1.27.9+k3s1/k3s-arm64
[INFO]  Verifying binary download
[INFO]  Installing k3s to /usr/local/bin/k3s
[INFO]  Skipping installation of SELinux RPM
[INFO]  Creating /usr/local/bin/kubectl symlink to k3s
[INFO]  Creating /usr/local/bin/crictl symlink to k3s
[INFO]  Creating /usr/local/bin/ctr symlink to k3s
[INFO]  Creating killall script /usr/local/bin/k3s-killall.sh
[INFO]  Creating uninstall script /usr/local/bin/k3s-agent-uninstall.sh
[INFO]  env: Creating environment file /etc/systemd/system/k3s-agent.service.env
[INFO]  systemd: Creating service file /etc/systemd/system/k3s-agent.service
[INFO]  systemd: Enabling k3s-agent unit
Created symlink /etc/systemd/system/multi-user.target.wants/k3s-agent.service → /etc/systemd/system/k3s-agent.service.
[INFO]  systemd: Starting k3s-agent
agent 노드는 k3s.service가 아니라 k3s-agent.service로 생성된다.
systemctl cat k3s-agent.service
systemctl cat k3s-agent.service 전문
# /etc/systemd/system/k3s-agent.service
[Unit]
Description=Lightweight Kubernetes
Documentation=https://k3s.io
Wants=network-online.target
After=network-online.target

[Install]
WantedBy=multi-user.target

[Service]
Type=notify
EnvironmentFile=-/etc/default/%N
EnvironmentFile=-/etc/sysconfig/%N
EnvironmentFile=-/etc/systemd/system/k3s-agent.service.env
KillMode=process
Delegate=yes
User=root
# Having non-zero Limit*s causes performance problems due to accounting overhead
# in the kernel. We recommend using cgroups to do container-local accounting.
LimitNOFILE=1048576
LimitNPROC=infinity
LimitCORE=infinity
TasksMax=infinity
TimeoutStartSec=0
Restart=always
RestartSec=5s
ExecStartPre=-/sbin/modprobe br_netfilter
ExecStartPre=-/sbin/modprobe overlay
ExecStart=/usr/local/bin/k3s \
    agent \
        '--server' \
        'https://192.168.56.11:6443' \
        '--node-ip' \
        '192.168.56.21' \
ExecStart에 --server와 --node-ip가 기록되어 있다.
ls -al /var/lib/rancher/k3s/
drwx------ 5 root root 4096 Feb 22 04:59 agent
drwxr-xr-x 3 root root 4096 Feb 22 04:59 data
server/ 디렉토리가 없고 agent/와 data/만 존재한다. agent 노드임을 확인할 수 있다.
4) w-2 접속. 동일하게 agent 조인.
# w-2에서 실행 (root)
INSTALL_K3S_VERSION="v1.27.9+k3s1" \
  INSTALL_K3S_EXEC="agent --server https://192.168.56.11:6443 --node-ip 192.168.56.22" \
  K3S_TOKEN="K107cb71a7dd8078059540e2217dbbf8cbdc928d733c55ad596fefb846f9033a1d3::server:96039607a727f087dece9a9fffa1f0bf" \
  /usr/local/bin/k3s-install.sh
5) cp-1에서 클러스터 상태 확인
kubectl get nodes -o wide
NAME   STATUS   ROLES                  AGE     VERSION        INTERNAL-IP     EXTERNAL-IP   OS-IMAGE             KERNEL-VERSION       CONTAINER-RUNTIME
cp-1   Ready    control-plane,master   14m     v1.27.9+k3s1   192.168.56.11   <none>        Ubuntu 22.04.5 LTS   5.15.0-160-generic   containerd://1.7.11-k3s2.27
w-1    Ready    <none>                 6m36s   v1.27.9+k3s1   192.168.56.21   <none>        Ubuntu 22.04.5 LTS   5.15.0-160-generic   containerd://1.7.11-k3s2.27
w-2    Ready    <none>                 30s     v1.27.9+k3s1   192.168.56.22   <none>        Ubuntu 22.04.5 LTS   5.15.0-160-generic   containerd://1.7.11-k3s2.27
CP 1대 + Worker 2대 구성으로, Part 1에서 기술한 삼중화 전환 이전의 최초 클러스터 상태와 동일하다. cp-1의 ROLES가 control-plane,master이고 etcd가 없으므로 SQLite 단독 모드임을 다시 확인할 수 있다.
실험 2: 삼중화 전환
목적
단독 SQLite 클러스터를 삼중화 etcd 클러스터로 전환하는 과정을 재현하고, systemd unit 파일에 플래그가 어떻게 기록되는지 확인한다.
절차
1) cp-1에서 K3s 중지 후 --cluster-init으로 재설치하여 etcd 전환.
# cp-1에서 실행
systemctl stop k3s
INSTALL_K3S_VERSION="v1.27.9+k3s1" \
  INSTALL_K3S_EXEC="server --cluster-init --node-ip 192.168.56.11 --advertise-address 192.168.56.11 --tls-san 192.168.56.11" \
  /usr/local/bin/k3s-install.sh
설치 로그
[INFO]  Using v1.27.9+k3s1 as release
[INFO]  Downloading hash https://github.com/k3s-io/k3s/releases/download/v1.27.9+k3s1/sha256sum-arm64.txt
[INFO]  Skipping binary downloaded, installed k3s matches hash
[INFO]  Skipping installation of SELinux RPM
[INFO]  Skipping /usr/local/bin/kubectl symlink to k3s, already exists
[INFO]  Skipping /usr/local/bin/crictl symlink to k3s, already exists
[INFO]  Skipping /usr/local/bin/ctr symlink to k3s, already exists
[INFO]  Creating killall script /usr/local/bin/k3s-killall.sh
[INFO]  Creating uninstall script /usr/local/bin/k3s-uninstall.sh
[INFO]  env: Creating environment file /etc/systemd/system/k3s.service.env
[INFO]  systemd: Creating service file /etc/systemd/system/k3s.service
[INFO]  systemd: Enabling k3s unit
Created symlink /etc/systemd/system/multi-user.target.wants/k3s.service → /etc/systemd/system/k3s.service.
[INFO]  systemd: Starting k3s
이미 바이너리가 설치되어 있으므로 다운로드는 건너뛰고, systemd unit 파일을 새로 생성한 뒤 서비스를 시작한다.
확인:
kubectl get nodes -o wide
NAME   STATUS   ROLES                       AGE     VERSION        INTERNAL-IP     EXTERNAL-IP   OS-IMAGE             KERNEL-VERSION       CONTAINER-RUNTIME
cp-1   Ready    control-plane,etcd,master   16m     v1.27.9+k3s1   192.168.56.11   <none>        Ubuntu 22.04.5 LTS   5.15.0-160-generic   containerd://1.7.11-k3s2.27
w-1    Ready    <none>                      8m18s   v1.27.9+k3s1   192.168.56.21   <none>        Ubuntu 22.04.5 LTS   5.15.0-160-generic   containerd://1.7.11-k3s2.27
w-2    Ready    <none>                      2m12s   v1.27.9+k3s1   192.168.56.22   <none>        Ubuntu 22.04.5 LTS   5.15.0-160-generic   containerd://1.7.11-k3s2.27
실험 1과 비교하면, cp-1의 ROLES가 control-plane,master → control-plane,etcd,master로 변경되었다. etcd가 추가된 것으로 embedded etcd 모드로 전환된 것을 확인할 수 있다. AGE가 리셋되지 않고 유지되는 점도 주목할 만하다 — 노드 오브젝트가 새로 생성된 것이 아니라 기존 것이 그대로 남아 있다.
ls -al /var/lib/rancher/k3s/server/db/
drwx------ 3 root root    4096 Feb 22 05:07 etcd
drwx------ 2 root root    4096 Feb 22 05:08 snapshots
-rw-r--r-- 1 root root 4546560 Feb 22 05:07 state.db.migrated
-rw-r--r-- 1 root root   32768 Feb 22 05:07 state.db-shm
-rw-r--r-- 1 root root       0 Feb 22 05:07 state.db-wal
state.db가 state.db.migrated로 이름이 바뀌었다. SQLite → etcd 마이그레이션이 수행된 흔적이다.
ls -al /var/lib/rancher/k3s/server/db/etcd/
-rw------- 1 root root 1150 Feb 22 05:07 config
drwx------ 4 root root 4096 Feb 22 05:07 member
-rw------- 1 root root   13 Feb 22 04:51 name
실험 1에서는 name 파일만 있었지만, 이제 config와 member/ 디렉토리가 생겼다. etcd가 실제로 기동 중이다.
systemctl cat k3s
systemctl cat k3s 전문
# /etc/systemd/system/k3s.service
[Unit]
Description=Lightweight Kubernetes
Documentation=https://k3s.io
Wants=network-online.target
After=network-online.target

[Install]
WantedBy=multi-user.target

[Service]
Type=notify
EnvironmentFile=-/etc/default/%N
EnvironmentFile=-/etc/sysconfig/%N
EnvironmentFile=-/etc/systemd/system/k3s.service.env
KillMode=process
Delegate=yes
User=root
# Having non-zero Limit*s causes performance problems due to accounting overhead
# in the kernel. We recommend using cgroups to do container-local accounting.
LimitNOFILE=1048576
LimitNPROC=infinity
LimitCORE=infinity
TasksMax=infinity
TimeoutStartSec=0
Restart=always
RestartSec=5s
ExecStartPre=-/sbin/modprobe br_netfilter
ExecStartPre=-/sbin/modprobe overlay
ExecStart=/usr/local/bin/k3s \
    server \
        '--cluster-init' \
        '--node-ip' \
        '192.168.56.11' \
        '--advertise-address' \
        '192.168.56.11' \
        '--tls-san' \
        '192.168.56.11' \
ExecStart에 --cluster-init이 추가되었다. 설치 스크립트가 INSTALL_K3S_EXEC의 내용을 그대로 systemd unit에 기록하는 것을 확인할 수 있다.
2) cp-1에서 토큰 확인.
sudo cat /var/lib/rancher/k3s/server/node-token
K107cb71a7dd8078059540e2217dbbf8cbdc928d733c55ad596fefb846f9033a1d3::server:96039607a727f087dece9a9fffa1f0bf
3) cp-2 접속. --server로 etcd 멤버 조인.
# cp-2에서 실행 (root)
INSTALL_K3S_VERSION="v1.27.9+k3s1" \
  INSTALL_K3S_EXEC="server --server https://192.168.56.11:6443 --node-ip 192.168.56.12 --advertise-address 192.168.56.12" \
  K3S_TOKEN="<토큰>" \
  /usr/local/bin/k3s-install.sh
설치 로그
[INFO]  Using v1.27.9+k3s1 as release
[INFO]  Downloading hash https://github.com/k3s-io/k3s/releases/download/v1.27.9+k3s1/sha256sum-arm64.txt
[INFO]  Downloading binary https://github.com/k3s-io/k3s/releases/download/v1.27.9+k3s1/k3s-arm64
[INFO]  Verifying binary download
[INFO]  Installing k3s to /usr/local/bin/k3s
[INFO]  Skipping installation of SELinux RPM
[INFO]  Creating /usr/local/bin/kubectl symlink to k3s
[INFO]  Creating /usr/local/bin/crictl symlink to k3s
[INFO]  Creating /usr/local/bin/ctr symlink to k3s
[INFO]  Creating killall script /usr/local/bin/k3s-killall.sh
[INFO]  Creating uninstall script /usr/local/bin/k3s-uninstall.sh
[INFO]  env: Creating environment file /etc/systemd/system/k3s.service.env
[INFO]  systemd: Creating service file /etc/systemd/system/k3s.service
[INFO]  systemd: Enabling k3s unit
Created symlink /etc/systemd/system/multi-user.target.wants/k3s.service → /etc/systemd/system/k3s.service.
[INFO]  systemd: Starting k3s
ls 출력 (cp-2 데이터스토어 확인)
ls -al /var/lib/rancher/k3s/server/db/
ls -al /var/lib/rancher/k3s/server/db/etcd/
# /var/lib/rancher/k3s/server/db/
drwx------ 3 root root 4096 Feb 22 05:10 etcd
drwx------ 2 root root 4096 Feb 22 05:11 snapshots

# /var/lib/rancher/k3s/server/db/etcd/
-rw------- 1 root root 1140 Feb 22 05:10 config
drwx------ 4 root root 4096 Feb 22 05:10 member
-rw------- 1 root root   13 Feb 22 05:10 name
cp-1과 달리 state.db가 존재하지 않는다. --server로 조인한 노드는 처음부터 etcd 멤버로 합류하므로 SQLite를 거치지 않는다. etcd/member/ 디렉토리가 바로 생성되어 있다.
systemctl cat k3s
systemctl cat k3s 전문
# /etc/systemd/system/k3s.service
[Unit]
Description=Lightweight Kubernetes
Documentation=https://k3s.io
Wants=network-online.target
After=network-online.target

[Install]
WantedBy=multi-user.target

[Service]
Type=notify
EnvironmentFile=-/etc/default/%N
EnvironmentFile=-/etc/sysconfig/%N
EnvironmentFile=-/etc/systemd/system/k3s.service.env
KillMode=process
Delegate=yes
User=root
# Having non-zero Limit*s causes performance problems due to accounting overhead
# in the kernel. We recommend using cgroups to do container-local accounting.
LimitNOFILE=1048576
LimitNPROC=infinity
LimitCORE=infinity
TasksMax=infinity
TimeoutStartSec=0
Restart=always
RestartSec=5s
ExecStartPre=-/sbin/modprobe br_netfilter
ExecStartPre=-/sbin/modprobe overlay
ExecStart=/usr/local/bin/k3s \
    server \
        '--server' \
        'https://192.168.56.11:6443' \
        '--node-ip' \
        '192.168.56.12' \
        '--advertise-address' \
        '192.168.56.12' \
ExecStart에 --server가 기록되어 있다.
4) cp-3 접속. 동일하게 조인.
# cp-3에서 실행
INSTALL_K3S_VERSION="v1.27.9+k3s1" \
  INSTALL_K3S_EXEC="server --server https://192.168.56.11:6443 --node-ip 192.168.56.13 --advertise-address 192.168.56.13" \
  K3S_TOKEN="K107cb71a7dd8078059540e2217dbbf8cbdc928d733c55ad596fefb846f9033a1d3::server:96039607a727f087dece9a9fffa1f0bf" \
  /usr/local/bin/k3s-install.sh
5) 삼중화 완료 확인.
# cp-1에서 실행
kubectl get nodes -o wide
kubectl get nodes, etcdctl member list, endpoint status 출력
NAME   STATUS   ROLES                       AGE     VERSION        INTERNAL-IP     EXTERNAL-IP   OS-IMAGE             KERNEL-VERSION       CONTAINER-RUNTIME
cp-1   Ready    control-plane,etcd,master   23m     v1.27.9+k3s1   192.168.56.11   <none>        Ubuntu 22.04.5 LTS   5.15.0-160-generic   containerd://1.7.11-k3s2.27
cp-2   Ready    control-plane,etcd,master   3m48s   v1.27.9+k3s1   192.168.56.12   <none>        Ubuntu 22.04.5 LTS   5.15.0-160-generic   containerd://1.7.11-k3s2.27
cp-3   Ready    control-plane,etcd,master   17s     v1.27.9+k3s1   192.168.56.13   <none>        Ubuntu 22.04.5 LTS   5.15.0-160-generic   containerd://1.7.11-k3s2.27
w-1    Ready    <none>                      15m     v1.27.9+k3s1   192.168.56.21   <none>        Ubuntu 22.04.5 LTS   5.15.0-160-generic   containerd://1.7.11-k3s2.27
w-2    Ready    <none>                      9m2s    v1.27.9+k3s1   192.168.56.22   <none>        Ubuntu 22.04.5 LTS   5.15.0-160-generic   containerd://1.7.11-k3s2.27
+------------------+---------+---------------+----------------------------+----------------------------+------------+
|        ID        | STATUS  |     NAME      |         PEER ADDRS         |        CLIENT ADDRS        | IS LEARNER |
+------------------+---------+---------------+----------------------------+----------------------------+------------+
|  5b9b4cb496c89f6 | started | cp-3-950e9061 | https://192.168.56.13:2380 | https://192.168.56.13:2379 |      false |
| b0139766c119db32 | started | cp-2-e08cab0e | https://192.168.56.12:2380 | https://192.168.56.12:2379 |      false |
| bf624c9e82dced96 | started | cp-1-e3e31a90 | https://192.168.56.11:2380 | https://192.168.56.11:2379 |      false |
+------------------+---------+---------------+----------------------------+----------------------------+------------+
+----------------+------------------+---------+---------+-----------+------------+-----------+------------+--------------------+--------+
|    ENDPOINT    |        ID        | VERSION | DB SIZE | IS LEADER | IS LEARNER | RAFT TERM | RAFT INDEX | RAFT APPLIED INDEX | ERRORS |
+----------------+------------------+---------+---------+-----------+------------+-----------+------------+--------------------+--------+
| 127.0.0.1:2379 | bf624c9e82dced96 |   3.5.9 |  4.1 MB |      true |      false |         2 |       4371 |               4371 |        |
+----------------+------------------+---------+---------+-----------+------------+-----------+------------+--------------------+--------+
5노드 모두 Ready. cp-1, cp-2, cp-3 모두 ROLES에 control-plane,etcd,master가 표시된다. 3개 etcd 멤버가 모두 started 상태이고 IS LEARNER이 false이므로 정상적인 voting 멤버이다1. --cluster-init으로 etcd를 초기화한 cp-1이 현재 leader이다.
6) 각 노드에서 systemd unit 확인
실험 2의 절차 1), 3), 4)에서 이미 각 노드의 systemctl cat k3s를 확인했다. 정리하면:
| 노드 | ExecStart 플래그 |
|---|---|
| cp-1 | --cluster-init |
| cp-2 | --server https://192.168.56.11:6443 |
| cp-3 | --server https://192.168.56.11:6443 |
설치 스크립트가 INSTALL_K3S_EXEC의 내용을 그대로 systemd unit에 기록하는 것을 확인했다.
K3s --server 플래그와 etcd 멤버십
여기서 짚고 넘어가야 할 점이 있다. K3s의 --server 플래그와 etcd 멤버십은 다른 레이어이다.
| 구분 | K3s --server 플래그 |
etcd 멤버십 |
|---|---|---|
| 역할 | 최초 부트스트랩 (CA 인증서 다운로드, 토큰 교환, etcd member add API 호출) | etcd 클러스터 내 피어 연결 |
| 저장 위치 | systemd unit 파일 (/etc/systemd/system/k3s.service) |
etcd WAL (/var/lib/rancher/k3s/server/db/etcd/member/) |
| 재기동 시 | K3s가 부팅 경로를 결정하는 데 참고 | etcd가 저장된 피어 URL로 직접 연결 |
즉, etcd가 한번 클러스터에 합류하면 피어 정보를 자체 WAL에 기록한다. 이후 재기동 시에는 K3s의 --server 플래그와 무관하게 etcd가 저장된 피어 URL로 다른 멤버에 연결한다. 이것이 실험 3a(“플래그 없이 재부팅해도 정상 동작”)이 가능한 이유이고, 동시에 실험 4(“etcd 데이터가 사라지면 K3s가 클러스터 정보를 잃는다”)에서 문제가 되는 이유이기도 하다.
실험 3a: systemd unit에서 플래그 제거 후 재부팅
목적
systemd unit에서 --cluster-init/--server 플래그를 제거한 뒤 노드를 재부팅했을 때, etcd 데이터가 있으면 정상적으로 클러스터에 합류하는지 확인한다. 이는 “플래그가 없어도 평상시에는 문제없이 동작하는가”를 검증하는 실험이다.
배경
K3s의 --server 플래그는 최초 조인 시 CA 인증서 다운로드, 토큰 교환, etcd 멤버 등록 등 부트스트랩에 필요하다. 하지만 etcd가 한번 합류하면, 피어 정보가 etcd 자체 데이터 디렉토리에 저장된다. 따라서 이후 재기동 시에는 --server 없이도 etcd가 저장된 피어 URL로 다른 멤버에 연결할 수 있다.
이것이 맞다면, 플래그가 빠진 systemd unit으로도 정상 재부팅이 가능하고, 따라서 “플래그가 빠진 상태를 인지하지 못하고 운영하는” 시나리오가 성립한다.
절차
1) cp-2에서 systemd unit의 --server 플래그를 제거한다.
# cp-2에서 실행 (root)
# 변경 전
cat /etc/systemd/system/k3s.service | grep ExecStart
ExecStart 변경 전/후
# 변경 전
ExecStart=/usr/local/bin/k3s \
    server \
        '--server' \
        'https://192.168.56.11:6443' \
        '--node-ip' \
        '192.168.56.12' \
        '--advertise-address' \
        '192.168.56.12' \
# 변경 후 (--server, URL 줄 삭제)
ExecStart=/usr/local/bin/k3s \
    server \
        '--node-ip' \
        '192.168.56.12' \
        '--advertise-address' \
        '192.168.56.12' \
--server와 URL 줄을 삭제하고 systemctl daemon-reload를 실행한다.
2) cp-2를 재부팅한다.
# 호스트에서 실행
vagrant reload cp-2
vagrant reload 로그
==> cp-2: Attempting graceful shutdown of VM...
==> cp-2: Checking if box 'bento/ubuntu-22.04' version '202510.26.0' is up to date...
==> cp-2: Clearing any previously set forwarded ports...
==> cp-2: Fixed port collision for 22 => 2222. Now on port 2200.
==> cp-2: Clearing any previously set network interfaces...
==> cp-2: Preparing network interfaces based on configuration...
    cp-2: Adapter 1: nat
    cp-2: Adapter 2: hostonly
==> cp-2: Forwarding ports...
    cp-2: 22 (guest) => 2200 (host) (adapter 1)
==> cp-2: Running 'pre-boot' VM customizations...
==> cp-2: Booting VM...
==> cp-2: Waiting for machine to boot. This may take a few minutes...
==> cp-2: Machine booted and ready!
==> cp-2: Checking for guest additions in VM...
==> cp-2: Setting hostname...
==> cp-2: Configuring and enabling network interfaces...
==> cp-2: Mounting shared folders...
    cp-2: /Users/eraser/study/k8s-practice/k3s-split-brain => /vagrant
==> cp-2: Machine already provisioned. Run `vagrant provision` or use the `--provision`
==> cp-2: flag to force provisioning. Provisioners marked to run always will still run.
3) cp-2가 정상적으로 클러스터에 합류했는지 확인한다.
재부팅 후 SSH 접속 시 systemctl status가 표시된다.
systemctl status, kubectl get nodes, etcdctl member list 출력
● k3s.service - Lightweight Kubernetes
     Loaded: loaded (/etc/systemd/system/k3s.service; enabled; vendor preset: enabled)
     Active: active (running) since Sun 2026-02-22 05:25:04 UTC; 8s ago
       Docs: https://k3s.io
   Main PID: 689 (k3s-server)
      Tasks: 35
     Memory: 714.3M
NAME   STATUS   ROLES                       AGE   VERSION        INTERNAL-IP     EXTERNAL-IP   OS-IMAGE             KERNEL-VERSION       CONTAINER-RUNTIME
cp-1   Ready    control-plane,etcd,master   45m   v1.27.9+k3s1   192.168.56.11   <none>        Ubuntu 22.04.5 LTS   5.15.0-160-generic   containerd://1.7.11-k3s2.27
cp-2   Ready    control-plane,etcd,master   26m   v1.27.9+k3s1   192.168.56.12   <none>        Ubuntu 22.04.5 LTS   5.15.0-160-generic   containerd://1.7.11-k3s2.27
cp-3   Ready    control-plane,etcd,master   22m   v1.27.9+k3s1   192.168.56.13   <none>        Ubuntu 22.04.5 LTS   5.15.0-160-generic   containerd://1.7.11-k3s2.27
w-1    Ready    <none>                      37m   v1.27.9+k3s1   192.168.56.21   <none>        Ubuntu 22.04.5 LTS   5.15.0-160-generic   containerd://1.7.11-k3s2.27
w-2    Ready    <none>                      31m   v1.27.9+k3s1   192.168.56.22   <none>        Ubuntu 22.04.5 LTS   5.15.0-160-generic   containerd://1.7.11-k3s2.27
+------------------+---------+---------------+----------------------------+----------------------------+------------+
|        ID        | STATUS  |     NAME      |         PEER ADDRS         |        CLIENT ADDRS        | IS LEARNER |
+------------------+---------+---------------+----------------------------+----------------------------+------------+
|  5b9b4cb496c89f6 | started | cp-3-950e9061 | https://192.168.56.13:2380 | https://192.168.56.13:2379 |      false |
| b0139766c119db32 | started | cp-2-e08cab0e | https://192.168.56.12:2380 | https://192.168.56.12:2379 |      false |
| bf624c9e82dced96 | started | cp-1-e3e31a90 | https://192.168.56.11:2380 | https://192.168.56.11:2379 |      false |
+------------------+---------+---------------+----------------------------+----------------------------+------------+
--server 플래그 없이도 K3s가 정상 기동되었다. cp-2가 Ready 상태로 클러스터에 남아 있고, etcd 멤버 3개 모두 started이다. systemd unit에서 --server 플래그를 제거해도 etcd 레벨의 멤버십에는 영향이 없음을 확인했다.
4) cp-3에서도 동일하게 --server 플래그 제거 후 재부팅
# cp-3에서 실행 (root)
vi /etc/systemd/system/k3s.service   # --server, URL 줄 삭제
systemctl daemon-reload
# 호스트에서 실행
vagrant reload cp-3
cp-1에서 확인:
kubectl get nodes, etcdctl member list 출력
NAME   STATUS   ROLES                       AGE   VERSION        INTERNAL-IP     EXTERNAL-IP   OS-IMAGE             KERNEL-VERSION       CONTAINER-RUNTIME
cp-1   Ready    control-plane,etcd,master   51m   v1.27.9+k3s1   192.168.56.11   <none>        Ubuntu 22.04.5 LTS   5.15.0-160-generic   containerd://1.7.11-k3s2.27
cp-2   Ready    control-plane,etcd,master   31m   v1.27.9+k3s1   192.168.56.12   <none>        Ubuntu 22.04.5 LTS   5.15.0-160-generic   containerd://1.7.11-k3s2.27
cp-3   Ready    control-plane,etcd,master   28m   v1.27.9+k3s1   192.168.56.13   <none>        Ubuntu 22.04.5 LTS   5.15.0-160-generic   containerd://1.7.11-k3s2.27
w-1    Ready    <none>                      42m   v1.27.9+k3s1   192.168.56.21   <none>        Ubuntu 22.04.5 LTS   5.15.0-160-generic   containerd://1.7.11-k3s2.27
w-2    Ready    <none>                      36m   v1.27.9+k3s1   192.168.56.22   <none>        Ubuntu 22.04.5 LTS   5.15.0-160-generic   containerd://1.7.11-k3s2.27
+------------------+---------+---------------+----------------------------+----------------------------+------------+
|        ID        | STATUS  |     NAME      |         PEER ADDRS         |        CLIENT ADDRS        | IS LEARNER |
+------------------+---------+---------------+----------------------------+----------------------------+------------+
|  5b9b4cb496c89f6 | started | cp-3-950e9061 | https://192.168.56.13:2380 | https://192.168.56.13:2379 |      false |
| b0139766c119db32 | started | cp-2-e08cab0e | https://192.168.56.12:2380 | https://192.168.56.12:2379 |      false |
| bf624c9e82dced96 | started | cp-1-e3e31a90 | https://192.168.56.11:2380 | https://192.168.56.11:2379 |      false |
+------------------+---------+---------------+----------------------------+----------------------------+------------+
cp-3도 --server 플래그 없이 정상 합류. cp-2와 동일한 결과이다.
결과
| 노드 | 제거한 플래그 | 재부팅 후 상태 | etcd 멤버십 |
|---|---|---|---|
| cp-2 | --server |
Ready | 유지 (started) |
| cp-3 | --server |
Ready | 유지 (started) |
cp-1은 --cluster-init 플래그를 가지고 있으나, 이 실험에서는 제거하지 않았다. cp-2, cp-3 두 노드에서 --server 제거 후 정상 동작을 확인한 것으로 가설 검증에 충분하다.
결론: systemd unit에서 K3s 조인 플래그(--server)를 제거해도, etcd 데이터가 남아 있으면 etcd 자체 피어 정보로 클러스터에 정상 합류한다. 이것이 “플래그가 빠진 상태를 인지하지 못하고 운영하는” 시나리오가 성립하는 이유이다.
실험 3b: 설치 스크립트 재실행으로 플래그 덮어쓰기
목적
실험 3a에서는 vi로 직접 systemd unit을 편집했다. 하지만 실제 운영 환경에서 플래그가 사라지는 더 현실적인 경로는 설치 스크립트를 INSTALL_K3S_EXEC 없이 재실행하는 것이다. 이 경우 설치 스크립트가 systemd unit 파일을 덮어쓴다.
cp-1(--cluster-init)에서 설치 스크립트 재실행을 테스트하고, cp-2/cp-3은 이미 실험 3a에서 플래그가 제거된 상태이므로 그대로 둔다.
절차
1) cp-1에서 현재 systemd unit 확인. --cluster-init이 있는 상태.
systemctl cat k3s 출력 (변경 전)
# cp-1에서 실행 (root)
systemctl cat k3s | grep ExecStart -A 10
ExecStart=/usr/local/bin/k3s \
    server \
        '--cluster-init' \
        '--node-ip' \
        '192.168.56.11' \
        '--advertise-address' \
        '192.168.56.11' \
        '--tls-san' \
        '192.168.56.11' \
2) --cluster-init 없이, --node-ip와 --advertise-address만 지정하여 설치 스크립트를 재실행.
INSTALL_K3S_VERSION="v1.27.9+k3s1" \
  INSTALL_K3S_EXEC="server --node-ip 192.168.56.11 --advertise-address 192.168.56.11 --tls-san 192.168.56.11" \
  /usr/local/bin/k3s-install.sh
설치 로그
[INFO]  Using v1.27.9+k3s1 as release
[INFO]  Downloading hash https://github.com/k3s-io/k3s/releases/download/v1.27.9+k3s1/sha256sum-arm64.txt
[INFO]  Skipping binary downloaded, installed k3s matches hash
[INFO]  Skipping installation of SELinux RPM
[INFO]  Skipping /usr/local/bin/kubectl symlink to k3s, already exists
[INFO]  Skipping /usr/local/bin/crictl symlink to k3s, already exists
[INFO]  Skipping /usr/local/bin/ctr symlink to k3s, already exists
[INFO]  Creating killall script /usr/local/bin/k3s-killall.sh
[INFO]  Creating uninstall script /usr/local/bin/k3s-uninstall.sh
[INFO]  env: Creating environment file /etc/systemd/system/k3s.service.env
[INFO]  systemd: Creating service file /etc/systemd/system/k3s.service
[INFO]  systemd: Enabling k3s unit
Created symlink /etc/systemd/system/multi-user.target.wants/k3s.service → /etc/systemd/system/k3s.service.
[INFO]  systemd: Starting k3s
Creating service file — 설치 스크립트가 systemd unit 파일을 새로 생성(덮어쓰기)하고, 서비스를 재시작했다.
3) systemd unit이 덮어쓰여졌는지 확인.
systemctl cat k3s 출력
systemctl cat k3s | grep ExecStart -A 10
ExecStart=/usr/local/bin/k3s \
    server \
        '--node-ip' \
        '192.168.56.11' \
        '--advertise-address' \
        '192.168.56.11' \
        '--tls-san' \
        '192.168.56.11' \
--cluster-init이 사라졌다. INSTALL_K3S_EXEC에 포함하지 않은 플래그는 새 unit 파일에 기록되지 않는다.
4) cp-1을 재부팅.
# 호스트에서 실행
vagrant reload cp-1
5) cp-1에서 클러스터 상태 확인
kubectl get nodes, etcdctl member list 출력
NAME   STATUS   ROLES                       AGE   VERSION        INTERNAL-IP     EXTERNAL-IP   OS-IMAGE             KERNEL-VERSION       CONTAINER-RUNTIME
cp-1   Ready    control-plane,etcd,master   69m   v1.27.9+k3s1   192.168.56.11   <none>        Ubuntu 22.04.5 LTS   5.15.0-160-generic   containerd://1.7.11-k3s2.27
cp-2   Ready    control-plane,etcd,master   50m   v1.27.9+k3s1   192.168.56.12   <none>        Ubuntu 22.04.5 LTS   5.15.0-160-generic   containerd://1.7.11-k3s2.27
cp-3   Ready    control-plane,etcd,master   46m   v1.27.9+k3s1   192.168.56.13   <none>        Ubuntu 22.04.5 LTS   5.15.0-160-generic   containerd://1.7.11-k3s2.27
w-1    Ready    <none>                      61m   v1.27.9+k3s1   192.168.56.21   <none>        Ubuntu 22.04.5 LTS   5.15.0-160-generic   containerd://1.7.11-k3s2.27
w-2    Ready    <none>                      55m   v1.27.9+k3s1   192.168.56.22   <none>        Ubuntu 22.04.5 LTS   5.15.0-160-generic   containerd://1.7.11-k3s2.27
+------------------+---------+---------------+----------------------------+----------------------------+------------+
|        ID        | STATUS  |     NAME      |         PEER ADDRS         |        CLIENT ADDRS        | IS LEARNER |
+------------------+---------+---------------+----------------------------+----------------------------+------------+
|  5b9b4cb496c89f6 | started | cp-3-950e9061 | https://192.168.56.13:2380 | https://192.168.56.13:2379 |      false |
| b0139766c119db32 | started | cp-2-e08cab0e | https://192.168.56.12:2380 | https://192.168.56.12:2379 |      false |
| bf624c9e82dced96 | started | cp-1-e3e31a90 | https://192.168.56.11:2380 | https://192.168.56.11:2379 |      false |
+------------------+---------+---------------+----------------------------+----------------------------+------------+
결과
설치 스크립트가 systemd unit을 덮어써서 --cluster-init이 사라졌지만, etcd 데이터가 남아 있으므로 재부팅 후에도 정상 기동되었다. 실험 3a(수동 편집)과 동일한 결과이며, 플래그가 사라지는 경로가 달라도 etcd 데이터만 있으면 클러스터에 정상 합류한다는 것이 다시 확인되었다.
최종 상태
실험 3a + 3b를 마친 후, 모든 CP 노드의 systemd unit에 조인/초기화 플래그가 없는 상태가 된다.
| 노드 | 플래그 제거 방법 | ExecStart |
|---|---|---|
| cp-1 | 설치 스크립트 재실행 (INSTALL_K3S_EXEC에 --cluster-init 미포함) |
k3s server --node-ip ... --advertise-address ... --tls-san ... |
| cp-2 | systemd unit 직접 편집 | k3s server --node-ip ... --advertise-address ... |
| cp-3 | systemd unit 직접 편집 | k3s server --node-ip ... --advertise-address ... |
이 상태는 Part 1에서 systemctl cat k3s로 확인했던 실제 운영 환경과 동일하다. 이 상태에서 실험 4를 진행한다.
실험 4: Split Brain 재현 — etcd 데이터 유무별
목적
실험 3a에서 “플래그 없이도 정상 동작”을 확인한 상태에서, etcd 데이터가 사라지면 어떤 일이 벌어지는지 확인한다. 이것이 실제 Split Brain 발생 시나리오를 재현하는 핵심 실험이다.
실험 3a(플래그 없이 재부팅 → 정상)과 실험 4(플래그 없이 + 데이터 소실 → Split Brain)의 대비를 통해, “평상시에는 문제없다가 비정상 상황에서 안전장치가 없어지는” 구조를 확인한다.
cp-1 모니터링 (실험 4 공통)
실험 시작 전, cp-1에서 노드 상태와 etcd 멤버 상태를 5초 간격으로 모니터링한다.
# cp-1에서 실행
while true; do
  echo "=== $(date) ==="
  kubectl get nodes -o wide
  echo "---"
  ETCDCTL_API=3 etcdctl --endpoints=https://127.0.0.1:2379 \
    --cacert=/var/lib/rancher/k3s/server/tls/etcd/server-ca.crt \
    --cert=/var/lib/rancher/k3s/server/tls/etcd/server-client.crt \
    --key=/var/lib/rancher/k3s/server/tls/etcd/server-client.key \
    member list -w table
  echo ""
  sleep 5
done 2>&1 | tee /tmp/monitor.log
실험 4a: etcd 데이터가 있는 상태에서 k3s server (no flags)
cp-3의 K3s를 중지한 뒤, etcd 데이터를 남긴 채 커맨드 라인에서 k3s server를 직접 실행한다. 실험 3a(systemd 재부팅)과의 차이는, systemd unit이 아니라 사람이 직접 커맨드 라인에서 실행한다는 점이다.
참고: VirtualBox 환경에서는 NAT 인터페이스(
10.0.2.15)가 기본으로 잡히기 때문에--node-ip와--advertise-address를 명시해야 한다. 이 플래그는 네트워크 바인딩을 위한 것이지, 클러스터 조인/초기화와는 무관하다.--server나--cluster-init없이 실행한다는 점이 핵심이다.
# cp-3에서 실행
sudo systemctl stop k3s
k3s-killall.sh
ls /var/lib/rancher/k3s/server/db/etcd/member/wal/  # WAL 존재 확인
sudo k3s server --node-ip 192.168.56.13 --advertise-address 192.168.56.13 &
결과
cp-3에서 k3s server를 실행하자 약 30초 만에 클러스터에 합류했다. cp-1의 모니터링 로그에서 NotReady → Ready 전환 과정이 확인된다.
cp-1 모니터링 로그: NotReady → Ready 전환
=== Sun Feb 22 06:09:24 AM UTC 2026 ===
NAME   STATUS     ROLES                       AGE   VERSION        INTERNAL-IP     EXTERNAL-IP   OS-IMAGE             KERNEL-VERSION       CONTAINER-RUNTIME
cp-1   Ready      control-plane,etcd,master   77m   v1.27.9+k3s1   192.168.56.11   <none>        Ubuntu 22.04.5 LTS   5.15.0-160-generic   containerd://1.7.11-k3s2.27
cp-2   Ready      control-plane,etcd,master   58m   v1.27.9+k3s1   192.168.56.12   <none>        Ubuntu 22.04.5 LTS   5.15.0-160-generic   containerd://1.7.11-k3s2.27
cp-3   NotReady   control-plane,etcd,master   54m   v1.27.9+k3s1   192.168.56.13   <none>        Ubuntu 22.04.5 LTS   5.15.0-160-generic   containerd://1.7.11-k3s2.27
...
---
|  5b9b4cb496c89f6 | started | cp-3-950e9061 | https://192.168.56.13:2380 |     https://10.0.2.15:2379 |      false |
| b0139766c119db32 | started | cp-2-e08cab0e | https://192.168.56.12:2380 | https://192.168.56.12:2379 |      false |
| bf624c9e82dced96 | started | cp-1-e3e31a90 | https://192.168.56.11:2380 | https://192.168.56.11:2379 |      false |

=== Sun Feb 22 06:09:29 AM UTC 2026 ===
NAME   STATUS   ROLES                       AGE   VERSION        INTERNAL-IP     EXTERNAL-IP   OS-IMAGE             KERNEL-VERSION       CONTAINER-RUNTIME
cp-1   Ready    control-plane,etcd,master   77m   v1.27.9+k3s1   192.168.56.11   <none>        Ubuntu 22.04.5 LTS   5.15.0-160-generic   containerd://1.7.11-k3s2.27
cp-2   Ready    control-plane,etcd,master   58m   v1.27.9+k3s1   192.168.56.12   <none>        Ubuntu 22.04.5 LTS   5.15.0-160-generic   containerd://1.7.11-k3s2.27
cp-3   Ready    control-plane,etcd,master   54m   v1.27.9+k3s1   192.168.56.13   <none>        Ubuntu 22.04.5 LTS   5.15.0-160-generic   containerd://1.7.11-k3s2.27
...
---
|  5b9b4cb496c89f6 | started | cp-3-950e9061 | https://192.168.56.13:2380 | https://192.168.56.13:2379 |      false |
| b0139766c119db32 | started | cp-2-e08cab0e | https://192.168.56.12:2380 | https://192.168.56.12:2379 |      false |
| bf624c9e82dced96 | started | cp-1-e3e31a90 | https://192.168.56.11:2380 | https://192.168.56.11:2379 |      false |
cp-3이 Ready로 전환되면서 CLIENT ADDRS도 10.0.2.15:2379 → 192.168.56.13:2379로 정상화되었다. etcd 멤버 목록에는 처음부터 3개 멤버 전부가 표시되고 있었다는 점이 중요하다.
cp-3에서 직접 확인해도 모든 노드가 보인다.
cp-3 kubectl get nodes, etcdctl member list, endpoint status 출력
NAME   STATUS   ROLES                       AGE   VERSION        INTERNAL-IP     EXTERNAL-IP   OS-IMAGE             KERNEL-VERSION       CONTAINER-RUNTIME
cp-1   Ready    control-plane,etcd,master   79m   v1.27.9+k3s1   192.168.56.11   <none>        Ubuntu 22.04.5 LTS   5.15.0-160-generic   containerd://1.7.11-k3s2.27
cp-2   Ready    control-plane,etcd,master   59m   v1.27.9+k3s1   192.168.56.12   <none>        Ubuntu 22.04.5 LTS   5.15.0-160-generic   containerd://1.7.11-k3s2.27
cp-3   Ready    control-plane,etcd,master   56m   v1.27.9+k3s1   192.168.56.13   <none>        Ubuntu 22.04.5 LTS   5.15.0-160-generic   containerd://1.7.11-k3s2.27
w-1    Ready    <none>                      71m   v1.27.9+k3s1   192.168.56.21   <none>        Ubuntu 22.04.5 LTS   5.15.0-160-generic   containerd://1.7.11-k3s2.27
w-2    Ready    <none>                      64m   v1.27.9+k3s1   192.168.56.22   <none>        Ubuntu 22.04.5 LTS   5.15.0-160-generic   containerd://1.7.11-k3s2.27
+------------------+---------+---------------+----------------------------+----------------------------+------------+
|        ID        | STATUS  |     NAME      |         PEER ADDRS         |        CLIENT ADDRS        | IS LEARNER |
+------------------+---------+---------------+----------------------------+----------------------------+------------+
|  5b9b4cb496c89f6 | started | cp-3-950e9061 | https://192.168.56.13:2380 | https://192.168.56.13:2379 |      false |
| b0139766c119db32 | started | cp-2-e08cab0e | https://192.168.56.12:2380 | https://192.168.56.12:2379 |      false |
| bf624c9e82dced96 | started | cp-1-e3e31a90 | https://192.168.56.11:2380 | https://192.168.56.11:2379 |      false |
+------------------+---------+---------------+----------------------------+----------------------------+------------+
+----------------+-----------------+---------+---------+-----------+------------+-----------+------------+--------------------+--------+
|    ENDPOINT    |       ID        | VERSION | DB SIZE | IS LEADER | IS LEARNER | RAFT TERM | RAFT INDEX | RAFT APPLIED INDEX | ERRORS |
+----------------+-----------------+---------+---------+-----------+------------+-----------+------------+--------------------+--------+
| 127.0.0.1:2379 | 5b9b4cb496c89f6 |   3.5.9 |  4.1 MB |     false |      false |         4 |      17844 |              17844 |        |
+----------------+-----------------+---------+---------+-----------+------------+-----------+------------+--------------------+--------+
+------------------------+------------------+---------+---------+-----------+------------+-----------+------------+--------------------+--------+
|        ENDPOINT        |        ID        | VERSION | DB SIZE | IS LEADER | IS LEARNER | RAFT TERM | RAFT INDEX | RAFT APPLIED INDEX | ERRORS |
+------------------------+------------------+---------+---------+-----------+------------+-----------+------------+--------------------+--------+
| https://127.0.0.1:2379 | bf624c9e82dced96 |   3.5.9 |  4.9 MB |     false |      false |         4 |      18031 |              18031 |        |
+------------------------+------------------+---------+---------+-----------+------------+-----------+------------+--------------------+--------+
cp-1, cp-3 모두 IS LEADER: false이므로 현재 리더는 cp-2다. cp-3 다운 중에 RAFT TERM이 4로 올라가며 리더 선출이 발생했고, cp-2가 리더가 되었다. 중요한 것은 cp-3이 같은 RAFT TERM(4)에서 동작하고 있다는 점이다 — 기존 클러스터에 합류한 것이지, 새 클러스터를 만든 것이 아니다.
해석: Split Brain이 아닌 정상 복귀
cp-3이 NotReady → Ready로 전환되었지만, 이것은 Split Brain이 아니라 정상적인 노드 복귀다.
Split Brain이라면 cp-3이 단독 클러스터를 새로 생성하여, etcdctl member list에 cp-3 혼자만 보이고, kubectl get nodes에서도 자기 자신만 보여야 한다. 그러나 실제 결과는 3개 etcd 멤버 전부, 5개 노드 전부가 보인다. cp-3의 RAFT TERM이 기존 클러스터와 동일한 4이고, 리더도 cp-2(기존 클러스터의 리더)라는 점이 이를 확정한다.
또한 cp-1과 cp-3에서 각각 kubectl get nodes를 실행한 결과가 완전히 동일하다.
# cp-1, cp-3 양쪽에서 동일한 결과
NAME   STATUS   ROLES                       AGE   VERSION
cp-1   Ready    control-plane,etcd,master   91m   v1.27.9+k3s1
cp-2   Ready    control-plane,etcd,master   72m   v1.27.9+k3s1
cp-3   Ready    control-plane,etcd,master   68m   v1.27.9+k3s1
w-1    Ready    <none>                      83m   v1.27.9+k3s1
w-2    Ready    <none>                      77m   v1.27.9+k3s1
노드 목록, STATUS, ROLES, AGE, VERSION이 모두 동일하다. 같은 etcd 데이터를 공유하는 하나의 클러스터이기 때문이다. cp-3 다운 중에 달라진 것은 리더가 cp-1 → cp-2로 넘어간 것뿐이며, 이것은 Raft 합의 알고리즘의 정상 동작이다. Split Brain이었다면 cp-3에서 AGE가 0~1분짜리 cp-3 혼자만 보이거나, 노드 목록 자체가 달랐을 것이다.
이것은 중요한 발견이다. etcd 데이터가 남아 있는 상태에서는, --server나 --cluster-init 플래그 없이 k3s server를 실행해도 기존 클러스터에 정상 합류한다. etcd 데이터 디렉토리(/var/lib/rancher/k3s/server/db/etcd/member/)에 피어 정보가 저장되어 있기 때문이다. 실험 3a(systemd 재부팅)과 본질적으로 동일한 결과이며, 실행 방법(systemd vs 커맨드 라인)과 관계없이 etcd 데이터의 존재 여부가 결정적이라는 것을 확인했다.
이는 곧, Part 1에서 목격한 상황 — cp-node-c가 자기 자신만 보이는 단독 클러스터를 생성한 것 — 이 etcd 데이터가 없는 상태에서 k3s server가 실행되었을 때만 발생할 수 있다는 것을 의미한다. 이 가설은 실험 4b에서 검증한다.
4a vs 4b가 이 글의 핵심 대비이다. 동일한 명령(
k3s server, 플래그 없음)이 etcd 데이터의 유무만으로 “정상 복귀”와 “Split Brain”이라는 정반대의 결과를 만든다.
실험 4b: etcd WAL만 삭제한 상태에서 k3s server (no flags)
절차
먼저 cp-3의 K3s를 중지한다.
# cp-3에서 실행
systemctl stop k3s
systemctl status k3s  # inactive (dead) 확인
cp-3이 중지되었는지 확인한다.
# cp-3에서 실행
kubectl get nodes
The connection to the server 127.0.0.1:6443 was refused - did you specify the right host or port?
# cp-1에서 실행
kubectl get nodes
NAME   STATUS     ROLES                       AGE    VERSION
cp-1   Ready      control-plane,etcd,master   100m   v1.27.9+k3s1
cp-2   Ready      control-plane,etcd,master   80m    v1.27.9+k3s1
cp-3   NotReady   control-plane,etcd,master   77m    v1.27.9+k3s1
w-1    Ready      <none>                      91m    v1.27.9+k3s1
w-2    Ready      <none>                      85m    v1.27.9+k3s1
cp-3이 NotReady로 확인되었다. 이제 etcd WAL을 삭제하고 k3s server를 실행한다.
# cp-3에서 실행
rm -rf /var/lib/rancher/k3s/server/db/etcd/member/wal/
ls /var/lib/rancher/k3s/server/db/etcd/member/  # wal/ 없음 확인
k3s server --node-ip 192.168.56.13 --advertise-address 192.168.56.13 &
결과
cp-3에서 kubectl get nodes를 실행하면 cp-3 자기 자신만 보인다.
cp-3 kubectl get nodes, etcdctl, ls 출력 + cp-1 모니터링
# cp-3에서 실행
kubectl get nodes -o wide
NAME   STATUS   ROLES                  AGE   VERSION        INTERNAL-IP     EXTERNAL-IP   OS-IMAGE             KERNEL-VERSION       CONTAINER-RUNTIME
cp-3   Ready    control-plane,master   30s   v1.27.9+k3s1   192.168.56.13   <none>        Ubuntu 22.04.5 LTS   5.15.0-160-generic   containerd://1.7.11-k3s2.27
# cp-3에서 실행
ETCDCTL_API=3 etcdctl --cacert=/var/lib/rancher/k3s/server/tls/etcd/server-ca.crt \
  --cert=/var/lib/rancher/k3s/server/tls/etcd/server-client.crt \
  --key=/var/lib/rancher/k3s/server/tls/etcd/server-client.key \
  endpoint status -w table
Failed to get the status of endpoint 127.0.0.1:2379 (context deadline exceeded)
# cp-3에서 실행
ls -al /var/lib/rancher/k3s/server/db/
total 6228
drwx------ 4 root root    4096 Feb 22 06:33 .
drwx------ 8 root root    4096 Feb 22 06:33 ..
drwx------ 3 root root    4096 Feb 22 06:17 etcd
drwx------ 2 root root    4096 Feb 22 05:14 snapshots
-rw-r--r-- 1 root root 2007040 Feb 22 06:37 state.db
-rw-r--r-- 1 root root   32768 Feb 22 06:37 state.db-shm
-rw-r--r-- 1 root root 4317792 Feb 22 06:38 state.db-wal
# cp-1 모니터링
=== Sun Feb 22 06:35:46 AM UTC 2026 ===
NAME   STATUS     ROLES                       AGE    VERSION
cp-1   Ready      control-plane,etcd,master   104m   v1.27.9+k3s1
cp-2   Ready      control-plane,etcd,master   84m    v1.27.9+k3s1
cp-3   NotReady   control-plane,etcd,master   81m    v1.27.9+k3s1
w-1    Ready      <none>                      95m    v1.27.9+k3s1
w-2    Ready      <none>                      89m    v1.27.9+k3s1
이것이 Part 1에서 목격한 상황과 동일한 현상이다! 결정적인 차이점들:
- AGE가 30초: 기존 노드(80m)가 아닌 완전히 새로운 노드 오브젝트가 생성되었다.
- ROLES에서
etcd가 없다:control-plane,master만 표시된다. 실험 4a에서는control-plane,etcd,master였다. - 다른 노드가 보이지 않는다: cp-1, cp-2, w-1, w-2가 전부 사라졌다.
- etcd가 실행되고 있지 않다:
etcdctl이 연결 불가. ROLES에etcd가 없다는 것과 일치한다. state.db(SQLite)가 새로 생성되었고,kine.sock도 존재한다. 기존etcd/디렉토리는 남아있지만 WAL이 없어 SQLite 모드로 폴백한 것이다.- cp-1에서는 기존 cp-3 노드 오브젝트(AGE 81m)가
NotReady로 표시된다. cp-3이 만든 새 클러스터는 기존 클러스터와 완전히 별개이다.해석: Split Brain 재현 성공
두 개의 독립된 클러스터가 동시에 존재하는 Split Brain 상태가 재현되었다.
| 기존 클러스터 (cp-1에서 확인) | cp-3의 새 클러스터 (cp-3에서 확인) | |
|---|---|---|
| 노드 수 | 5개 (cp-3은 NotReady) | 1개 (cp-3만) |
| cp-3 AGE | 81m | 30s |
| cp-3 ROLES | control-plane,etcd,master |
control-plane,master (etcd 없음) |
| 데이터 스토어 | etcd 3노드 클러스터 | SQLite |
실험 4a(etcd 데이터 있음)에서는 정상 복귀했지만, 실험 4b(etcd WAL 삭제)에서는 Split Brain이 발생했다. etcd 데이터의 존재 여부가 정상 복귀와 Split Brain을 가르는 결정적 요인임이 실험적으로 증명되었다.
K3s의 동작을 정리하면:
- etcd 데이터가 있다 → “기존 etcd 클러스터 멤버”로 인식 → 피어 정보로 기존 클러스터에 합류
- etcd 데이터가 없다 +
--server플래그 없다 → “새로운 단독 서버”로 인식 → SQLite 모드로 새 클러스터 생성
--server 플래그가 없는 상태에서 etcd 데이터까지 사라지면, K3s는 이 노드가 기존 클러스터의 멤버였다는 것을 알 방법이 없다. 결과적으로 단독 클러스터를 새로 만들며, 이것이 Split Brain의 원인이다.
실험 4c: K3s 완전 제거 후 재설치 (no flags)
하드웨어 수리 후 데이터가 완전히 사라진 시나리오 재현. 4b에서는 etcd WAL만 삭제했지만, 4c에서는 K3s 자체를 완전히 제거하고 처음부터 재설치한다.
절차
# cp-3에서 실행: 기존 프로세스 정리 및 완전 제거
k3s-killall.sh
/usr/local/bin/k3s-uninstall.sh
ls /var/lib/rancher/k3s/  # 디렉토리 없음 확인
# cp-3에서 실행: K3s 재설치 (--server, --cluster-init 플래그 없이)
curl -sfL https://get.k3s.io | INSTALL_K3S_VERSION="v1.27.9+k3s1" \
  INSTALL_K3S_EXEC="server --node-ip 192.168.56.13 --advertise-address 192.168.56.13" sh -
확인:
# cp-3에서 실행
kubectl get nodes -o wide
ls -al /var/lib/rancher/k3s/server/db/
# cp-1에서 실행
kubectl get nodes -o wide
결과
k3s-uninstall.sh가 /var/lib/rancher/k3s를 완전히 삭제한 것을 확인한 후 재설치했다.
kubectl get nodes, ls 출력
ls: cannot access '/var/lib/rancher/k3s': No such file or directory
# cp-3에서 실행
kubectl get nodes -o wide
NAME   STATUS     ROLES                  AGE   VERSION        INTERNAL-IP     EXTERNAL-IP   OS-IMAGE             KERNEL-VERSION       CONTAINER-RUNTIME
cp-3   NotReady   control-plane,master   10m   v1.27.9+k3s1   192.168.56.13   <none>        Ubuntu 22.04.5 LTS   5.15.0-160-generic   containerd://1.7.11-k3s2.27
# cp-3에서 실행
ls -al /var/lib/rancher/k3s/server/db/
total 76
drwx------ 3 root root  4096 Feb 22 06:44 .
drwx------ 6 root root  4096 Feb 22 06:44 ..
drwx------ 2 root root  4096 Feb 22 06:44 etcd
-rw-r--r-- 1 root root 32768 Feb 22 06:44 state.db
-rw-r--r-- 1 root root 32768 Feb 22 06:44 state.db-shm
-rw-r--r-- 1 root root     0 Feb 22 06:44 state.db-wal
ls -al /var/lib/rancher/k3s/server/db/etcd/
total 12
drwx------ 2 root root 4096 Feb 22 06:44 .
drwx------ 3 root root 4096 Feb 22 06:44 ..
-rw------- 1 root root   13 Feb 22 06:44 name
4b와 동일한 결과다. cp-3 자기 자신만 보이고, ROLES에 etcd가 없으며, AGE도 새로 시작된 값이다. state.db(SQLite)가 생성되었고, etcd/ 디렉토리에는 name 파일만 있을 뿐 member/ 디렉토리가 없다. 완전히 새로운 SQLite 단독 클러스터다. 4b와 동일하게 Split Brain이 발생했다.
결과 비교
| 조건 | ROLES | AGE | 다른 노드 보임 | 데이터 스토어 | Split Brain |
|---|---|---|---|---|---|
| 4a: etcd 데이터 있음 | control-plane,etcd,master |
유지 (56m) | 5개 전부 | etcd (기존) | 미발생 |
| 4b: etcd WAL 삭제 | control-plane,master |
새로 시작 (30s) | cp-3만 | SQLite (새로 생성) | 발생 |
| 4c: K3s 완전 제거 후 재설치 | control-plane,master |
새로 시작 (10m) | cp-3만 | SQLite (새로 생성) | 발생 |
| Part 1의 실제 관찰 | control-plane,master |
19h | cp-node-c만 | (미확인, SQLite 추정) | 발생 |
4b와 4c 모두 동일한 결과를 보인다. etcd 데이터가 사라진 경로(부분 삭제 vs 완전 제거)와 무관하게, 유효한 etcd 데이터가 없고 --server 플래그도 없으면 K3s는 SQLite 모드로 단독 클러스터를 생성한다.
Part 1에서 관찰한 현상(cp-node-c만 보임, etcd role 없음)은 4b 또는 4c 중 하나의 시나리오로 발생했을 가능성이 높다. 하드웨어 수리 과정에서 디스크 교체, OS 재설치, 또는 k3s-uninstall.sh 실행 등으로 etcd 데이터가 사라진 뒤, --server 플래그 없이 k3s server가 기동된 것이다.
실험 5: etcd 멤버 제거 메커니즘 확인
목적
etcd 멤버가 K3s에 의해 자동 제거되는지, 아니면 kubectl delete node에 의해서만 제거되는지 확인한다. 소스 코드 분석에서 member_controller.go의 onRemove 핸들러가 Node 삭제 이벤트에 반응하여 etcd 멤버를 제거한다는 것을 확인했다. 이를 실험으로 검증한다.
전제
실험 4c 이후 클러스터 상태를 그대로 사용한다.
- 원래 클러스터(cp-1, cp-2): cp-3은
NotReady. etcd는 cp-1, cp-2 2멤버로 동작 중(cp-3 멤버 엔트리 존재 여부 확인 필요). - cp-3: 독립 SQLite 클러스터로 동작 중(실험 4c 결과).
5a: 장시간 NotReady 후 자동 제거 여부 확인
cp-3이 원래 클러스터에서 분리된 상태가 실험 4 시작부터 상당 시간 경과했다. K3s가 응답 없는 etcd 멤버를 자동으로 제거하는지 확인한다.
절차
# cp-1에서 실행: 현재 etcd 멤버 목록 확인
ETCDCTL_API=3 etcdctl \
  --endpoints=https://127.0.0.1:2379 \
  --cacert=/var/lib/rancher/k3s/server/tls/etcd/server-ca.crt \
  --cert=/var/lib/rancher/k3s/server/tls/etcd/server-client.crt \
  --key=/var/lib/rancher/k3s/server/tls/etcd/server-client.key \
  member list -w table
# cp-1에서 실행: 노드 상태 확인
kubectl get nodes -o wide
결과
kubectl get nodes, etcdctl member list, endpoint health, endpoint status 출력
root@cp-1:~# kubectl get nodes -o wide
NAME   STATUS     ROLES                       AGE    VERSION        INTERNAL-IP     EXTERNAL-IP   OS-IMAGE             KERNEL-VERSION       CONTAINER-RUNTIME
cp-1   Ready      control-plane,etcd,master   113m   v1.27.9+k3s1   192.168.56.11   <none>        Ubuntu 22.04.5 LTS   5.15.0-160-generic   containerd://1.7.11-k3s2.27
cp-2   Ready      control-plane,etcd,master   93m    v1.27.9+k3s1   192.168.56.12   <none>        Ubuntu 22.04.5 LTS   5.15.0-160-generic   containerd://1.7.11-k3s2.27
cp-3   NotReady   control-plane,etcd,master   89m    v1.27.9+k3s1   192.168.56.13   <none>        Ubuntu 22.04.5 LTS   5.15.0-160-generic   containerd://1.7.11-k3s2.27
w-1    Ready      <none>                      104m   v1.27.9+k3s1   192.168.56.21   <none>        Ubuntu 22.04.5 LTS   5.15.0-160-generic   containerd://1.7.11-k3s2.27
w-2    Ready      <none>                      98m    v1.27.9+k3s1   192.168.56.22   <none>        Ubuntu 22.04.5 LTS   5.15.0-160-generic   containerd://1.7.11-k3s2.27
root@cp-1:~# ETCDCTL_API=3 etcdctl \
  --endpoints=https://127.0.0.1:2379 \
  --cacert=/var/lib/rancher/k3s/server/tls/etcd/server-ca.crt \
  --cert=/var/lib/rancher/k3s/server/tls/etcd/server-client.crt \
  --key=/var/lib/rancher/k3s/server/tls/etcd/server-client.key \
  member list -w table
+------------------+---------+---------------+----------------------------+----------------------------+------------+
|        ID        | STATUS  |     NAME      |         PEER ADDRS         |        CLIENT ADDRS        | IS LEARNER |
+------------------+---------+---------------+----------------------------+----------------------------+------------+
|  5b9b4cb496c89f6 | started | cp-3-950e9061 | https://192.168.56.13:2380 | https://192.168.56.13:2379 |      false |
| b0139766c119db32 | started | cp-2-e08cab0e | https://192.168.56.12:2380 | https://192.168.56.12:2379 |      false |
| bf624c9e82dced96 | started | cp-1-e3e31a90 | https://192.168.56.11:2380 | https://192.168.56.11:2379 |      false |
+------------------+---------+---------------+----------------------------+----------------------------+------------+
root@cp-1:~# ETCDCTL_API=3 etcdctl \
  --cacert=/var/lib/rancher/k3s/server/tls/etcd/server-ca.crt \
  --cert=/var/lib/rancher/k3s/server/tls/etcd/server-client.crt \
  --key=/var/lib/rancher/k3s/server/tls/etcd/server-client.key \
  endpoint health -w table
+----------------+--------+------------+-------+
|    ENDPOINT    | HEALTH |    TOOK    | ERROR |
+----------------+--------+------------+-------+
| 127.0.0.1:2379 |   true | 7.305542ms |       |
+----------------+--------+------------+-------+
root@cp-1:~# ETCDCTL_API=3 etcdctl \
  --cacert=/var/lib/rancher/k3s/server/tls/etcd/server-ca.crt \
  --cert=/var/lib/rancher/k3s/server/tls/etcd/server-client.crt \
  --key=/var/lib/rancher/k3s/server/tls/etcd/server-client.key \
  endpoint status -w table
+----------------+------------------+---------+---------+-----------+------------+-----------+------------+--------------------+--------+
|    ENDPOINT    |        ID        | VERSION | DB SIZE | IS LEADER | IS LEARNER | RAFT TERM | RAFT INDEX | RAFT APPLIED INDEX | ERRORS |
+----------------+------------------+---------+---------+-----------+------------+-----------+------------+--------------------+--------+
| 127.0.0.1:2379 | bf624c9e82dced96 |   3.5.9 |  4.9 MB |     false |      false |         4 |      29137 |              29137 |        |
+----------------+------------------+---------+---------+-----------+------------+-----------+------------+--------------------+--------+
cp-3(5b9b4cb496c89f6)이 여전히 etcd 멤버로 존재한다. 실험 4 시작 이후 cp-3이 분리된 상태로 상당 시간(약 30분 이상)이 경과했지만, K3s는 응답 없는 etcd 멤버를 자동으로 제거하지 않았다. cp-2가 리더인 상태에서 2/3 quorum으로 동작하고 있다.
5b: kubectl delete node에 의한 etcd 멤버 제거 확인
Node 오브젝트를 삭제하면 etcd 멤버도 함께 제거되는지 확인한다.
절차
# cp-1에서 실행: Node 오브젝트 삭제
kubectl delete node cp-3
# cp-1에서 실행: 삭제 후 etcd 멤버 목록 확인
ETCDCTL_API=3 etcdctl \
  --endpoints=https://127.0.0.1:2379 \
  --cacert=/var/lib/rancher/k3s/server/tls/etcd/server-ca.crt \
  --cert=/var/lib/rancher/k3s/server/tls/etcd/server-client.crt \
  --key=/var/lib/rancher/k3s/server/tls/etcd/server-client.key \
  member list -w table
# cp-1에서 실행: 노드 목록 확인
kubectl get nodes -o wide
결과
root@cp-1:~# kubectl delete node cp-3
node "cp-3" deleted
삭제 후 etcdctl member list, kubectl get nodes 출력
root@cp-1:~# ETCDCTL_API=3 etcdctl \
  --endpoints=https://127.0.0.1:2379 \
  --cacert=/var/lib/rancher/k3s/server/tls/etcd/server-ca.crt \
  --cert=/var/lib/rancher/k3s/server/tls/etcd/server-client.crt \
  --key=/var/lib/rancher/k3s/server/tls/etcd/server-client.key \
  member list -w table
+------------------+---------+---------------+----------------------------+----------------------------+------------+
|        ID        | STATUS  |     NAME      |         PEER ADDRS         |        CLIENT ADDRS        | IS LEARNER |
+------------------+---------+---------------+----------------------------+----------------------------+------------+
| b0139766c119db32 | started | cp-2-e08cab0e | https://192.168.56.12:2380 | https://192.168.56.12:2379 |      false |
| bf624c9e82dced96 | started | cp-1-e3e31a90 | https://192.168.56.11:2380 | https://192.168.56.11:2379 |      false |
+------------------+---------+---------------+----------------------------+----------------------------+------------+
root@cp-1:~# kubectl get nodes -o wide
NAME   STATUS   ROLES                       AGE    VERSION        INTERNAL-IP     EXTERNAL-IP   OS-IMAGE             KERNEL-VERSION       CONTAINER-RUNTIME
cp-1   Ready    control-plane,etcd,master   119m   v1.27.9+k3s1   192.168.56.11   <none>        Ubuntu 22.04.5 LTS   5.15.0-160-generic   containerd://1.7.11-k3s2.27
cp-2   Ready    control-plane,etcd,master   99m    v1.27.9+k3s1   192.168.56.12   <none>        Ubuntu 22.04.5 LTS   5.15.0-160-generic   containerd://1.7.11-k3s2.27
w-1    Ready    <none>                      111m   v1.27.9+k3s1   192.168.56.21   <none>        Ubuntu 22.04.5 LTS   5.15.0-160-generic   containerd://1.7.11-k3s2.27
w-2    Ready    <none>                      105m   v1.27.9+k3s1   192.168.56.22   <none>        Ubuntu 22.04.5 LTS   5.15.0-160-generic   containerd://1.7.11-k3s2.27
cp-3(5b9b4cb496c89f6)이 etcd 멤버 목록에서 사라졌다. 3멤버 → 2멤버가 되었고, Node 오브젝트도 완전히 제거되었다. kubectl delete node가 Kubernetes Node 오브젝트 삭제와 etcd 멤버 제거를 동시에 수행함을 확인했다. 소스 코드의 member_controller.go onRemove 핸들러 동작이 실험으로 검증되었다.
5c: 정리된 상태에서 재조인
etcd 멤버가 제거된 상태에서 cp-3을 정상적으로 재조인시킨다. 이것이 올바른 복구 절차임을 확인한다.
절차
# cp-3에서 실행: 잔여 K3s 프로세스 및 데이터 완전 제거
kill -9 <잔여 K3s PID>  # 백그라운드로 실행한 프로세스가 남아 있으면 정리
rm -rf /var/lib/rancher/k3s/
# cp-3에서 실행: --server 플래그로 정상 재조인
curl -sfL https://get.k3s.io | INSTALL_K3S_VERSION="v1.27.9+k3s1" \
  INSTALL_K3S_EXEC="server \
    --server https://192.168.56.11:6443 \
    --token <TOKEN> \
    --node-ip 192.168.56.13 \
    --advertise-address 192.168.56.13" sh -
# cp-3에서 실행: systemd 서비스 시작 확인
systemctl status k3s
# cp-1에서 실행: 재조인 확인 (모니터링)
kubectl get nodes -o wide
ETCDCTL_API=3 etcdctl \
  --endpoints=https://127.0.0.1:2379 \
  --cacert=/var/lib/rancher/k3s/server/tls/etcd/server-ca.crt \
  --cert=/var/lib/rancher/k3s/server/tls/etcd/server-client.crt \
  --key=/var/lib/rancher/k3s/server/tls/etcd/server-client.key \
  member list -w table
결과
cp-3에서 잔여 프로세스 정리, 데이터 삭제 후 --server 플래그로 K3s를 재설치하고 서비스를 시작한다.
root@cp-3:~# systemctl status k3s
● k3s.service - Lightweight Kubernetes
     Loaded: loaded (/etc/systemd/system/k3s.service; enabled; vendor preset: enabled)
     Active: active (running) since Sun 2026-02-22 07:00:27 UTC; 9s ago
cp-3 systemd unit 확인
root@cp-3:~# systemctl cat k3s
# /etc/systemd/system/k3s.service
...
ExecStart=/usr/local/bin/k3s \
    server \
        '--server' \
        'https://192.168.56.11:6443' \
        '--token' \
        ...
--server https://192.168.56.11:6443이 포함된 상태로 서비스가 기동되었다.
cp-1 모니터링에서 cp-3의 조인 과정이 관찰된다.
cp-1 모니터링 로그: learner → member 승격 과정
=== Sun Feb 22 07:00:10 AM UTC 2026 ===
NAME   STATUS   ROLES                       AGE    VERSION        INTERNAL-IP     EXTERNAL-IP   OS-IMAGE             KERNEL-VERSION       CONTAINER-RUNTIME
cp-1   Ready    control-plane,etcd,master   128m   v1.27.9+k3s1   192.168.56.11   <none>        Ubuntu 22.04.5 LTS   5.15.0-160-generic   containerd://1.7.11-k3s2.27
cp-2   Ready    control-plane,etcd,master   108m   v1.27.9+k3s1   192.168.56.12   <none>        Ubuntu 22.04.5 LTS   5.15.0-160-generic   containerd://1.7.11-k3s2.27
w-1    Ready    <none>                      120m   v1.27.9+k3s1   192.168.56.21   <none>        Ubuntu 22.04.5 LTS   5.15.0-160-generic   containerd://1.7.11-k3s2.27
w-2    Ready    <none>                      114m   v1.27.9+k3s1   192.168.56.22   <none>        Ubuntu 22.04.5 LTS   5.15.0-160-generic   containerd://1.7.11-k3s2.27
---
+------------------+---------+---------------+----------------------------+----------------------------+------------+
|        ID        | STATUS  |     NAME      |         PEER ADDRS         |        CLIENT ADDRS        | IS LEARNER |
+------------------+---------+---------------+----------------------------+----------------------------+------------+
| b0139766c119db32 | started | cp-2-e08cab0e | https://192.168.56.12:2380 | https://192.168.56.12:2379 |      false |
| bf624c9e82dced96 | started | cp-1-e3e31a90 | https://192.168.56.11:2380 | https://192.168.56.11:2379 |      false |
+------------------+---------+---------------+----------------------------+----------------------------+------------+

=== Sun Feb 22 07:00:15 AM UTC 2026 ===  # 5초 후: cp-3이 learner로 등록
...
| c8f6b8d5b2608446 | started | cp-3-d782f9b7 | https://192.168.56.13:2380 | https://192.168.56.13:2379 |       true |
+------------------+---------+---------------+----------------------------+----------------------------+------------+

=== Sun Feb 22 07:00:20 AM UTC 2026 ===  # 10초 후: learner → voting member 승격
...
| c8f6b8d5b2608446 | started | cp-3-d782f9b7 | https://192.168.56.13:2380 | https://192.168.56.13:2379 |      false |
+------------------+---------+---------------+----------------------------+----------------------------+------------+
cp-3(c8f6b8d5b2608446)이 새로운 ID로 learner(IS LEARNER: true)로 먼저 등록된 뒤, 데이터 동기화가 완료되면 IS LEARNER: false로 승격되어 정식 voting member가 되었다. etcd 클러스터가 다시 3멤버로 복원되었다.
조인 과정에서 주목할 점:
- learner → member 2단계 승격: cp-3은 처음에
IS LEARNER: true로 등록된 뒤, 데이터 동기화가 완료되면IS LEARNER: false로 승격된다. K3s가 etcd의 learner 메커니즘을 활용하여 안전하게 새 멤버를 추가하는 것이다. - 새로운 member ID 발급: 5b에서 제거된 cp-3의 ID(
5b9b4cb496c89f6)와 재조인 후 cp-3의 ID(c8f6b8d5b2608446)가 다르다. 완전히 새로운 멤버로 등록된 것이다. - Node 오브젝트는 아직 미등록: 07:00:20 시점에서
kubectl get nodes에 cp-3이 아직 나타나지 않는다. etcd 멤버 등록이 먼저 완료되고, Node 오브젝트 등록은 그 이후에 이루어진다.
cp-3에서 직접 확인한다.
root@cp-3:~# kubectl get nodes
NAME   STATUS   ROLES                       AGE    VERSION
cp-1   Ready    control-plane,etcd,master   130m   v1.27.9+k3s1
cp-2   Ready    control-plane,etcd,master   110m   v1.27.9+k3s1
cp-3   Ready    control-plane,etcd,master   102s   v1.27.9+k3s1
w-1    Ready    <none>                      122m   v1.27.9+k3s1
w-2    Ready    <none>                      116m   v1.27.9+k3s1
cp-3에서 5개 노드 전체가 보인다. cp-3의 AGE만 102s로 새로 등록된 반면, 나머지 노드의 AGE는 기존과 동일하다. ROLES에 etcd가 포함되어 있어, etcd 멤버로서도 정상 동작하고 있음을 확인할 수 있다.
--server 플래그로 설치하면 K3s가 대상 서버에서 CA 인증서와 bootstrap 데이터를 자동으로 다운로드하여 /etc/rancher/k3s/k3s.yaml(kubeconfig)을 생성한다. 이 kubeconfig가 server: https://127.0.0.1:6443을 가리키므로, cp-3 자체가 클러스터의 API server로서 별도의 kubeconfig 설정 없이 kubectl이 바로 동작한다.
결과 비교
| 단계 | 확인 사항 | 결과 |
|---|---|---|
| 5a | 장시간 NotReady 후 etcd 멤버 자동 제거 | 미제거. K3s는 응답 없는 voting member를 시간 기반으로 자동 제거하지 않는다. |
| 5b | kubectl delete node에 의한 etcd 멤버 제거 |
즉시 제거. Node 오브젝트 삭제와 etcd 멤버 제거가 동시에 수행된다. |
| 5c | 정리 후 --server 플래그로 재조인 |
정상 재조인. learner → member 승격 과정을 거쳐 3멤버 etcd 클러스터 복원. |
원인 분석
Part 1의 추정 vs 실제
| 항목 | Part 1의 추정 | 코드/실험 결과 |
|---|---|---|
| 독립 클러스터 생성 메커니즘 | 기존 etcd 데이터로 단독 etcd 클러스터 부트스트랩 | SQLite 모드로 새 단독 클러스터 생성. etcd 데이터가 없고 --server 플래그도 없으면 managedDB = nil → SQLite. (실험 4b, 4c) |
| etcd 데이터 보존 여부 | 보존됨 (데이터 위에서 분기) | 사라진 상태. etcd 데이터가 보존되어 있었다면 기존 클러스터에 정상 복귀한다. (실험 4a) Split Brain은 etcd 데이터가 없을 때만 발생한다. (실험 4b, 4c) |
| etcd 멤버 자동 제거 | K3s가 응답 없는 멤버를 자동 제거 | 자동 제거하지 않는다. kubectl delete node에 의해서만 제거된다. (실험 5a, 5b) |
Part 1에서는 “기존 etcd 데이터 위에서 독립 클러스터가 분기되었다”고 추정했지만, 실제로는 정반대다. etcd 데이터가 사라졌기 때문에 독립 클러스터가 생성된 것이다.
실제 발생 시나리오
코드 분석과 실험 결과를 종합하면, Part 1의 상황은 다음 순서로 발생했다.
- 삼중화 클러스터 운영 중, cp-node-c에 하드웨어 장애 발생.
- 하드웨어 수리 과정에서 etcd 데이터 소실. 디스크 교체, OS 재설치, 또는
k3s-uninstall.sh실행 등으로/var/lib/rancher/k3s/server/db/etcd/디렉토리가 사라짐. k3s server가--server플래그 없이 기동됨. systemd unit에--server플래그가 누락된 상태.- K3s의 데이터스토어 선택 로직(
assignManagedDriver())이 동작:- etcd WAL 디렉토리가 없다 →
IsInitialized() = false --cluster-init도,--server+token도 없다 →managedDB = nil- SQLite 모드로 결정됨.
- etcd WAL 디렉토리가 없다 →
- K3s가 SQLite 기반의 새 단독 클러스터를 생성. cp-node-c만 존재하는 1노드 클러스터.
- Split Brain 상태. 원래 클러스터(cp-node-a, cp-node-b)와 cp-node-c가 각각 독립적으로 동작.
이것이 실험 4b(etcd WAL 삭제)와 4c(K3s 완전 제거 후 재설치)에서 재현한 시나리오와 정확히 일치한다. Part 1에서 관찰한 control-plane,master(etcd role 없음), 짧지 않은 AGE(19h), 다른 노드가 보이지 않는 현상 모두 SQLite 모드 단독 클러스터의 특징이다.
k3s server 부팅 동작 정리
소스 코드 분석과 실험 결과를 종합하여, etcd 데이터 존재 여부와 실행 플래그 조합에 따른 동작을 정리한다.
| 조건 | etcd 데이터 있음 | etcd 데이터 없음 |
|---|---|---|
k3s server (플래그 없음) |
기존 멤버로서 정상 기동. --server 없이도 etcd 피어 정보로 클러스터 합류. (실험 3a, 4a) |
SQLite 모드로 단독 클러스터 생성. Split Brain 위험. (실험 4b, 4c) |
k3s server --server <URL> --token <TOKEN> |
대부분 조인 실패 (etcd member ID mismatch). 데이터 정리 후 재시도 필요 | 해당 클러스터에 정상 조인. learner → member 승격. (실험 5c) |
k3s server --cluster-init |
플래그가 무시되고 기존 멤버로서 정상 기동 | 새로운 HA 클러스터의 첫 번째 노드로 초기화 (실험 1) |
k3s server --cluster-reset |
etcd 클러스터를 단일 멤버로 리셋 | 의미 없음 |
핵심은 첫 번째 행이다. etcd 데이터 유무에 따라 같은 명령이 완전히 다른 결과를 만든다. etcd 데이터가 있으면 안전하게 복귀하지만, 없으면 경고 없이 SQLite 단독 클러스터를 만든다. K3s가 사용자에게 어떤 확인도 요구하지 않기 때문에, 의도하지 않은 Split Brain이 발생할 수 있다.
K3s vs kubeadm: 설계 철학의 차이
| 비교 | K3s | kubeadm |
|---|---|---|
| 기존 etcd 데이터 + 재시작 | 자동으로 기존 멤버로 복귀. 플래그 없이도 동작. (실험 3a, 4a) | 에러 + 중단 |
| etcd 데이터 없이 재시작 | 경고 없이 SQLite 단독 클러스터 생성 (실험 4b, 4c) | 명시적 init/join 없이는 기동 불가 |
| 조인 vs 초기화 구분 | --server 유무 + etcd 데이터 존재 여부로 암시적 결정 |
init / join 명령 자체가 다름. 명시적 선택 필수 |
| 안전장치 | 최소한. 데이터 없이 시작해도 차단하지 않음 | 검증·안전장치 다수. kubeadm join의 CA hash 검증, kubeadm init의 기존 클러스터 감지 등 |
| 설계 철학 | 단순성, 자동 복구 | 명시성, 안전성 |
K3s의 “어떤 상태에서든 일단 뭔가 되게 한다”는 설계는 정상 운영 시 편리하지만, 비정상 상태에서 조용히 잘못된 방향으로 동작할 수 있다. kubeadm은 반대로, 상태가 맞지 않으면 시작 자체를 거부하여 운영자가 문제를 인식하도록 강제한다.
결론
K3s Split Brain의 원인은 “네트워크 파티션”이 아니라 “etcd 데이터 소실 + --server 플래그 누락“이었다.
K3s는 k3s server 실행 시 etcd WAL 디렉토리 존재 여부와 실행 플래그로 데이터스토어를 결정한다. etcd 데이터가 있으면 기존 클러스터에 자동 복귀하지만, etcd 데이터가 없고 플래그도 없으면 경고 없이 SQLite 모드로 새 단독 클러스터를 생성한다. 이것이 Split Brain의 직접적인 원인이다.
실험을 통해 확인한 핵심 사실:
- etcd 데이터가 있으면 안전하다.
--server플래그가 없어도 etcd 피어 정보로 기존 클러스터에 복귀한다. (실험 3a, 4a) - etcd 데이터가 없으면 위험하다. WAL 삭제(4b), 완전 제거 후 재설치(4c) 모두 SQLite 단독 클러스터를 생성하여 Split Brain이 발생한다.
- K3s는 응답 없는 etcd 멤버를 자동 제거하지 않는다.
kubectl delete node에 의해서만 제거된다. (실험 5a, 5b) - 정상 복구 절차는
kubectl delete node→ 데이터 정리 →--server플래그로 재조인이다. 재조인 시 learner → member 승격 과정을 거쳐 안전하게 클러스터에 합류한다. (실험 5c)
교훈
--server플래그는 안전장치다. etcd 데이터가 없는 상태에서--server없이 K3s를 시작하면 경고 없이 단독 클러스터가 생성된다. 컨트롤 플레인 노드의 systemd unit에는 항상--server플래그를 유지하는 것이 좋다. 정상 운영 시에는 없어도 문제가 없지만(etcd 데이터가 있으므로), 비정상 상황에서 Split Brain을 방지하는 안전장치 역할을 한다.- 제거 시 반드시 K3s 데이터를 완전히 정리한다.
k3s-uninstall.sh실행 후/var/lib/rancher/k3s와/etc/rancher/k3s디렉토리가 남아 있지 않은지 확인한다. 잔여 데이터를 삭제하지 않고 재조인하면 대부분 조인에 실패한다. 기존 etcd 데이터의 member ID가 현재 클러스터와 맞지 않기 때문이다(FATAL etcd member add failed: etcdserver: re-configuration failed due to not enough started members). - 재조인 전 etcd 상태를 확인한다.
etcdctl member list로 멤버 목록을 확인하고, 이전 멤버 엔트리가 남아 있으면kubectl delete node로 정리한 뒤 재조인한다. etcd 상태가 비정상이면 etcd 비정상 시나리오별 대응을 참고한다. - 컨트롤 플레인은 워커와 다르다. 컨트롤 플레인 노드는 etcd 데이터를 보유하므로, 제거·재조인 절차를 워커 노드와 동일하게 취급하면 안 된다. 워커 노드는
kubectl delete node후k3s agent로 재조인하면 되지만, 컨트롤 플레인은 etcd 멤버십과 데이터 정합성을 함께 고려해야 한다. - Split Brain은 원래 클러스터에서 감지할 수 없다. 분리된 노드는 단순히
NotReady로만 보인다. 하드웨어 수리 등으로 노드를 재투입할 때는 반드시kubectl get nodes와etcdctl member list를 양쪽에서 확인하여 클러스터 상태가 일치하는지 검증해야 한다.
-
etcd의 learner는 Raft 합의에 참여하지 않는 non-voting 멤버이다. K3s에서는 새 멤버가 조인할 때 먼저 learner로 등록하여 데이터를 동기화한 뒤, 완료되면 voting member로 승격하는 방식으로 사용된다. 정상 상태에서는 모든 멤버가
IS LEARNER: false여야 한다. 실험 5c에서 이 승격 과정을 관찰한다. ↩


댓글남기기