
[EKS] EKS: Networking - 2. 실습 환경 구성
서종호(가시다)님의 AWS EKS Workshop Study(AEWS) 2주차 학습 내용을 기반으로 합니다.
TL;DR
- 2주차 실습 환경은 1주차 대비 서브넷 CIDR을 /24에서 /22로 확대하고, VPC CNI addon에
WARM_ENI_TARGET설정을 추가했다 enable_irsa = true로 OIDC 기반 IRSA를 활성화하여, 파드(서비스 어카운트) 단위로 AWS IAM 권한을 세밀하게 부여할 수 있다terraform output을 활용하면 kubeconfig 설정 명령을 자동으로 얻을 수 있다- 배포 후 EKS 콘솔과 kubectl로 클러스터, 노드, 파드, addon, IAM 역할, 보안 그룹 등 기본 정보를 확인한다
분석
2주차 실습 환경은 1주차 실습 환경과 동일한 Terraform 기반이다. VPC CNI 기반 네트워킹 실습에 맞게 달라진 부분을 중심으로 살펴본다.
서브넷 CIDR 확대
1주차에는 퍼블릭/프라이빗 서브넷 모두 /24(IP 251개)를 사용했다. 2주차에서는 /22(IP 1,019개)로 확대했다.
참고: AWS VPC 서브넷의 사용 가능 IP 수는
2^(32 - 프리픽스 길이) - 5로 계산된다. AWS가 각 서브넷에서 5개의 IP를 예약하기 때문이다 — 네트워크 주소(.0), VPC 라우터(.1), DNS 서버(.2), 예비(.3), 브로드캐스트(마지막 주소)./24는256 - 5 = 251,/22는1,024 - 5 = 1,019개다.
variable "public_subnet_blocks" {
  type    = list(string)
  default = ["192.168.0.0/22", "192.168.4.0/22", "192.168.8.0/22"] # 1주차: /24 → 2주차: /22
}

variable "private_subnet_blocks" {
  type    = list(string)
  default = ["192.168.12.0/22", "192.168.16.0/22", "192.168.20.0/22"]
}
VPC CNI는 파드에게 VPC의 실제 IP를 부여하므로, ENI와 Secondary IP를 많이 소비한다. 서브넷이 좁으면 IP 부족으로 파드 스케줄링이 실패할 수 있다. /22로 확대하면 서브넷당 약 1,000개의 IP를 확보할 수 있어, 이후 실습에서 IP 부족 걱정 없이 다양한 시나리오를 테스트할 수 있다.
VPC CNI addon 설정
1주차에서는 VPC CNI를 기본 설정으로 배포했지만, 2주차에서는 configuration_values를 통해 환경 변수를 직접 지정한다.
addons = {
  vpc-cni = {
    most_recent = true
    before_compute = true  # 노드 그룹보다 먼저 배포
    configuration_values = jsonencode({
      env = {
        WARM_ENI_TARGET = "1"  # 현재 ENI 외에 여유 ENI 1개를 항상 확보
      }
    })
  }
}
WARM_ENI_TARGET = "1"은 사실 기본값과 동일하다. 여기서는 addon 배포 시 환경 변수를 설정하는 방법 자체를 확인하기 위한 목적이 크다. 이후 실습에서 이 값을 변경하거나, WARM_IP_TARGET, MINIMUM_IP_TARGET, ENABLE_PREFIX_DELEGATION 등 다른 설정을 추가해 가며 동작을 비교할 예정이다.
before_compute = true를 설정하면, VPC CNI addon이 노드 그룹보다 먼저 배포된다. 노드가 생성될 때 이미 CNI 설정이 적용되어 있어야 IP 할당이 정상적으로 이루어지기 때문이다.
IRSA 활성화
module "eks" {
  # ...
  enable_irsa = true  # 1주차에는 없던 설정
}
1주차 실습에서는 enable_irsa를 명시적으로 설정하지 않았다. terraform-aws-modules/eks 모듈은 v18.4.0부터 기본값이 true이므로 OIDC Provider 자체는 생성되었겠지만, IRSA를 활용하는 addon 설정은 없었다. 2주차에서는 이를 명시적으로 선언하여 의도를 드러내고, VPC CNI를 포함한 addon들이 파드 단위로 AWS IAM 권한을 받을 수 있는 기반을 마련한 것이다.
enable_irsa = true를 설정하면 EKS 클러스터에 OIDC Provider가 생성된다. 이 OIDC Provider가 쿠버네티스 서비스 어카운트와 AWS IAM Role을 연결하는 다리 역할을 한다. OIDC와 IRSA의 동작 원리는 아래에서 간략히 살펴보자.
OIDC와 IRSA
앞서 분석한 코드에서 enable_irsa = true를 설정했다. 이번 실습에서 VPC CNI를 비롯한 addon들이 파드 단위로 AWS 권한을 부여받으려면 OIDC와 IRSA가 필요하다. 배포 전 배경 지식 차원에서 핵심 개념을 짚고 넘어가자.
OIDC
OIDC/IRSA가 없으면, 파드가 AWS API를 호출할 때 노드(EC2 인스턴스)의 IAM Role을 그대로 사용한다. 같은 노드의 모든 파드가 동일한 권한을 갖게 되므로, 최소 권한 원칙(Least Privilege)을 위반한다.
예를 들어, aws-node(VPC CNI) 파드는 AssignPrivateIpAddresses, AttachNetworkInterface 같은 EC2 네트워크 API 권한이 필요하다. 이 권한을 노드 IAM Role에 부여하면, 같은 노드의 일반 앱 파드도 이 권한에 접근할 수 있다.
OIDC(OpenID Connect) Provider는 이 문제를 해결하기 위한 첫 번째 단계다. EKS 클러스터에 OIDC Provider를 연결하면, 쿠버네티스 내부의 서비스 어카운트 토큰을 AWS IAM이 검증할 수 있는 표준(OIDC) 형식으로 변환할 수 있다. 즉, 쿠버네티스 세계와 AWS IAM 세계를 연결하는 다리 역할을 한다.
IRSA
IRSA(IAM Roles for Service Accounts)는 OIDC Provider를 기반으로 서비스 어카운트 단위로 IAM Role을 매핑하는 메커니즘이다.
| 구성 요소 | 역할 |
|---|---|
| OIDC Provider | EKS 클러스터가 “이 서비스 어카운트는 진짜 이 클러스터의 것이다”라는 JWT 토큰을 발행 |
| AWS IAM Trust Policy | “이 OIDC Provider가 발행한 토큰 중, 특정 서비스 어카운트만 신뢰한다”고 설정 |
| AWS STS | JWT를 검증하고, 해당 서비스 어카운트 전용 임시 자격증명을 발급 |
이번 실습에서는 IRSA 덕분에 아래와 같은 addon들이 파드 단위로 세밀한 AWS 권한을 부여받을 수 있다.
- aws-node(VPC CNI): ENI 생성/삭제, IP 할당 등 EC2 네트워크 API 권한
- CoreDNS: 필요 시 Route53 접근 권한
- AWS Load Balancer Controller: ALB/NLB 생성 권한
- ExternalDNS: Route53 레코드 관리 권한
배포
Terraform 배포
실습 코드를 클론하고 변수를 설정한 뒤, Terraform으로 배포한다.
git clone https://github.com/gasida/aews.git
cd aews/2w

export TF_VAR_KeyName=$(aws ec2 describe-key-pairs --query "KeyPairs[].KeyName" --output text)
export TF_VAR_ssh_access_cidr=$(curl -s ipinfo.io/ip)/32
echo $TF_VAR_KeyName $TF_VAR_ssh_access_cidr
my-eks-keypair 121.171.163.127/32
# 배포 (약 12분 소요)
terraform init
terraform plan
nohup sh -c "terraform apply -auto-approve" > create.log 2>&1 &
tail -f create.log
terraform init 출력
Initializing the backend...
Initializing modules...
Downloading registry.terraform.io/terraform-aws-modules/eks/aws 21.15.1 for eks...
- eks in .terraform/modules/eks
- eks.eks_managed_node_group in .terraform/modules/eks/modules/eks-managed-node-group
- eks.eks_managed_node_group.user_data in .terraform/modules/eks/modules/_user_data
- eks.fargate_profile in .terraform/modules/eks/modules/fargate-profile
Downloading registry.terraform.io/terraform-aws-modules/kms/aws 4.0.0 for eks.kms...
- eks.kms in .terraform/modules/eks.kms
- eks.self_managed_node_group in .terraform/modules/eks/modules/self-managed-node-group
- eks.self_managed_node_group.user_data in .terraform/modules/eks/modules/_user_data
Downloading registry.terraform.io/terraform-aws-modules/vpc/aws 6.6.0 for vpc...
- vpc in .terraform/modules/vpc

Initializing provider plugins...
- Finding hashicorp/time versions matching ">= 0.9.0"...
- Finding hashicorp/tls versions matching ">= 4.0.0"...
- Finding hashicorp/cloudinit versions matching ">= 2.0.0"...
- Finding hashicorp/null versions matching ">= 3.0.0"...
- Finding hashicorp/aws versions matching ">= 6.0.0, >= 6.28.0"...
- Installing hashicorp/tls v4.2.1...
- Installed hashicorp/tls v4.2.1 (signed by HashiCorp)
- Installing hashicorp/cloudinit v2.3.7...
- Installed hashicorp/cloudinit v2.3.7 (signed by HashiCorp)
- Installing hashicorp/null v3.2.4...
- Installed hashicorp/null v3.2.4 (signed by HashiCorp)
- Installing hashicorp/aws v6.37.0...
- Installed hashicorp/aws v6.37.0 (signed by HashiCorp)
- Installing hashicorp/time v0.13.1...
- Installed hashicorp/time v0.13.1 (signed by HashiCorp)

Terraform has created a lock file .terraform.lock.hcl to record the provider
selections it made above. Include this file in your version control repository
so that Terraform can guarantee to make the same selections by default when
you run "terraform init" in the future.

Terraform has been successfully initialized!

You may now begin working with Terraform. Try running "terraform plan" to see
any changes that are required for your infrastructure. All Terraform commands
should now work.

If you ever set or change modules or backend configuration for Terraform,
rerun this command to reinitialize your working directory. If you forget, other
commands will detect it and remind you to do so if necessary.
Terraform 전체 코드 (var.tf, vpc.tf, eks.tf, output.tf)
var.tf
variable "KeyName" {
  description = "Name of an existing EC2 KeyPair to enable SSH access to the instances."
  type        = string
}

variable "ssh_access_cidr" {
  description = "Allowed CIDR for SSH access"
  type        = string
}

variable "ClusterBaseName" {
  description = "Base name of the cluster."
  type        = string
  default     = "myeks"
}

variable "KubernetesVersion" {
  description = "Kubernetes version for the EKS cluster."
  type        = string
  default     = "1.34"
}

variable "WorkerNodeInstanceType" {
  description = "EC2 instance type for the worker nodes."
  type        = string
  default     = "t3.medium"
}

variable "WorkerNodeCount" {
  description = "Number of worker nodes."
  type        = number
  default     = 3
}

variable "WorkerNodeVolumesize" {
  description = "Volume size for worker nodes (in GiB)."
  type        = number
  default     = 30
}

variable "TargetRegion" {
  description = "AWS region where the resources will be created."
  type        = string
  default     = "ap-northeast-2"
}

variable "availability_zones" {
  description = "List of availability zones."
  type        = list(string)
  default     = ["ap-northeast-2a", "ap-northeast-2b", "ap-northeast-2c"]
}

variable "VpcBlock" {
  description = "CIDR block for the VPC."
  type        = string
  default     = "192.168.0.0/16"
}

variable "public_subnet_blocks" {
  description = "List of CIDR blocks for the public subnets."
  type        = list(string)
  default     = ["192.168.0.0/22", "192.168.4.0/22", "192.168.8.0/22"]
}

variable "private_subnet_blocks" {
  description = "List of CIDR blocks for the private subnets."
  type        = list(string)
  default     = ["192.168.12.0/22", "192.168.16.0/22", "192.168.20.0/22"]
}
vpc.tf
module "vpc" {
  source  = "terraform-aws-modules/vpc/aws"
  version = "~>6.5"

  name = "${var.ClusterBaseName}-VPC"
  cidr = var.VpcBlock
  azs  = var.availability_zones

  enable_dns_support   = true
  enable_dns_hostnames = true

  public_subnets  = var.public_subnet_blocks
  private_subnets = var.private_subnet_blocks

  enable_nat_gateway     = false
  single_nat_gateway     = true
  one_nat_gateway_per_az = false

  manage_default_network_acl = false
  map_public_ip_on_launch    = true

  igw_tags = { "Name" = "${var.ClusterBaseName}-IGW" }
  nat_gateway_tags = { "Name" = "${var.ClusterBaseName}-NAT" }

  public_subnet_tags = {
    "Name"                   = "${var.ClusterBaseName}-PublicSubnet"
    "kubernetes.io/role/elb" = "1"
  }

  private_subnet_tags = {
    "Name"                            = "${var.ClusterBaseName}-PrivateSubnet"
    "kubernetes.io/role/internal-elb" = "1"
  }

  tags = { "Environment" = "cloudneta-lab" }
}
eks.tf
provider "aws" {
  region = var.TargetRegion
}

resource "aws_security_group" "node_group_sg" {
  name        = "${var.ClusterBaseName}-node-group-sg"
  description = "Security group for EKS Node Group"
  vpc_id      = module.vpc.vpc_id
  tags = { Name = "${var.ClusterBaseName}-node-group-sg" }
}

resource "aws_security_group_rule" "allow_ssh" {
  type              = "ingress"
  from_port         = 0
  to_port           = 0
  protocol          = "-1"
  cidr_blocks       = [var.ssh_access_cidr, var.VpcBlock]
  security_group_id = aws_security_group.node_group_sg.id
}

module "eks" {
  source  = "terraform-aws-modules/eks/aws"
  version = "~> 21.0"

  name              = var.ClusterBaseName
  kubernetes_version = var.KubernetesVersion

  vpc_id     = module.vpc.vpc_id
  subnet_ids = module.vpc.public_subnets

  enable_irsa = true

  endpoint_public_access  = true
  endpoint_private_access = true

  enabled_log_types = []
  enable_cluster_creator_admin_permissions = true

  eks_managed_node_groups = {
    primary = {
      name             = "${var.ClusterBaseName}-1nd-node-group"
      use_name_prefix  = false
      instance_types   = ["${var.WorkerNodeInstanceType}"]
      desired_size     = var.WorkerNodeCount
      max_size         = var.WorkerNodeCount + 2
      min_size         = var.WorkerNodeCount - 1
      disk_size        = var.WorkerNodeVolumesize
      subnets          = module.vpc.public_subnets
      key_name         = "${var.KeyName}"
      vpc_security_group_ids = [aws_security_group.node_group_sg.id]

      labels = { tier = "primary" }

      cloudinit_pre_nodeadm = [
        {
          content_type = "text/x-shellscript"
          content      = <<-EOT
            #!/bin/bash
            dnf update -y
            dnf install -y tree bind-utils tcpdump nvme-cli links sysstat ipset htop
          EOT
        }
      ]
    }
  }

  addons = {
    coredns    = { most_recent = true }
    kube-proxy = { most_recent = true }
    vpc-cni = {
      most_recent    = true
      before_compute = true
      configuration_values = jsonencode({
        env = {
          WARM_ENI_TARGET = "1"
        }
      })
    }
  }

  tags = {
    Environment = "cloudneta-lab"
    Terraform   = "true"
  }
}
output.tf
output "configure_kubectl" {
  description = "Configure kubectl: run this command to update your kubeconfig"
  value       = "aws eks --region ${var.TargetRegion} update-kubeconfig --name ${var.ClusterBaseName}"
}
배포가 완료되면 Outputs: 섹션에 configure_kubectl 값이 출력된다. 이것은 output.tf에서 정의한 출력 변수로, kubeconfig 업데이트에 필요한 AWS CLI 명령을 알려 준다.
Apply complete! Resources: 15 added, 0 changed, 0 destroyed.

Outputs:

configure_kubectl = "aws eks --region ap-northeast-2 update-kubeconfig --name myeks"
kubeconfig 설정
배포 시 출력된 terraform output의 configure_kubectl 값을 활용하여 kubeconfig를 설정한다. 주의할 점은 configure_kubectl이 Terraform 출력 변수명이지, 셸 명령이 아니라는 것이다. 직접 치면 command not found 에러가 발생한다.
configure_kubectl = "aws eks --region ap-northeast-2 update-kubeconfig --name myeks"
zsh: command not found: configure_kubectl
terraform output 명령으로 값을 추출해서 실행해야 한다.
terraform output -raw configure_kubectl
aws eks --region ap-northeast-2 update-kubeconfig --name myeks
추출한 명령을 실행하여 kubeconfig를 업데이트한다.
aws eks --region ap-northeast-2 update-kubeconfig --name myeks
context 이름이 ARN 형식이라 길고 불편하다. 짧은 이름으로 변경해 두면 편하다.
kubectl config rename-context \
  $(cat ~/.kube/config | grep current-context | awk '{print $2}') \
  myeks
Context "arn:aws:eks:ap-northeast-2:988608581192:cluster/myeks" renamed to "myeks".
kubectl config current-context
myeks
kubens default
kubeconfig 전체 내용
apiVersion: v1
clusters:
- cluster:
    certificate-authority-data: DATA+OMITTED
    server: https://BC5D9DD98C53D848472F89889BAAB6F1.yl4.ap-northeast-2.eks.amazonaws.com
  name: arn:aws:eks:ap-northeast-2:988608581192:cluster/myeks
contexts:
- context:
    cluster: arn:aws:eks:ap-northeast-2:988608581192:cluster/myeks
    namespace: default
    user: arn:aws:eks:ap-northeast-2:988608581192:cluster/myeks
  name: myeks
current-context: myeks
kind: Config
users:
- name: arn:aws:eks:ap-northeast-2:988608581192:cluster/myeks
  user:
    exec:
      apiVersion: client.authentication.k8s.io/v1beta1
      args:
      - --region
      - ap-northeast-2
      - eks
      - get-token
      - --cluster-name
      - myeks
      - --output
      - json
      command: aws
      env: null
      interactiveMode: IfAvailable
      provideClusterInfo: false
기본 정보 확인
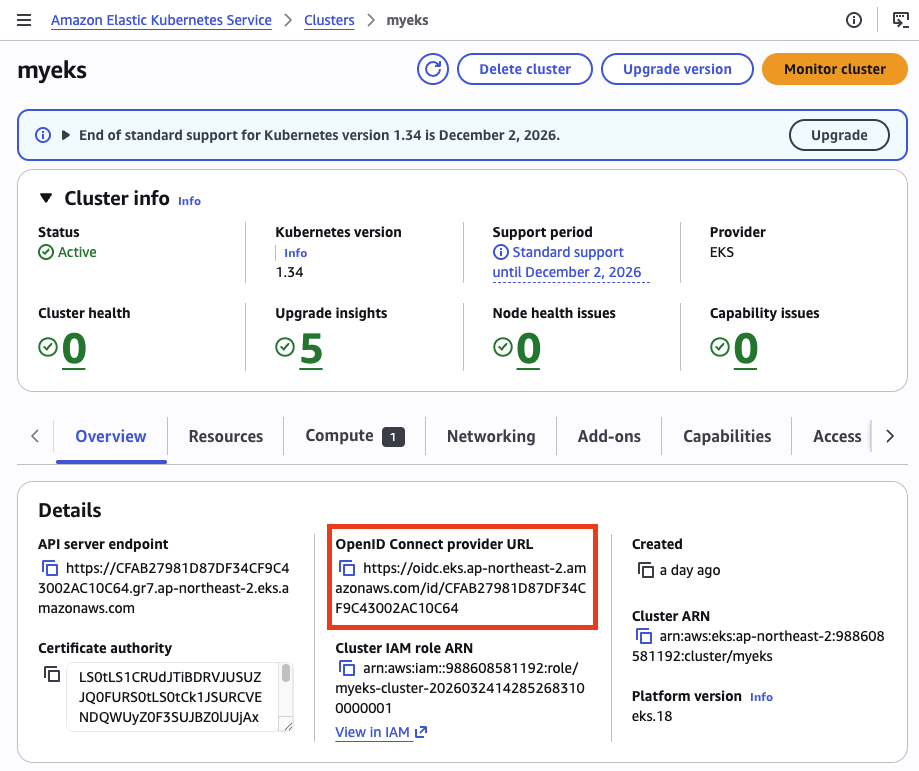
EKS 관리 콘솔
Overview
API server endpoint와 OpenID Connect provider URL을 확인할 수 있다. OIDC Provider URL이 표시된다는 것은, 앞서 enable_irsa = true로 설정한 OIDC Provider가 정상적으로 생성되었다는 의미다. 이 URL이 있어야 IRSA를 통한 파드 단위 IAM 권한 부여가 가능하다.
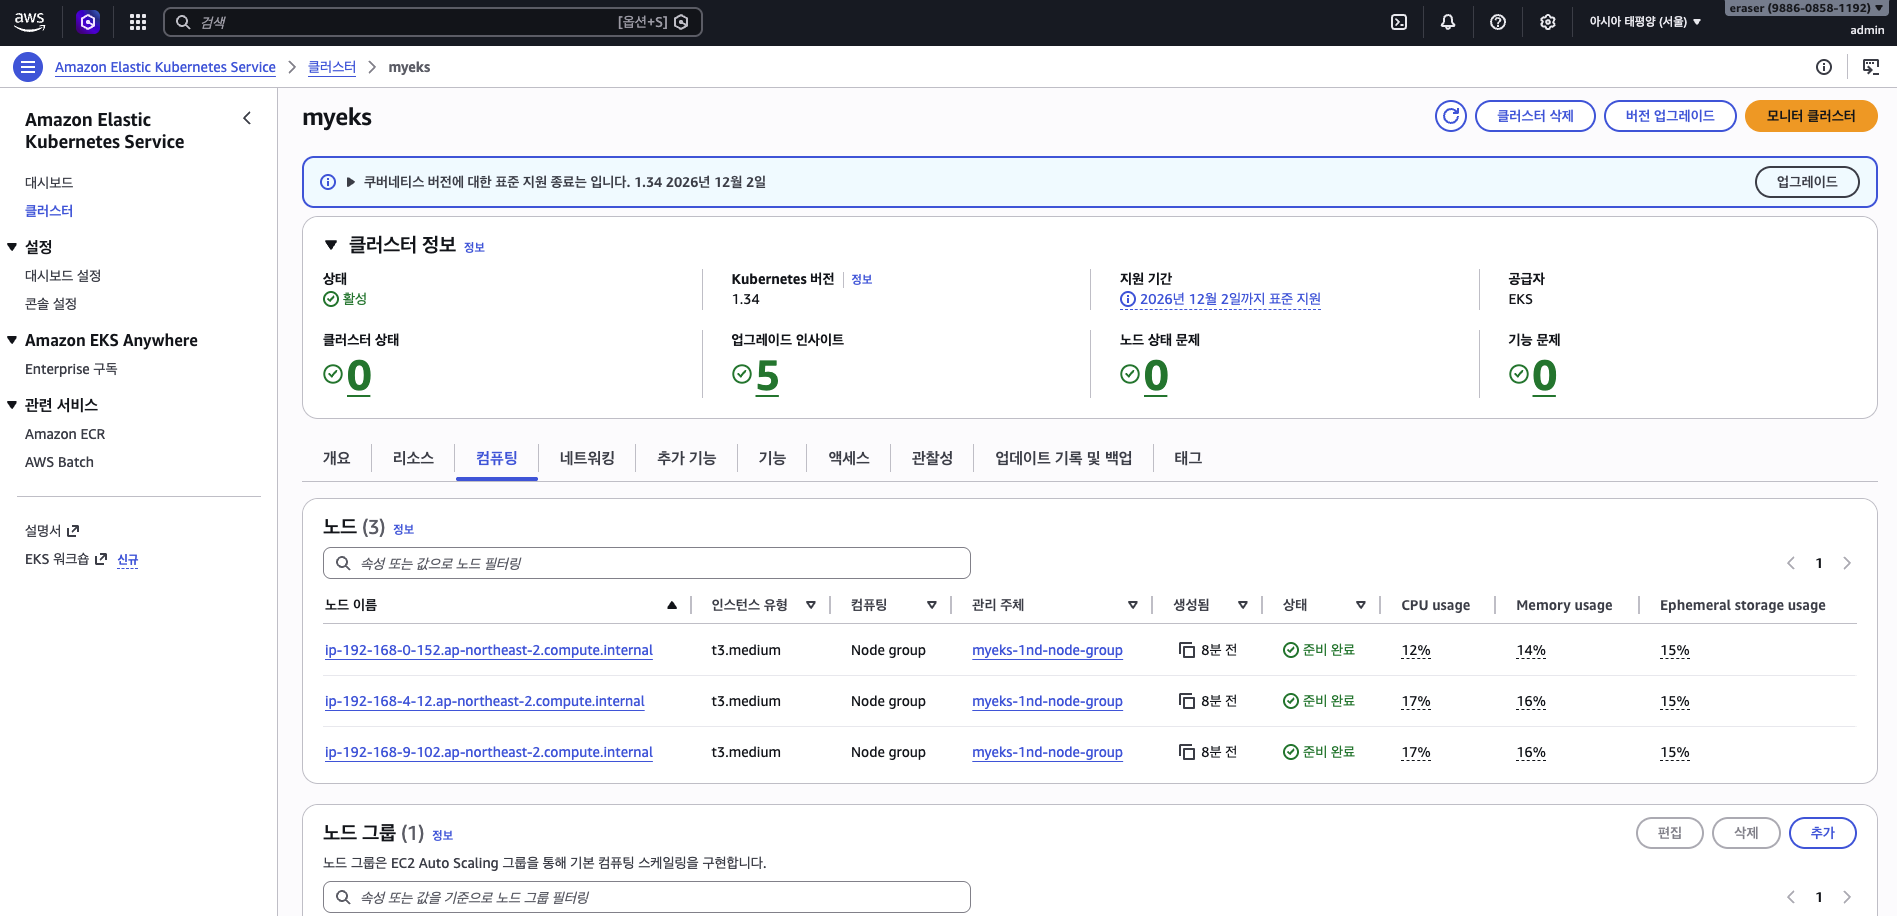
Compute
Compute 탭에서 3개 노드가 각각 다른 가용 영역에 t3.medium 타입으로 동작하고 있는 것을 확인할 수 있다.
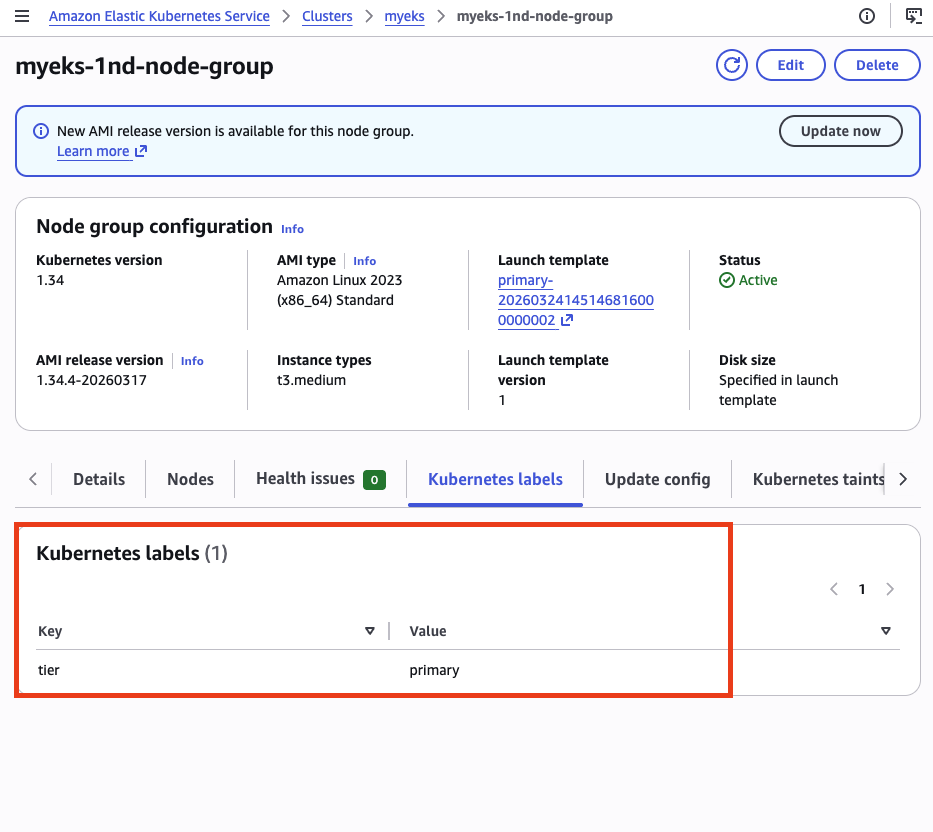
Node groups를 클릭하면 상세 정보를 확인할 수 있다. Terraform에서 설정한 tier = primary 레이블이 노드 그룹에 적용되어 있다. 이후 2번째 관리형 노드 그룹을 추가 배포할 때 라벨로 구분하기 위한 준비다.
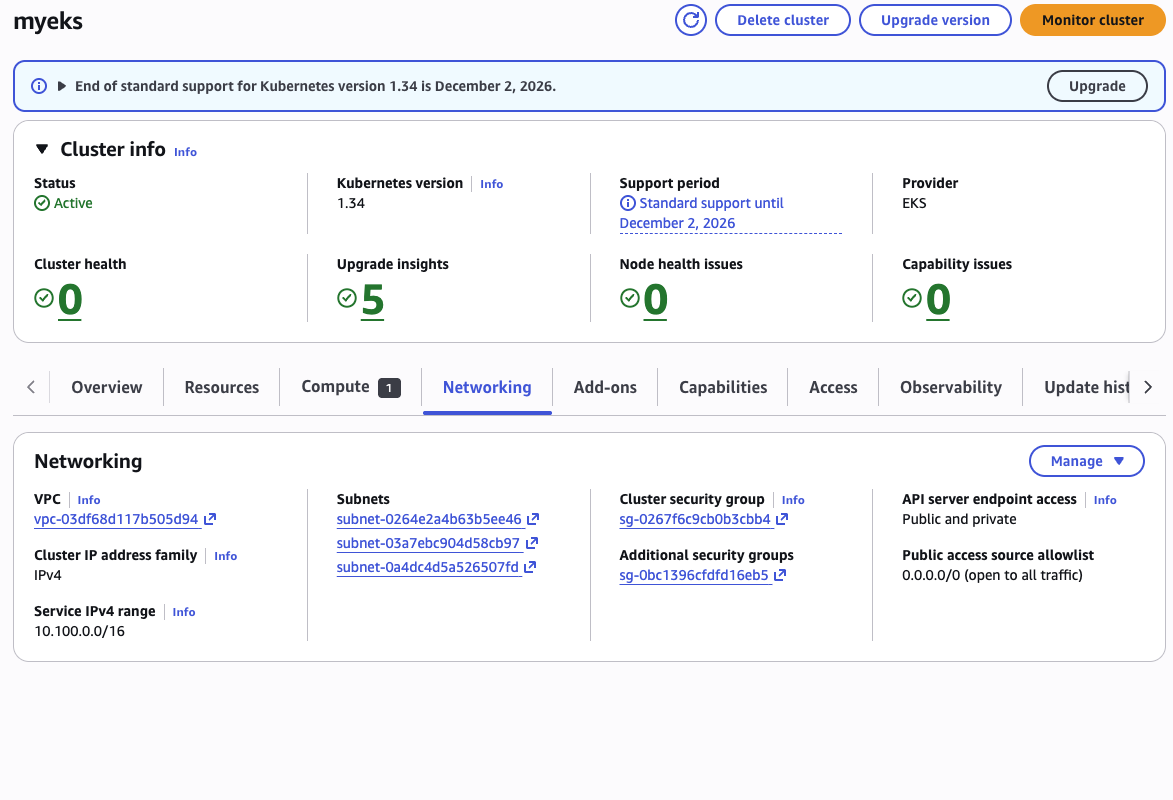
Networking
서비스 IPv4 범위(10.100.0.0/16), 서브넷 목록, 클러스터 엔드포인트 접근 설정(public and private)을 확인할 수 있다.
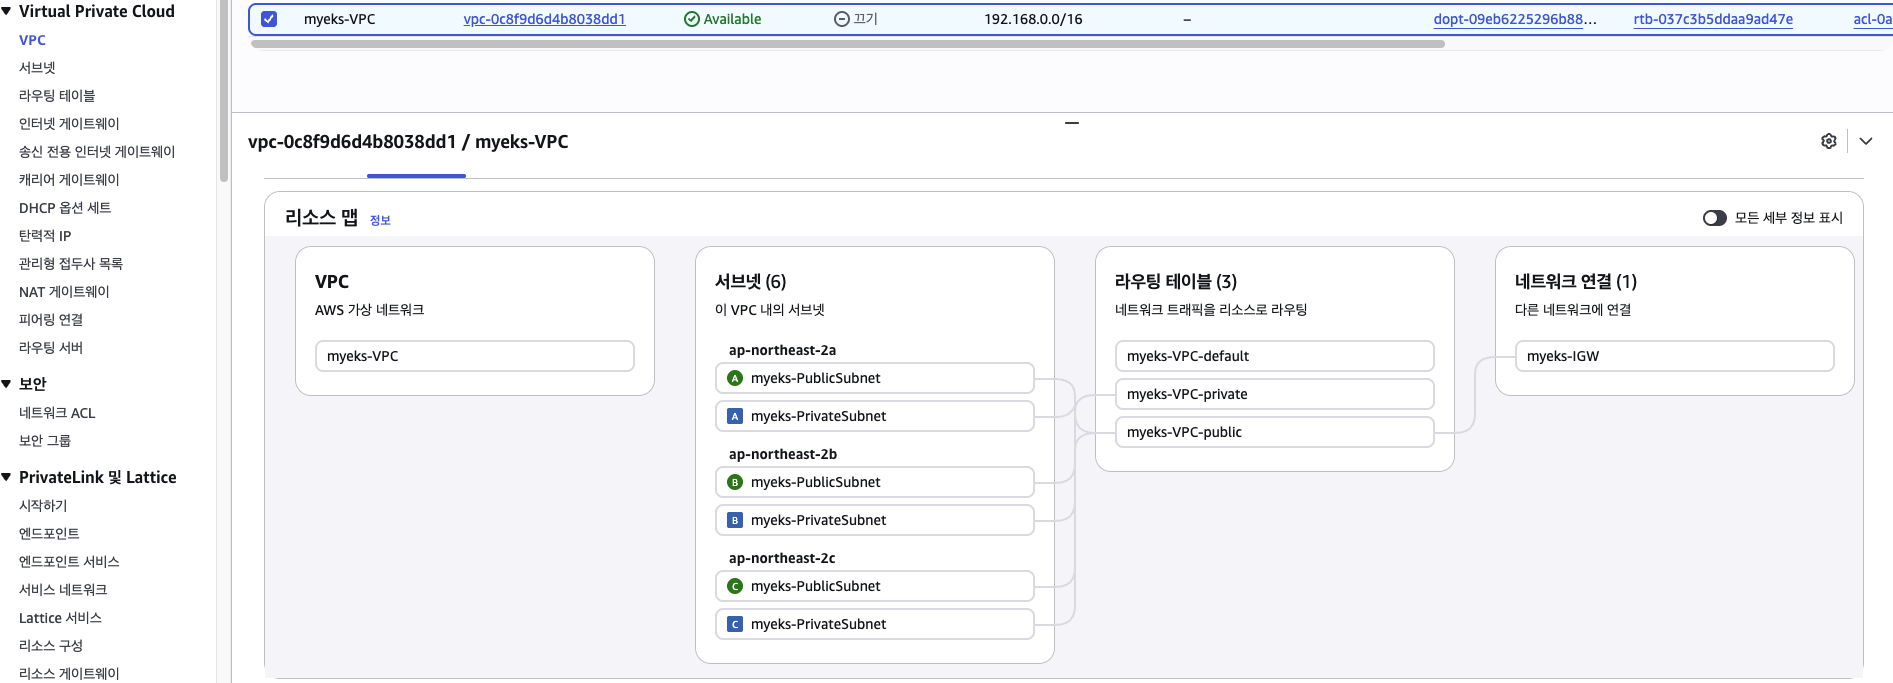
VPC 콘솔의 리소스 맵에서 전체 네트워크 구성을 한눈에 확인할 수 있다. 3개 AZ에 퍼블릭/프라이빗 서브넷이 각각 배포되어 있고, IGW가 연결되어 있다.
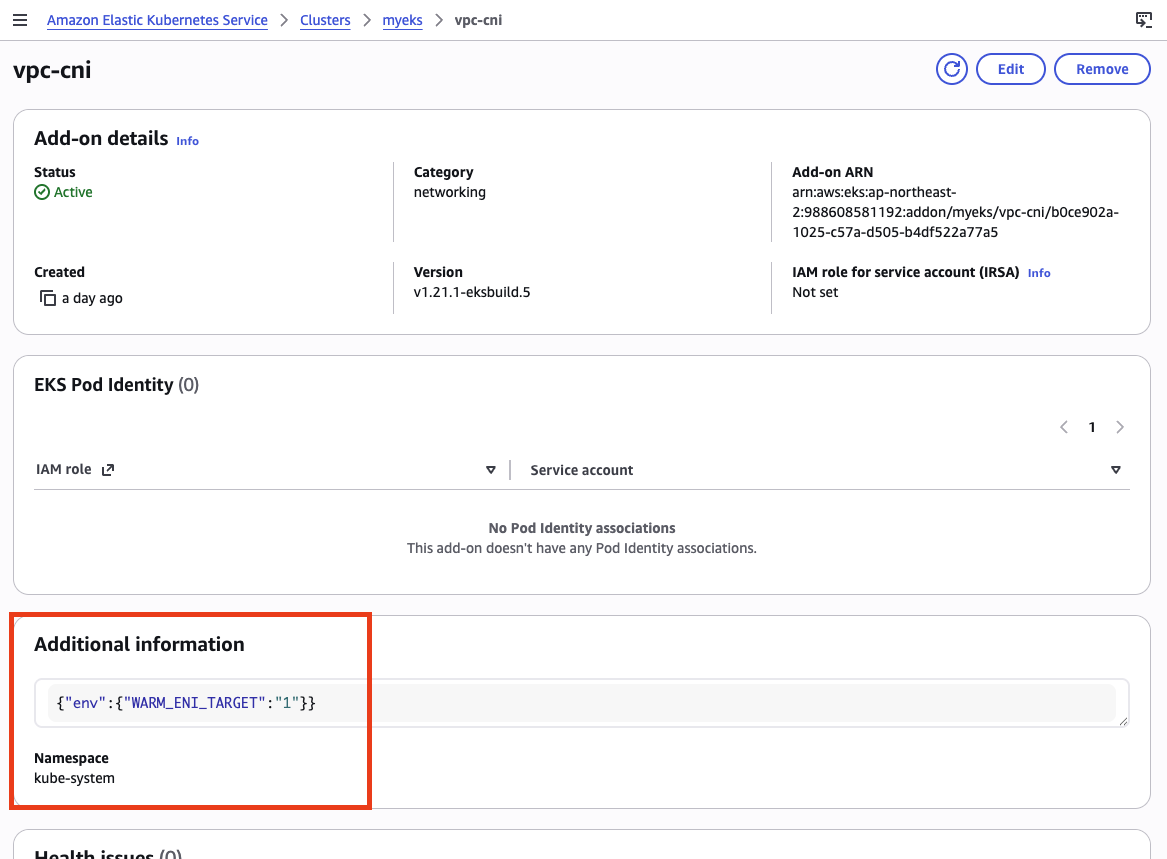
Add-ons
VPC CNI addon을 클릭하면 설정된 configuration values를 확인할 수 있다. Terraform에서 지정한 WARM_ENI_TARGET 설정이 반영되어 있다. WARM_ENI_TARGET=1은 현재 사용 중인 ENI 외에 여유 ENI 1개를 항상 미리 붙여 두라는 의미다. 이 ENI에는 Secondary IP까지 미리 할당되어 있어, 새 파드가 스케줄링되면 즉시 IP를 부여받을 수 있다. 이후 실습에서 이 값을 변경하거나 WARM_IP_TARGET, MINIMUM_IP_TARGET, ENABLE_PREFIX_DELEGATION 등으로 전환하며 IP 할당 동작의 차이를 직접 비교하게 된다.
kubectl 확인
kubectl cluster-info
Kubernetes control plane is running at https://CFAB27981D87DF34CF9C43002AC10C64.gr7.ap-northeast-2.eks.amazonaws.com
CoreDNS is running at https://CFAB27981D87DF34CF9C43002AC10C64.gr7.ap-northeast-2.eks.amazonaws.com/api/v1/namespaces/kube-system/services/kube-dns:dns/proxy
kubectl get node --label-columns=node.kubernetes.io/instance-type,eks.amazonaws.com/capacityType,topology.kubernetes.io/zone
NAME                                               STATUS   ROLES    AGE   VERSION               INSTANCE-TYPE   CAPACITYTYPE   ZONE
ip-192-168-0-216.ap-northeast-2.compute.internal   Ready    <none>   23h   v1.34.4-eks-f69f56f   t3.medium       ON_DEMAND      ap-northeast-2a
ip-192-168-7-38.ap-northeast-2.compute.internal    Ready    <none>   23h   v1.34.4-eks-f69f56f   t3.medium       ON_DEMAND      ap-northeast-2b
ip-192-168-9-174.ap-northeast-2.compute.internal   Ready    <none>   23h   v1.34.4-eks-f69f56f   t3.medium       ON_DEMAND      ap-northeast-2c
3개 노드가 각각 다른 가용 영역(AZ)에 하나씩 배포되어 있다.
kubectl get nodes -L=tier
NAME                                               STATUS   ROLES    AGE   VERSION               TIER
ip-192-168-0-216.ap-northeast-2.compute.internal   Ready    <none>   22h   v1.34.4-eks-f69f56f   primary
ip-192-168-7-38.ap-northeast-2.compute.internal    Ready    <none>   22h   v1.34.4-eks-f69f56f   primary
ip-192-168-9-174.ap-northeast-2.compute.internal   Ready    <none>   22h   v1.34.4-eks-f69f56f   primary
모든 노드에 tier=primary 라벨이 붙어 있다. Terraform의 노드 그룹 설정에서 지정한 라벨이 정상 적용된 것이다.
kubectl get node -v=6 출력
kubectl get node -v=6
I0325 23:17:26.462115   38921 loader.go:405] Config loaded from file:  /Users/eraser/.kube/config
I0325 23:17:26.462345   38921 envvar.go:172] "Feature gate default state" feature="ClientsPreferCBOR" enabled=false
I0325 23:17:26.462352   38921 envvar.go:172] "Feature gate default state" feature="InOrderInformers" enabled=true
I0325 23:17:26.462355   38921 envvar.go:172] "Feature gate default state" feature="InOrderInformersBatchProcess" enabled=true
I0325 23:17:26.462357   38921 envvar.go:172] "Feature gate default state" feature="InformerResourceVersion" enabled=true
I0325 23:17:26.462358   38921 envvar.go:172] "Feature gate default state" feature="WatchListClient" enabled=true
I0325 23:17:26.462360   38921 envvar.go:172] "Feature gate default state" feature="ClientsAllowCBOR" enabled=false
I0325 23:17:27.024329   38921 round_trippers.go:632] "Response" verb="GET" url="https://CFAB27981D87DF34CF9C43002AC10C64.gr7.ap-northeast-2.eks.amazonaws.com/api/v1/nodes?limit=500" status="200 OK" milliseconds=558
NAME                                               STATUS   ROLES    AGE   VERSION
ip-192-168-0-216.ap-northeast-2.compute.internal   Ready    <none>   23h   v1.34.4-eks-f69f56f
ip-192-168-7-38.ap-northeast-2.compute.internal    Ready    <none>   23h   v1.34.4-eks-f69f56f
ip-192-168-9-174.ap-northeast-2.compute.internal   Ready    <none>   23h   v1.34.4-eks-f69f56f
kubectl get node --show-labels 전체 출력
kubectl get node --show-labels
NAME                                               STATUS   ROLES    AGE   VERSION               LABELS
ip-192-168-0-216.ap-northeast-2.compute.internal   Ready    <none>   23h   v1.34.4-eks-f69f56f   beta.kubernetes.io/arch=amd64,beta.kubernetes.io/instance-type=t3.medium,beta.kubernetes.io/os=linux,eks.amazonaws.com/capacityType=ON_DEMAND,eks.amazonaws.com/nodegroup-image=ami-0041be04b53631868,eks.amazonaws.com/nodegroup=myeks-1nd-node-group,eks.amazonaws.com/sourceLaunchTemplateId=lt-020ba32d69dc74a74,eks.amazonaws.com/sourceLaunchTemplateVersion=1,failure-domain.beta.kubernetes.io/region=ap-northeast-2,failure-domain.beta.kubernetes.io/zone=ap-northeast-2a,k8s.io/cloud-provider-aws=5553ae84a0d29114870f67bbabd07d44,kubernetes.io/arch=amd64,kubernetes.io/hostname=ip-192-168-0-216.ap-northeast-2.compute.internal,kubernetes.io/os=linux,node.kubernetes.io/instance-type=t3.medium,tier=primary,topology.k8s.aws/zone-id=apne2-az1,topology.kubernetes.io/region=ap-northeast-2,topology.kubernetes.io/zone=ap-northeast-2a
ip-192-168-7-38.ap-northeast-2.compute.internal    Ready    <none>   23h   v1.34.4-eks-f69f56f   beta.kubernetes.io/arch=amd64,beta.kubernetes.io/instance-type=t3.medium,beta.kubernetes.io/os=linux,eks.amazonaws.com/capacityType=ON_DEMAND,eks.amazonaws.com/nodegroup-image=ami-0041be04b53631868,eks.amazonaws.com/nodegroup=myeks-1nd-node-group,eks.amazonaws.com/sourceLaunchTemplateId=lt-020ba32d69dc74a74,eks.amazonaws.com/sourceLaunchTemplateVersion=1,failure-domain.beta.kubernetes.io/region=ap-northeast-2,failure-domain.beta.kubernetes.io/zone=ap-northeast-2b,k8s.io/cloud-provider-aws=5553ae84a0d29114870f67bbabd07d44,kubernetes.io/arch=amd64,kubernetes.io/hostname=ip-192-168-7-38.ap-northeast-2.compute.internal,kubernetes.io/os=linux,node.kubernetes.io/instance-type=t3.medium,tier=primary,topology.k8s.aws/zone-id=apne2-az2,topology.kubernetes.io/region=ap-northeast-2,topology.kubernetes.io/zone=ap-northeast-2b
ip-192-168-9-174.ap-northeast-2.compute.internal   Ready    <none>   23h   v1.34.4-eks-f69f56f   beta.kubernetes.io/arch=amd64,beta.kubernetes.io/instance-type=t3.medium,beta.kubernetes.io/os=linux,eks.amazonaws.com/capacityType=ON_DEMAND,eks.amazonaws.com/nodegroup-image=ami-0041be04b53631868,eks.amazonaws.com/nodegroup=myeks-1nd-node-group,eks.amazonaws.com/sourceLaunchTemplateId=lt-020ba32d69dc74a74,eks.amazonaws.com/sourceLaunchTemplateVersion=1,failure-domain.beta.kubernetes.io/region=ap-northeast-2,failure-domain.beta.kubernetes.io/zone=ap-northeast-2c,k8s.io/cloud-provider-aws=5553ae84a0d29114870f67bbabd07d44,kubernetes.io/arch=amd64,kubernetes.io/hostname=ip-192-168-9-174.ap-northeast-2.compute.internal,kubernetes.io/os=linux,node.kubernetes.io/instance-type=t3.medium,tier=primary,topology.k8s.aws/zone-id=apne2-az3,topology.kubernetes.io/region=ap-northeast-2,topology.kubernetes.io/zone=ap-northeast-2c
kubectl get pod -A
NAMESPACE     NAME                      READY   STATUS    RESTARTS   AGE
kube-system   aws-node-mgwdh            2/2     Running   0          23h
kube-system   aws-node-nczbm            2/2     Running   0          23h
kube-system   aws-node-xtphq            2/2     Running   0          23h
kube-system   coredns-d487b6fcb-hz52x   1/1     Running   0          23h
kube-system   coredns-d487b6fcb-kmj4x   1/1     Running   0          23h
kube-system   kube-proxy-8pqgv          1/1     Running   0          23h
kube-system   kube-proxy-f2c4w          1/1     Running   0          23h
kube-system   kube-proxy-p4gqv          1/1     Running   0          23h
aws-node(VPC CNI), coredns, kube-proxy가 각각 데몬셋/디플로이먼트로 동작하고 있다. aws-node은 2/2인데, VPC CNI 컨테이너와 aws-network-policy-agent 컨테이너가 함께 실행되기 때문이다.
kubectl get pdb -n kube-system
NAME      MIN AVAILABLE   MAX UNAVAILABLE   ALLOWED DISRUPTIONS   AGE
coredns   N/A             1                 1                     23h
eksctl get addon --cluster myeks
NAME            VERSION                 STATUS  ISSUES  IAMROLE UPDATE AVAILABLE        CONFIGURATION VALUES            NAMESPACE
coredns         v1.13.2-eksbuild.3      ACTIVE  0                                                                       kube-system
kube-proxy      v1.34.5-eksbuild.2      ACTIVE  0                                                                       kube-system
vpc-cni         v1.21.1-eksbuild.5      ACTIVE  0                                       {"env":{"WARM_ENI_TARGET":"1"}} kube-system
vpc-cni addon의 CONFIGURATION VALUES 컬럼에서 WARM_ENI_TARGET 설정이 반영된 것을 확인할 수 있다. 이 설정이 실제로 EC2 인스턴스에 어떤 영향을 미치는지는 아래 워커 노드 상세에서 확인한다.
aws eks describe-nodegroup 전체 출력
{
  "nodegroup": {
    "nodegroupName": "myeks-1nd-node-group",
    "nodegroupArn": "arn:aws:eks:ap-northeast-2:988608581192:nodegroup/myeks/myeks-1nd-node-group/24ce902a-549c-7e49-dfdd-3b6128f30175",
    "clusterName": "myeks",
    "version": "1.34",
    "releaseVersion": "1.34.4-20260317",
    "createdAt": "2026-03-24T23:51:55.574000+09:00",
    "modifiedAt": "2026-03-25T23:12:13.917000+09:00",
    "status": "ACTIVE",
    "capacityType": "ON_DEMAND",
    "scalingConfig": {
      "minSize": 2,
      "maxSize": 5,
      "desiredSize": 3
    },
    "instanceTypes": [
      "t3.medium"
    ],
    "subnets": [
      "subnet-0264e2a4b63b5ee46",
      "subnet-03a7ebc904d58cb97",
      "subnet-0a4dc4d5a526507fd"
    ],
    "amiType": "AL2023_x86_64_STANDARD",
    "nodeRole": "arn:aws:iam::988608581192:role/myeks-1nd-node-group-eks-node-group-20260324142907655200000006",
    "labels": {
      "tier": "primary"
    },
    "resources": {
      "autoScalingGroups": [
        {
          "name": "eks-myeks-1nd-node-group-24ce902a-549c-7e49-dfdd-3b6128f30175"
        }
      ]
    },
    "health": {
      "issues": []
    },
    "updateConfig": {
      "maxUnavailablePercentage": 33
    },
    "launchTemplate": {
      "name": "primary-20260324145146816000000002",
      "version": "1",
      "id": "lt-020ba32d69dc74a74"
    },
    "tags": {
      "Terraform": "true",
      "Environment": "cloudneta-lab",
      "Name": "myeks-1nd-node-group"
    }
  }
}
워커 노드 IAM 역할
EC2 콘솔에서 워커 노드를 확인하면, 3개 노드가 각각 다른 AZ에 t3.medium 타입으로 동작하고 있다.
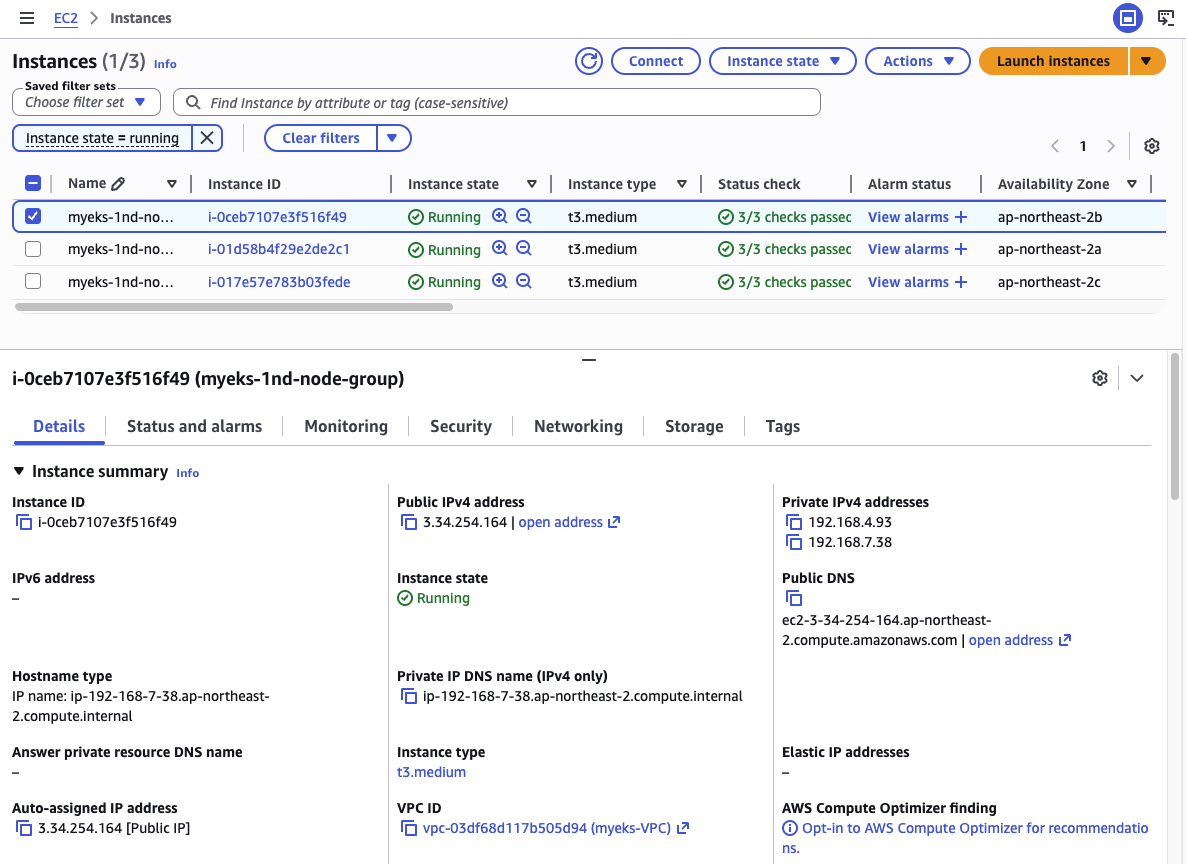
인스턴스 상세에서 프라이빗 IPv4 주소를 확인하면, 노드 자체의 Primary IP 외에 추가 IP가 보인다. 이것이 WARM_ENI_TARGET=1 설정에 의해 VPC CNI가 미리 확보해 둔 Warm Pool이다. 아직 파드에 할당되지 않았지만, ENI에 Secondary IP가 미리 할당되어 새 파드가 생성되면 즉시 IP를 부여할 수 있는 상태다.
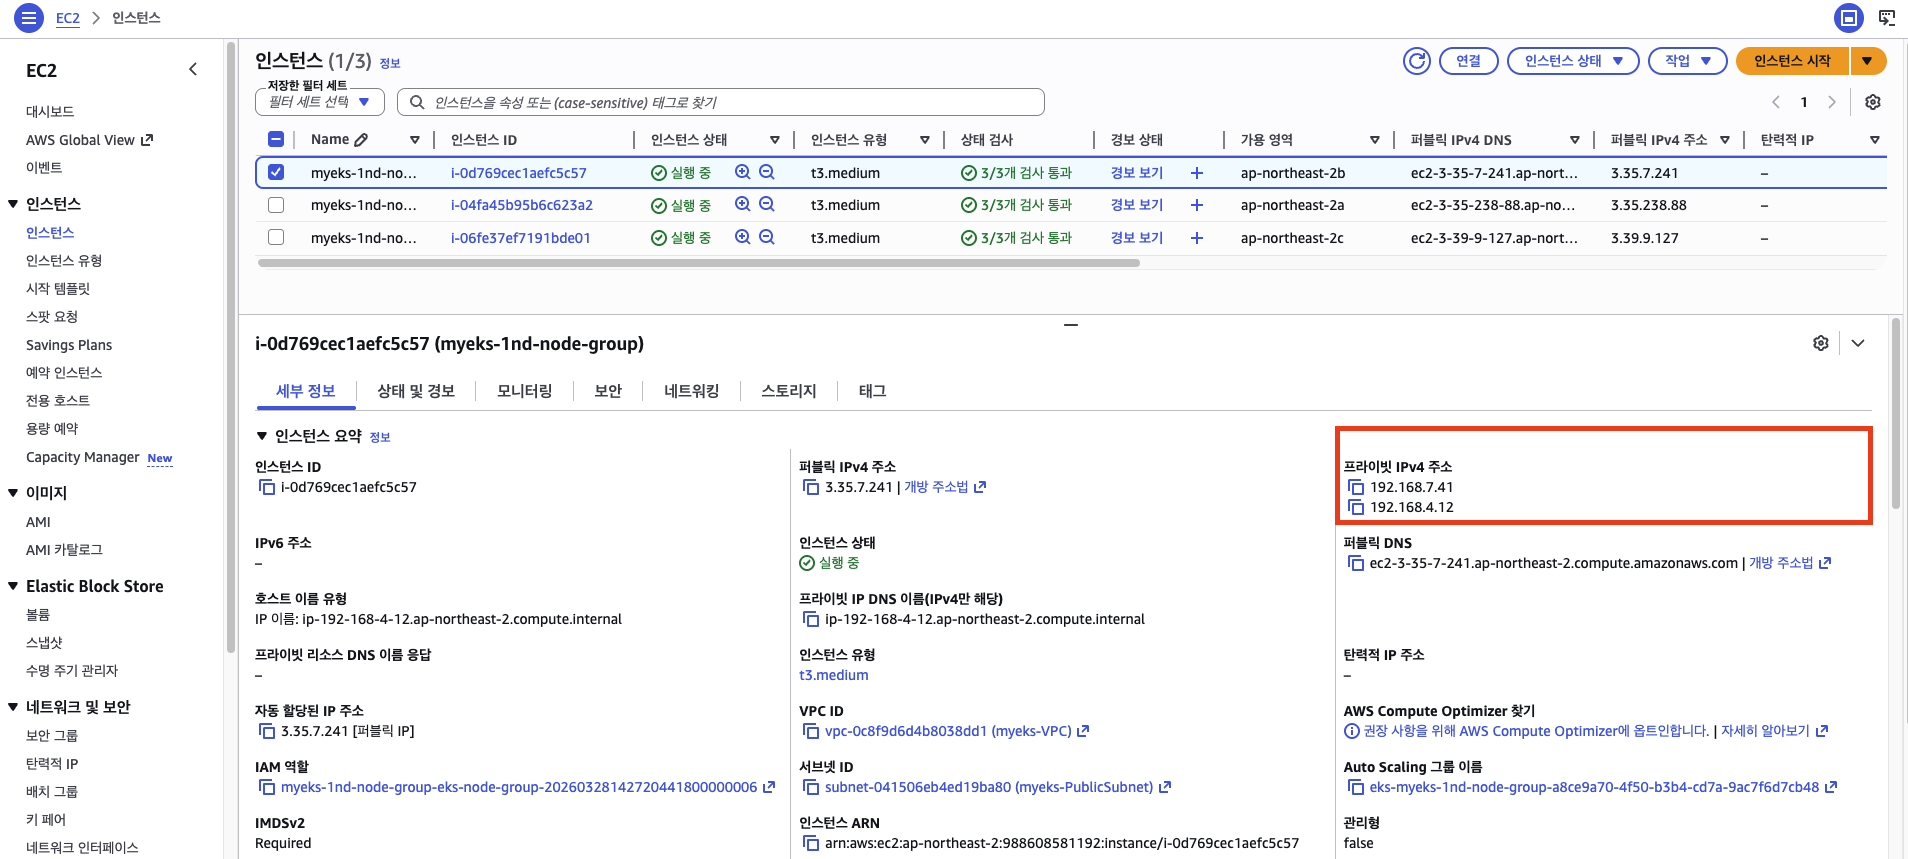
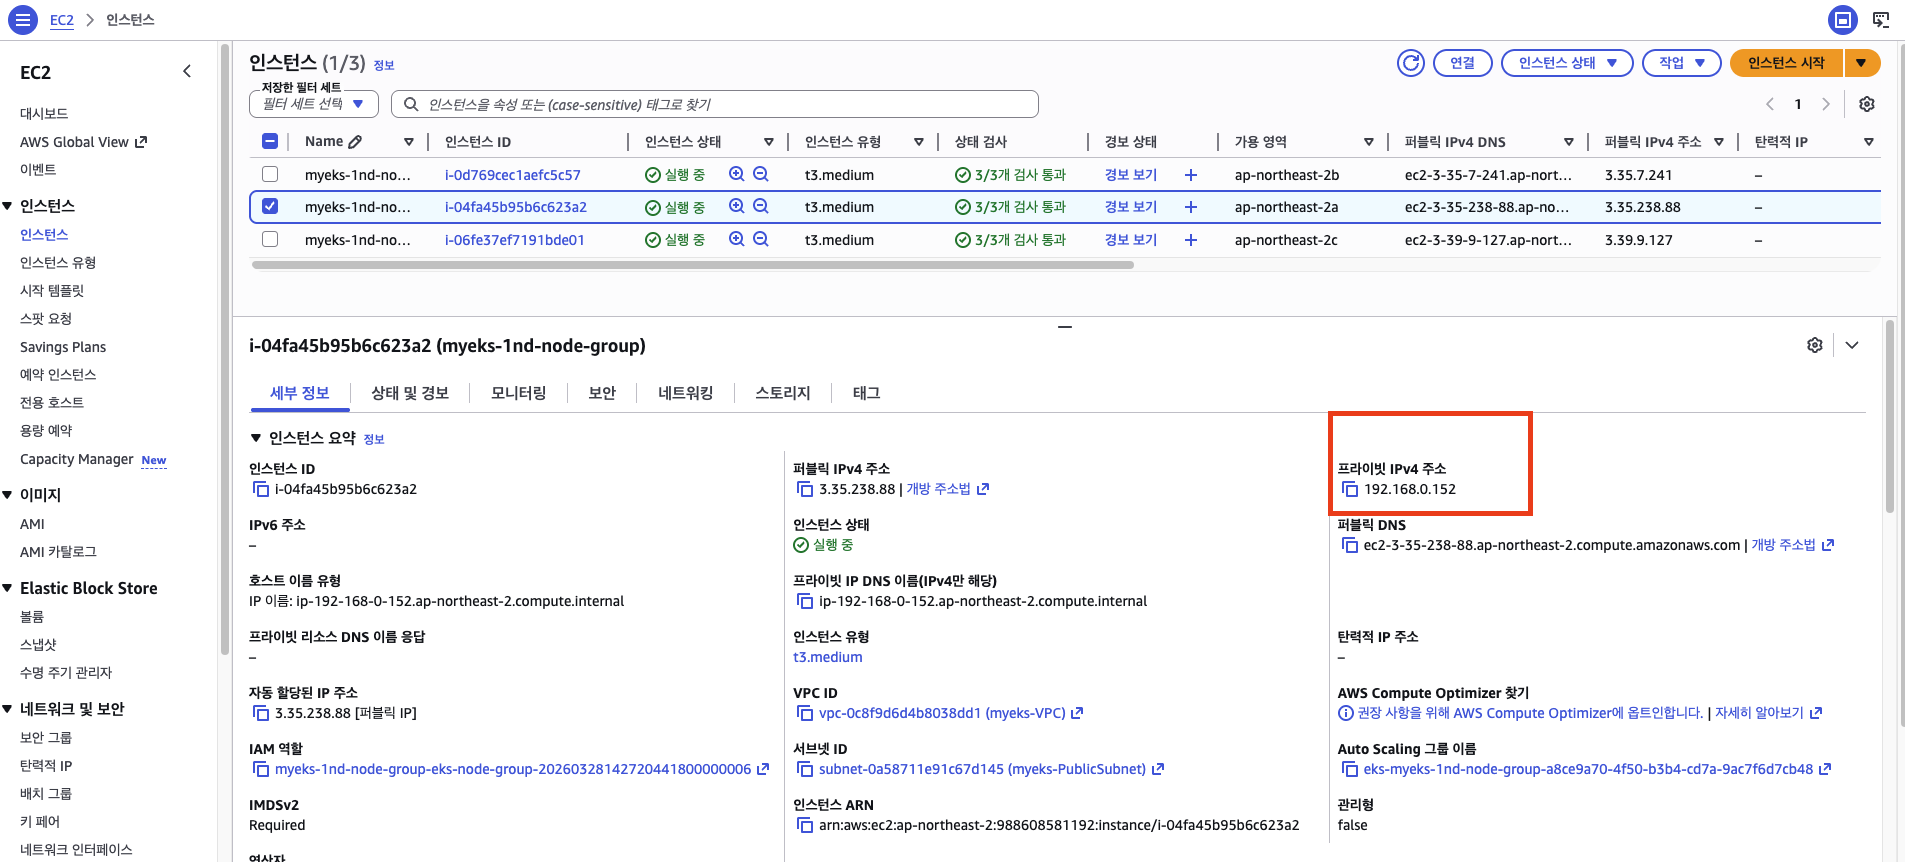
이후 실습에서 파드를 대량 생성하면 이 Warm Pool의 IP가 소진되고, VPC CNI가 새 ENI를 추가로 붙이는 과정을 직접 관찰할 수 있다.
워커 노드의 IAM 역할을 확인하면, AmazonEKS_CNI_Policy가 연결되어 있다.
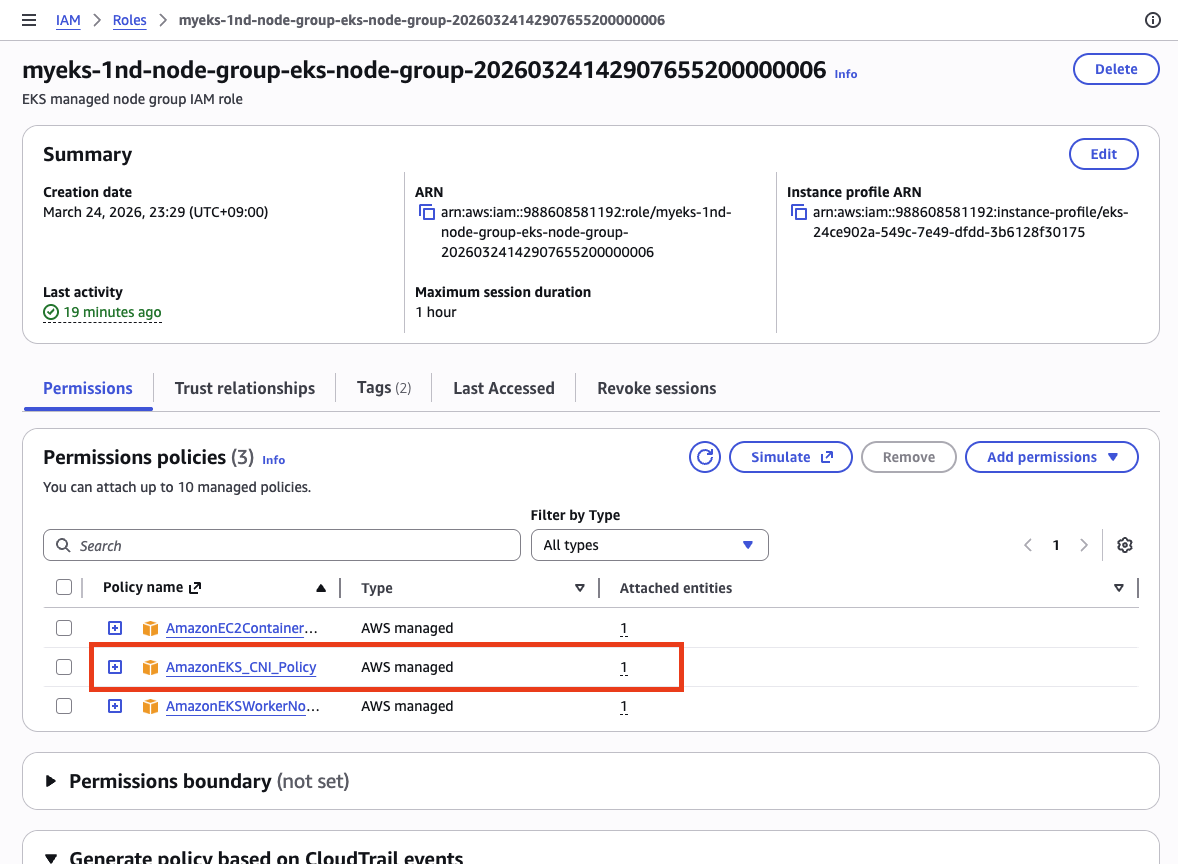
이 정책에는 AssignPrivateIpAddresses, AttachNetworkInterface, CreateNetworkInterface, DeleteNetworkInterface 등 EC2 네트워크 API 권한이 포함되어 있다.
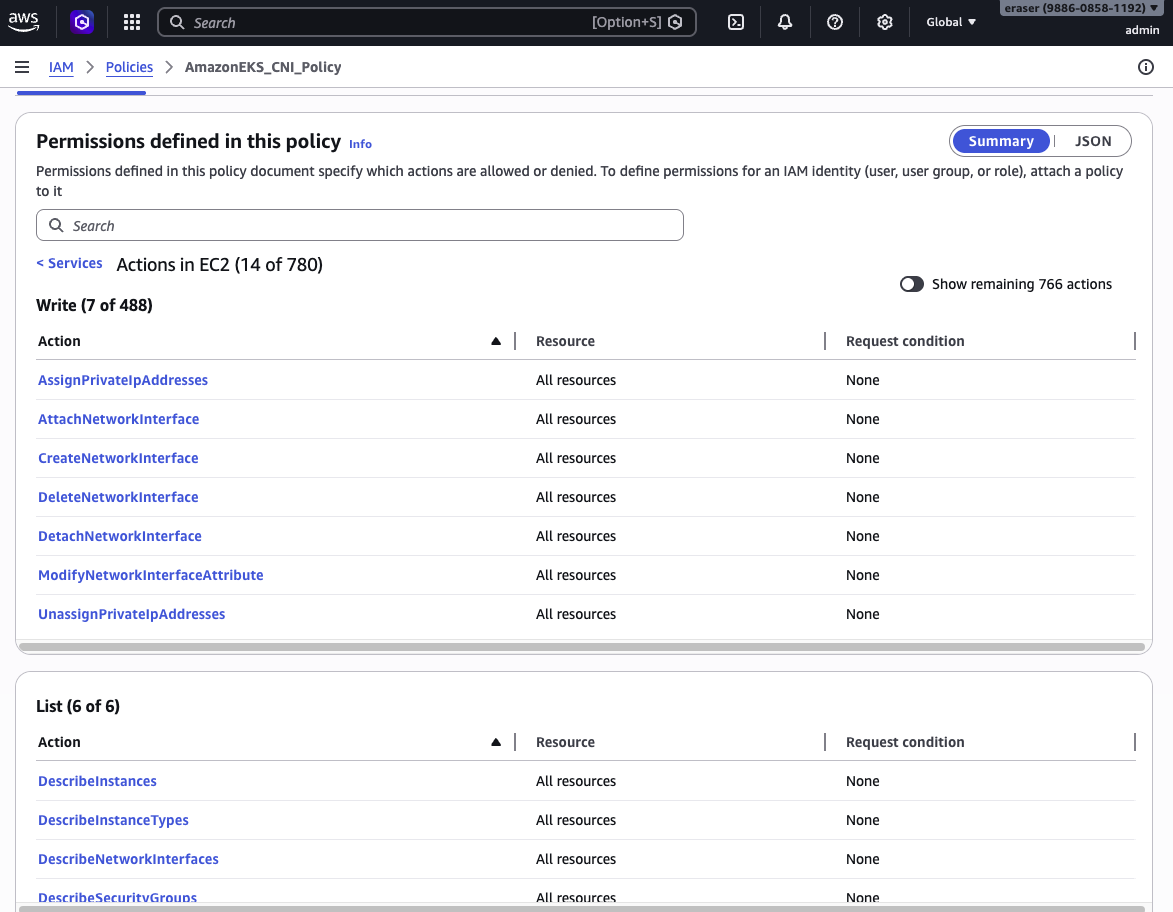
이것이 바로 이번 주차의 핵심 주제인 AWS VPC CNI가 동작하기 위해 필요한 권한이다. aws-node(VPC CNI) 데몬셋이 이 권한으로 ENI를 생성/삭제하고, Secondary IP를 할당/해제한다.
현재는 이 권한이 노드 IAM Role에 직접 붙어 있다. 앞서 IRSA를 설명할 때 언급한 것처럼, 이 구조에서는 같은 노드의 모든 파드가 동일한 권한에 접근할 수 있다. IRSA를 적용하면 aws-node 서비스 어카운트에만 이 권한을 부여하고 노드 Role에서는 제거할 수 있지만, 이번 실습에서는 기본 구성 그대로 진행한다.
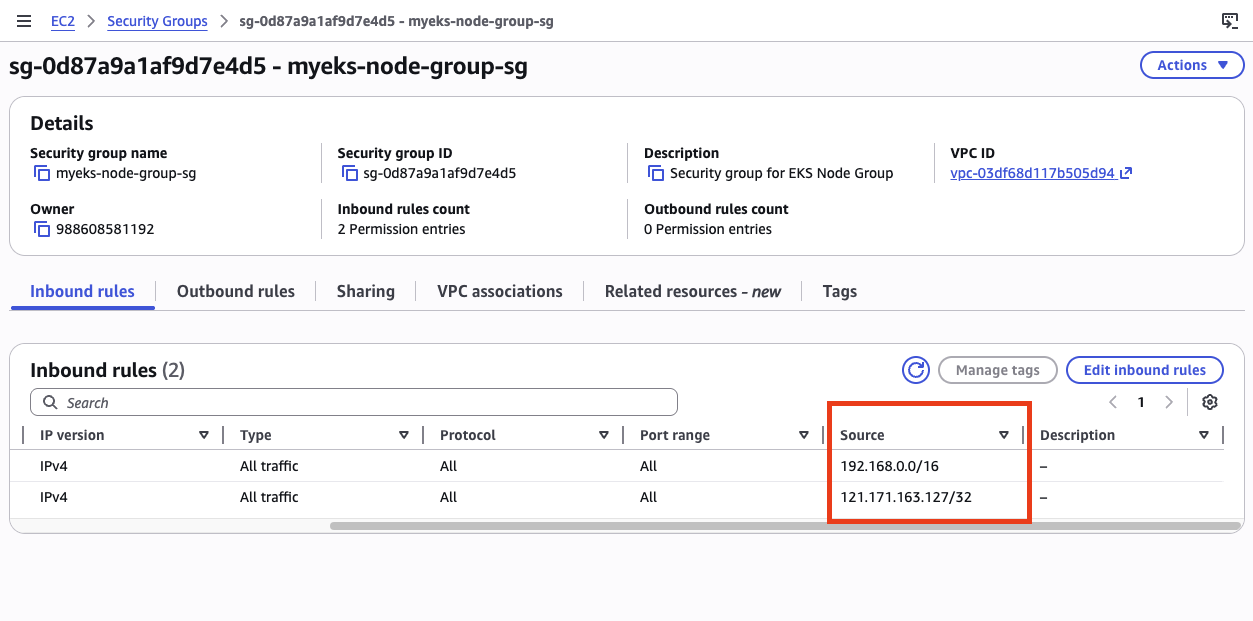
보안 그룹
EC2 콘솔에서 워커 노드의 보안 그룹을 확인하면, 192.168.0.0/16(VPC CIDR 전체)에서 모든 트래픽을 허용하는 인바운드 규칙이 있다. Terraform의 aws_security_group_rule 리소스에서 설정한 것으로, VPC 내부 통신이 제한 없이 가능하도록 한 것이다.
정리
| 항목 | 1주차 | 2주차 |
|---|---|---|
| 서브넷 CIDR | /24 (251 IP) | /22 (1,019 IP) |
| VPC CNI 설정 | 기본값 | WARM_ENI_TARGET=1 명시 |
| IRSA | 기본값(암묵적 true) |
enable_irsa = true 명시 |
| Terraform output | 없음 | configure_kubectl 추가 |
VPC CNI 실습에서는 많은 파드를 생성하고, 다양한 IP 할당 모드를 테스트해야 한다. 서브넷 확대와 CNI 설정 옵션 추가는 이를 위한 준비다. IRSA 활성화는 보안 모범 사례를 따르는 첫 단계로, 이후 AWS Load Balancer Controller 등을 배포할 때 직접 활용하게 된다.


댓글남기기