
[Kubernetes] Cluster: Kubespray를 이용해 클러스터 구성하기 - 5.1. HA 구성 - 실습 환경
서종호(가시다)님의 On-Premise K8s Hands-on Study 5주차 학습 내용을 기반으로 합니다.
TL;DR
이번 글에서는 HA Control Plane 실습 환경을 구성한다.
- 구성: External LB (HAProxy) + Control Plane 3대 + Worker Node 2대
- Case 2 (Hybrid LB): 외부는 HAProxy, 워커는 Client-Side LB
- admin-lb 노드: HAProxy + NFS + Kubespray 실행 환경
실습 환경 구성
전체 구성도
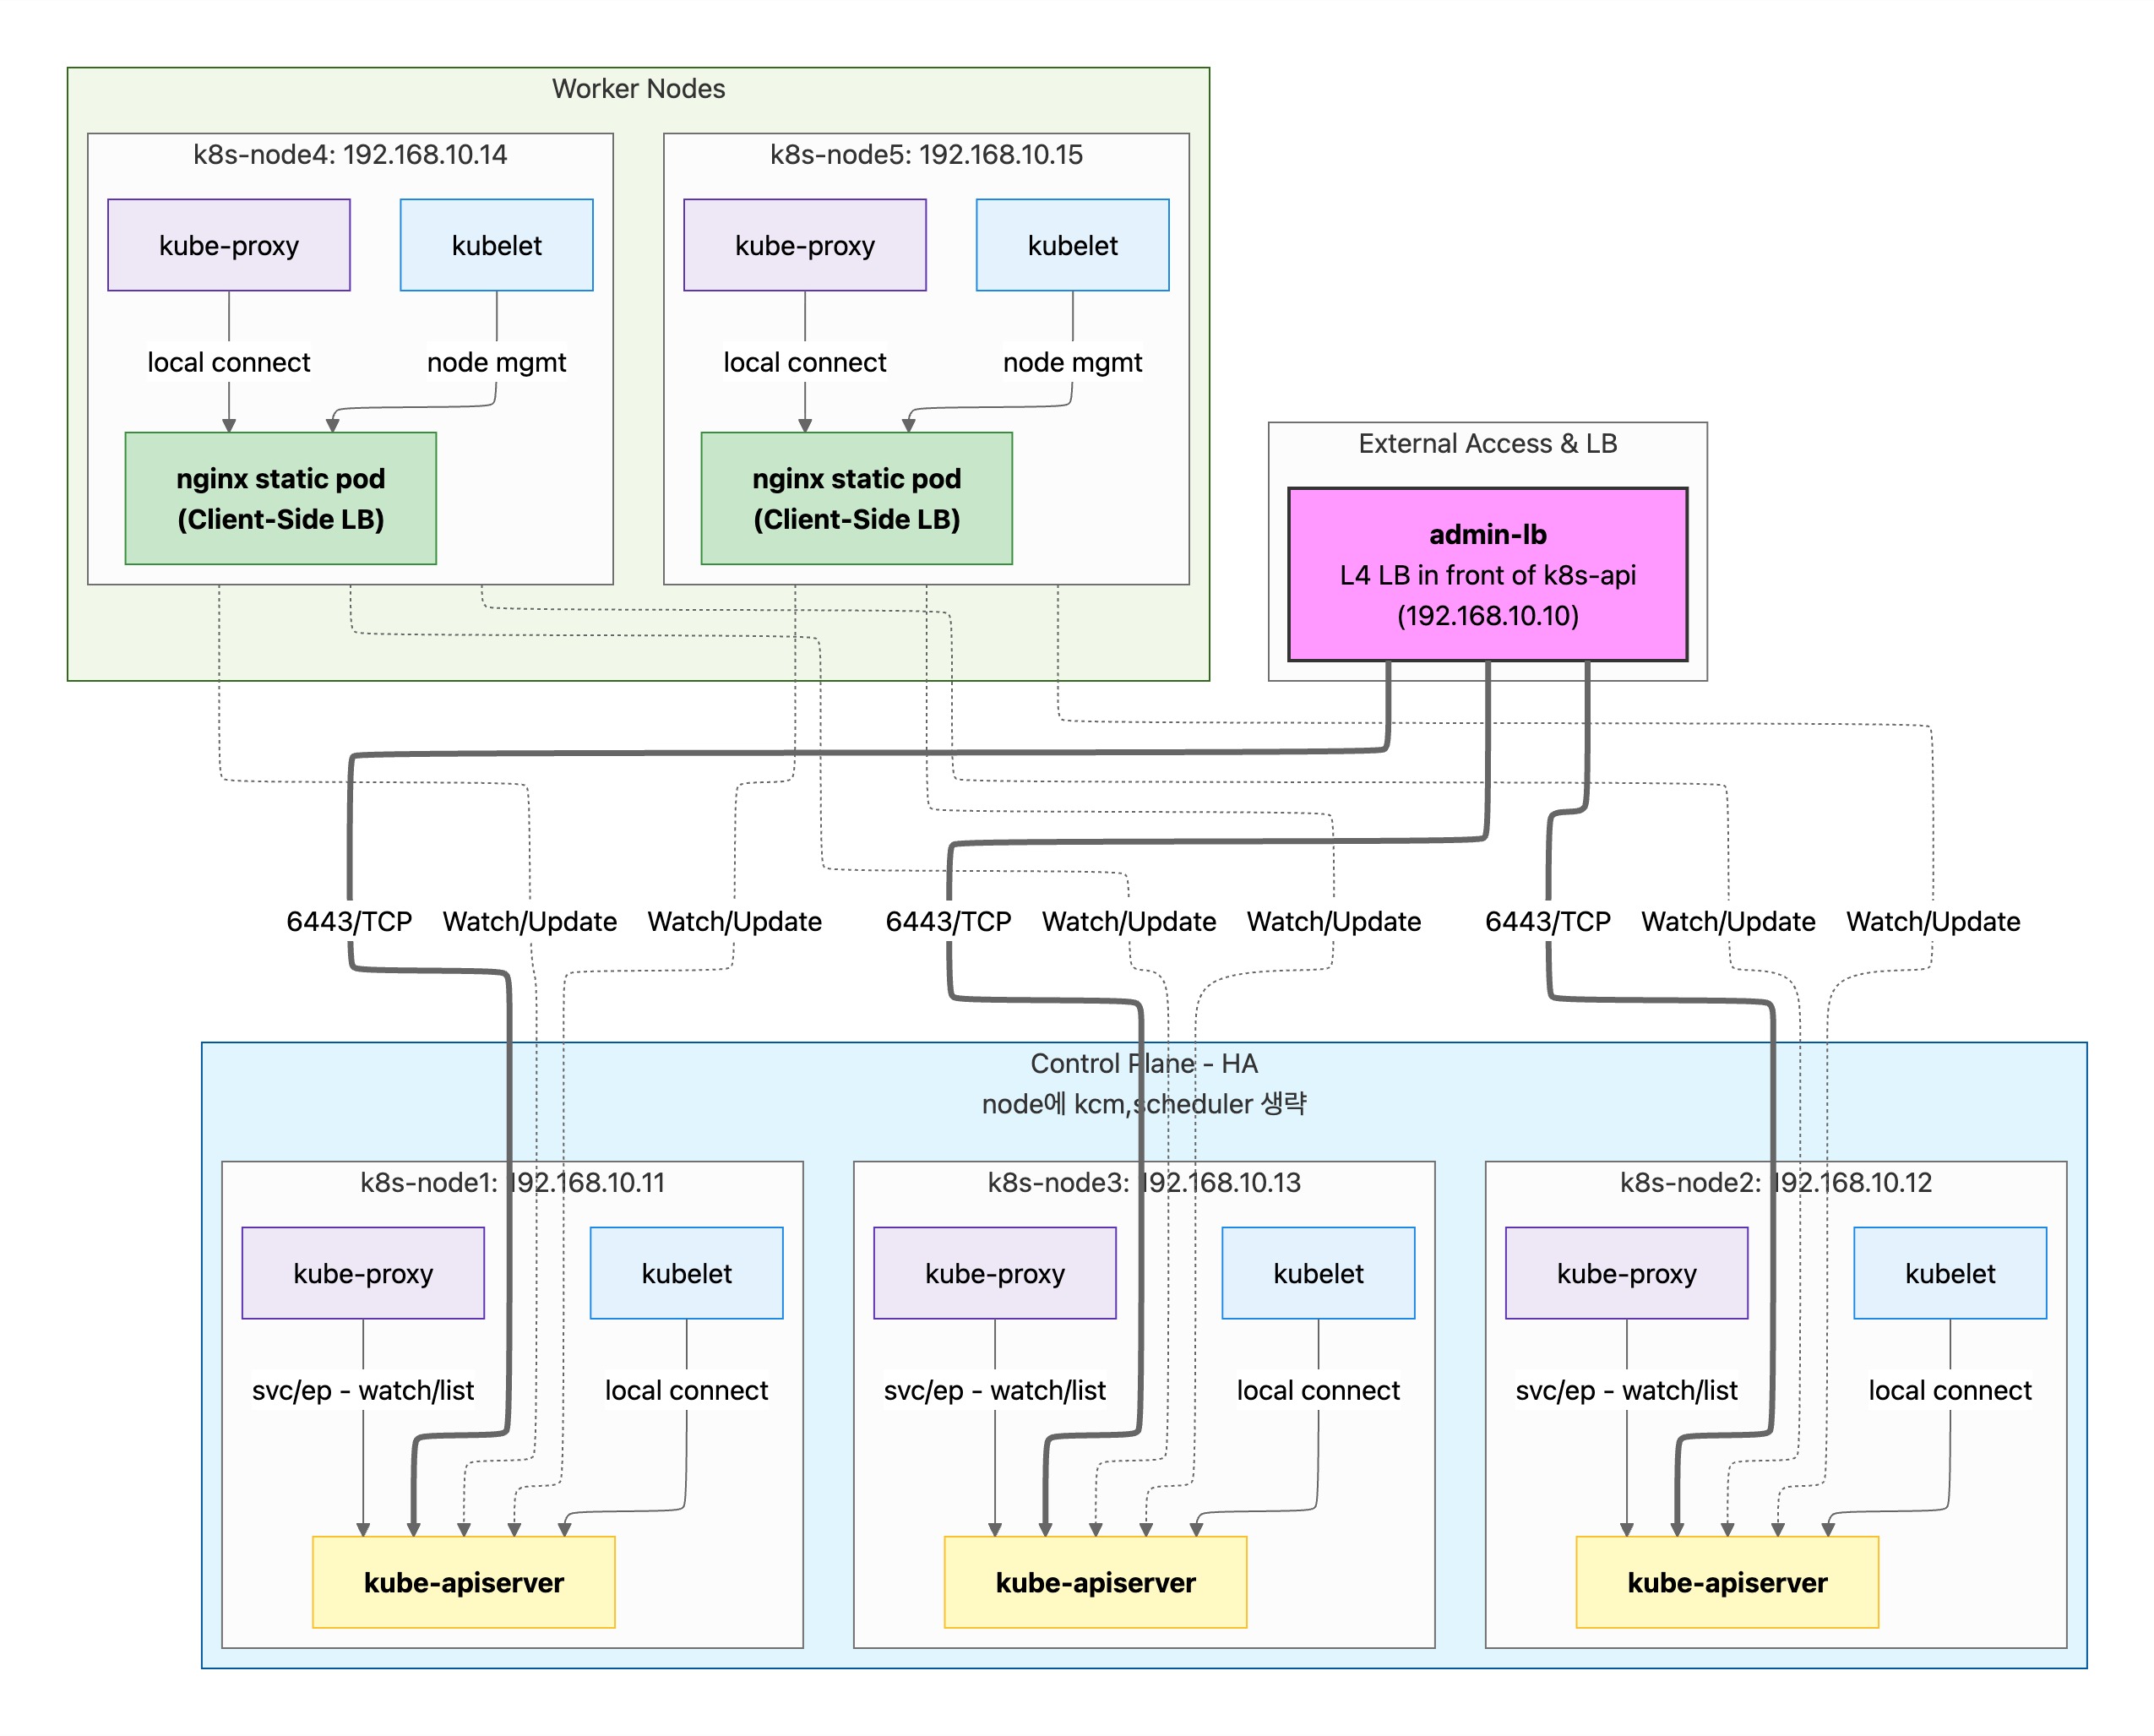
API Server 접근 방식
| Case | Control Plane (kubelet, kube-proxy) | Worker Node (kubelet, kube-proxy) |
|---|---|---|
| Case 1 | localhost:6443 | nginx static pod → 3 API servers |
| Case 2 | localhost:6443 | nginx static pod → 3 API servers |
| Case 3 | localhost:6443 | External LB → 3 API servers |
- Control Plane: 모든 Case에서 동일 (같은 노드의 API server에 직접 연결)
- Worker Node (Case 1, 2): nginx static pod(localhost:6443)를 통해 3개 API server로 로드밸런싱
- Worker Node (Case 3): External LB를 통해 API server 접근 (LB 장애 시 SPOF)
참고: kubelet/kube-proxy의 접근 이유 및 Case별 상세 비교는 이전 글 - HA 구성 개요 참조
Case별 구성 비교
Case 1: Full Client-Side LB
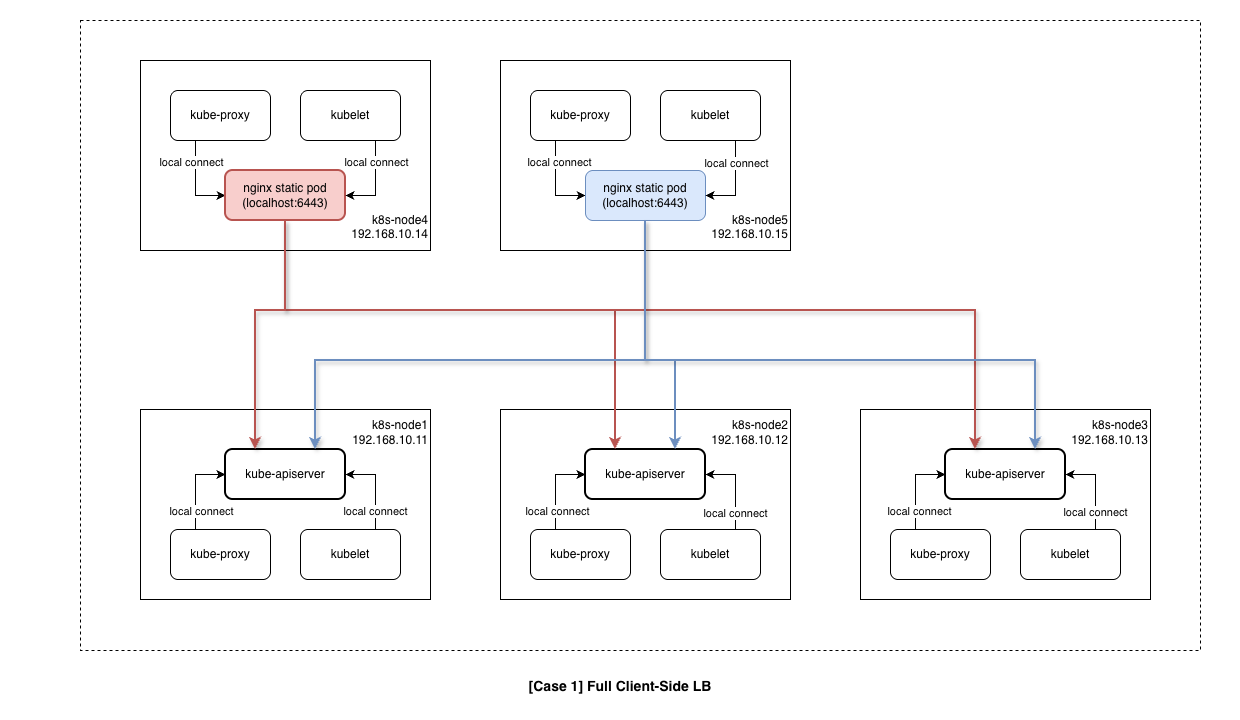
- 구성
- External LB: 없음
- 외부 접근: 직접 3개 엔드포인트 (192.168.10.11~13:6443)
- 워커 노드: 직접 3개 엔드포인트 (192.168.10.11~13:6443)
- 특징
- Control Plane: localhost API server 직접 접근
- Worker Node: 3개 API server endpoint에 직접 연결 (HA 보장)
Case 2: Hybrid LB
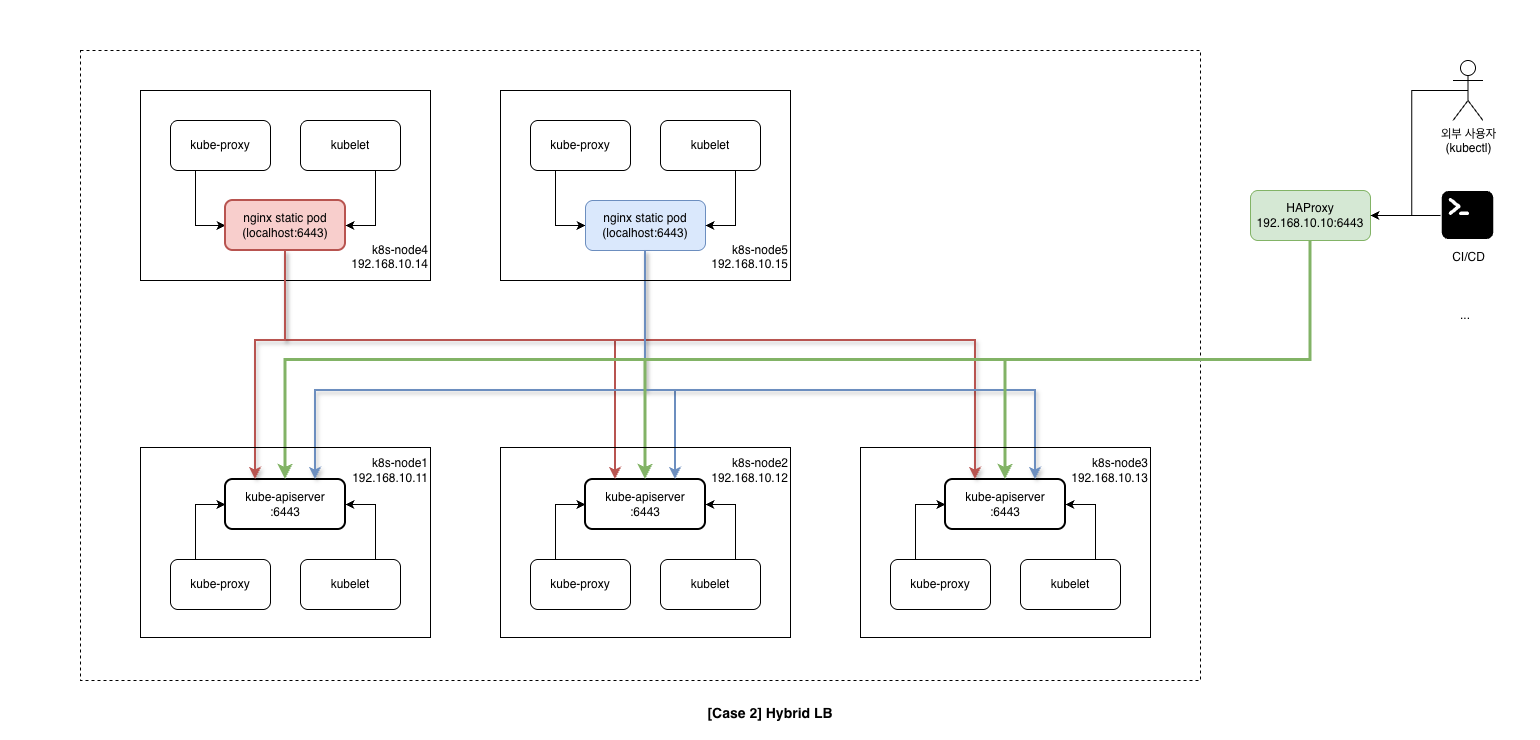
- 구성
- External LB: HAProxy (192.168.10.10:6443)
- 외부 접근: HAProxy VIP 1개 (192.168.10.10:6443)
- 워커 노드: nginx static pod → 3개 엔드포인트 (192.168.10.11~13:6443)
- 특징
- Control Plane: localhost API server 직접 접근
- Worker Node: nginx static pod(localhost:6443) 경유 → 3개 API server로 로드밸런싱
- 외부는 HAProxy, 내부(Worker)는 Client-Side LB로 분리
Case 3: Centralized LB
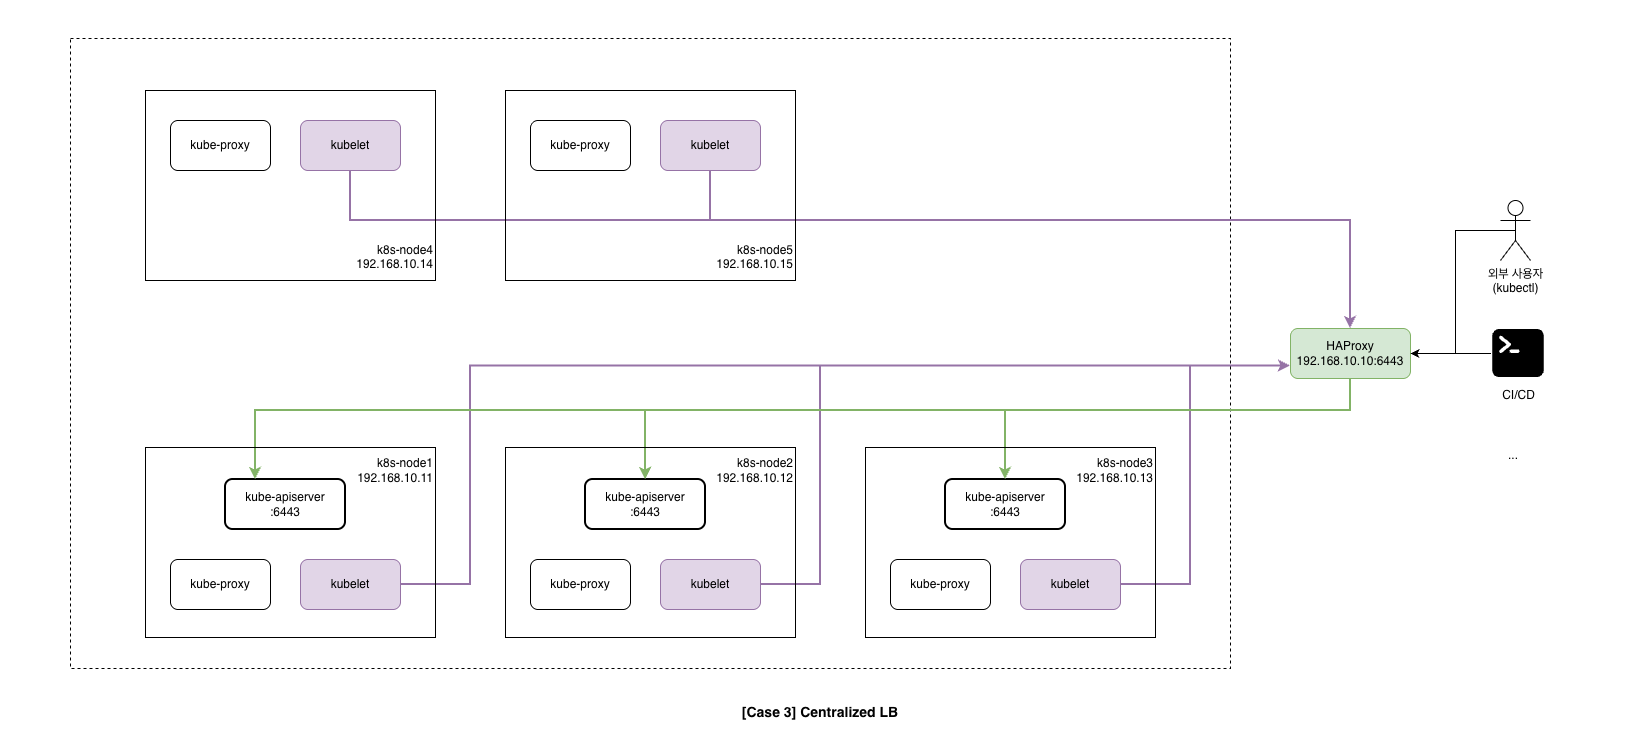
- 구성
- External LB: 필수 (HA 구성 필요) - 192.168.10.10:6443
- 외부 접근: LB VIP 1개 (192.168.10.10:6443)
- 워커 노드: LB VIP 1개 (192.168.10.10:6443) - LB 장애 시 전체 장애
- 특징
- Control Plane: localhost API server 직접 접근
- Worker Node: External LB VIP(192.168.10.10:6443)만 의존
- 단점: LB 장애 시 Worker Node의 모든 API server 통신 불가 (SPOF)
노드 구성
| NAME | Description | CPU | RAM | NIC2 (Private) | Init Script |
|---|---|---|---|---|---|
| admin-lb | Kubespray 실행, API LB | 2 | 1GB | 192.168.10.10 | admin-lb.sh |
| k8s-node1 | Control Plane | 4 | 2GB | 192.168.10.11 | init_cfg.sh |
| k8s-node2 | Control Plane | 4 | 2GB | 192.168.10.12 | init_cfg.sh |
| k8s-node3 | Control Plane | 4 | 2GB | 192.168.10.13 | init_cfg.sh |
| k8s-node4 | Worker Node | 4 | 2GB | 192.168.10.14 | init_cfg.sh |
| k8s-node5 | Worker Node | 4 | 2GB | 192.168.10.15 | init_cfg.sh |
참고: 최소 메모리 요구사항은 약 11GB (admin-lb 1GB + 노드 5대 × 2GB). 리소스가 부족하면 k8s-node5를 제외하고 4대로 시작할 수 있다.
Case 2 (Hybrid LB) 동작 방식
# 외부 접근 (kubectl, CI/CD)
External Client → HAProxy (admin-lb:6443)
                     → k8s-node1:6443
                     → k8s-node2:6443
                     → k8s-node3:6443

# 워커 노드 kubelet (Client-Side LB)
Worker Node (k8s-node4/5)
  → localhost:6443 (nginx static pod)
      → k8s-node1:6443
      → k8s-node2:6443
      → k8s-node3:6443
Vagrantfile
Vagrantfile (클릭하여 펼치기)
# Base Image  https://portal.cloud.hashicorp.com/vagrant/discover/bento/rockylinux-10.0
BOX_IMAGE = "bento/rockylinux-10.0"
BOX_VERSION = "202510.26.0"
N = 5 # max number of Node

Vagrant.configure("2") do |config|

# Nodes
  (1..N).each do |i|
    config.vm.define "k8s-node#{i}" do |subconfig|
      subconfig.vm.box = BOX_IMAGE
      subconfig.vm.box_version = BOX_VERSION
      subconfig.vm.provider "virtualbox" do |vb|
        vb.customize ["modifyvm", :id, "--groups", "/Kubespray-Lab"]
        vb.customize ["modifyvm", :id, "--nicpromisc2", "allow-all"]
        vb.name = "k8s-node#{i}"
        vb.cpus = 4
        vb.memory = 2048
        vb.linked_clone = true
      end
      subconfig.vm.host_name = "k8s-node#{i}"
      subconfig.vm.network "private_network", ip: "192.168.10.1#{i}"
      subconfig.vm.network "forwarded_port", guest: 22, host: "6000#{i}", auto_correct: true, id: "ssh"
      subconfig.vm.synced_folder "./", "/vagrant", disabled: true
      subconfig.vm.provision "shell", path: "init_cfg.sh", args: "#{N}" # N 전달
    end
  end

# Admin & LoadBalancer Node
    config.vm.define "admin-lb" do |subconfig|
      subconfig.vm.box = BOX_IMAGE
      subconfig.vm.box_version = BOX_VERSION
      subconfig.vm.provider "virtualbox" do |vb|
        vb.customize ["modifyvm", :id, "--groups", "/Kubespray-Lab"]
        vb.customize ["modifyvm", :id, "--nicpromisc2", "allow-all"]
        vb.name = "admin-lb"
        vb.cpus = 2
        vb.memory = 1024
        vb.linked_clone = true
      end
      subconfig.vm.host_name = "admin-lb"
      subconfig.vm.network "private_network", ip: "192.168.10.10"
      subconfig.vm.network "forwarded_port", guest: 22, host: "60000", auto_correct: true, id: "ssh"
      subconfig.vm.synced_folder "./", "/vagrant", disabled: true
      subconfig.vm.provision "shell", path: "admin-lb.sh", args: "#{N}"
    end

end
주요 설정 설명
| 설정 | 값 | 설명 |
|---|---|---|
N = 5 |
5 | 생성할 k8s-node 개수 |
args: "#{N}" |
- | 프로비저닝 스크립트에 노드 수 전달 |
vb.linked_clone |
true |
디스크 공간 절약 |
--nicpromisc2 |
allow-all |
Promiscuous 모드 (CNI 통신용) |
프로비저닝 스크립트
admin-lb.sh
admin-lb 노드는 다음 역할을 수행한다:
| Task | 설명 |
|---|---|
| HAProxy 설치 | External LB (API Server 로드밸런싱) |
| NFS Server | 영구 볼륨 실습용 공유 스토리지 |
| Kubespray Clone | 클러스터 배포 도구 |
| kubectl, k9s, helm | 클러스터 관리 도구 |
| SSH Key 배포 | Ansible 접속용 |
admin-lb.sh (클릭하여 펼치기)
#!/usr/bin/env bash

echo ">>>> Initial Config Start <<<<"

echo "[TASK 1] Change Timezone and Enable NTP"
timedatectl set-local-rtc 0
timedatectl set-timezone Asia/Seoul

echo "[TASK 2] Disable firewalld and selinux"
systemctl disable --now firewalld >/dev/null 2>&1
setenforce 0
sed -i 's/^SELINUX=enforcing/SELINUX=permissive/' /etc/selinux/config

echo "[TASK 3] Setting Local DNS Using Hosts file"
sed -i '/^127\.0\.\(1\|2\)\.1/d' /etc/hosts
echo "192.168.10.10 k8s-api-srv.admin-lb.com admin-lb" >> /etc/hosts
for (( i=1; i<=$1; i++  )); do echo "192.168.10.1$i k8s-node$i" >> /etc/hosts; done

echo "[TASK 4] Delete default routing - enp0s9 NIC"
nmcli connection modify enp0s9 ipv4.never-default yes
nmcli connection up enp0s9 >/dev/null 2>&1

echo "[TASK 5] Install kubectl"
cat << EOF > /etc/yum.repos.d/kubernetes.repo
[kubernetes]
name=Kubernetes
baseurl=https://pkgs.k8s.io/core:/stable:/v1.32/rpm/
enabled=1
gpgcheck=1
gpgkey=https://pkgs.k8s.io/core:/stable:/v1.32/rpm/repodata/repomd.xml.key
exclude=kubectl
EOF
dnf install -y -q kubectl --disableexcludes=kubernetes >/dev/null 2>&1

echo "[TASK 6] Install HAProxy"
dnf install -y haproxy >/dev/null 2>&1

cat << EOF > /etc/haproxy/haproxy.cfg
#---------------------------------------------------------------------
# Global settings
#---------------------------------------------------------------------
global
    log         127.0.0.1 local2
    chroot      /var/lib/haproxy
    pidfile     /var/run/haproxy.pid
    maxconn     4000
    user        haproxy
    group       haproxy
    daemon
    stats socket /var/lib/haproxy/stats
    ssl-default-bind-ciphers PROFILE=SYSTEM
    ssl-default-server-ciphers PROFILE=SYSTEM

#---------------------------------------------------------------------
# common defaults
#---------------------------------------------------------------------
defaults
    mode                    http
    log                     global
    option                  httplog
    option                  tcplog
    option                  dontlognull
    option http-server-close
    option                  redispatch
    retries                 3
    timeout http-request    10s
    timeout queue           1m
    timeout connect         10s
    timeout client          1m
    timeout server          1m
    timeout http-keep-alive 10s
    timeout check           10s
    maxconn                 3000

# ---------------------------------------------------------------------
# Kubernetes API Server Load Balancer Configuration
# ---------------------------------------------------------------------
frontend k8s-api
    bind *:6443
    mode tcp
    option tcplog
    default_backend k8s-api-backend

backend k8s-api-backend
    mode tcp
    option tcp-check
    option log-health-checks
    timeout client 3h
    timeout server 3h
    balance roundrobin
    server k8s-node1 192.168.10.11:6443 check check-ssl verify none inter 10000
    server k8s-node2 192.168.10.12:6443 check check-ssl verify none inter 10000
    server k8s-node3 192.168.10.13:6443 check check-ssl verify none inter 10000

# ---------------------------------------------------------------------
# HAProxy Stats Dashboard - http://192.168.10.10:9000/haproxy_stats
# ---------------------------------------------------------------------
listen stats
    bind *:9000
    mode http
    stats enable
    stats uri /haproxy_stats
    stats realm HAProxy\ Statistic
    stats admin if TRUE

# ---------------------------------------------------------------------
# Prometheus exporter - curl http://192.168.10.10:8405/metrics
# ---------------------------------------------------------------------
frontend prometheus
    bind *:8405
    mode http
    http-request use-service prometheus-exporter if { path /metrics }
    no log
EOF
systemctl enable --now haproxy >/dev/null 2>&1

echo "[TASK 7] Install nfs-utils"
dnf install -y nfs-utils >/dev/null 2>&1
systemctl enable --now nfs-server >/dev/null 2>&1
mkdir -p /srv/nfs/share
chown nobody:nobody /srv/nfs/share
chmod 755 /srv/nfs/share
echo '/srv/nfs/share *(rw,async,no_root_squash,no_subtree_check)' > /etc/exports
exportfs -rav

echo "[TASK 8] Install packages"
dnf install -y python3-pip git sshpass >/dev/null 2>&1

echo "[TASK 9] Setting SSHD"
echo "root:qwe123" | chpasswd
cat << EOF >> /etc/ssh/sshd_config
PermitRootLogin yes
PasswordAuthentication yes
EOF
systemctl restart sshd >/dev/null 2>&1

echo "[TASK 10] Setting SSH Key"
ssh-keygen -t rsa -N "" -f /root/.ssh/id_rsa >/dev/null 2>&1
sshpass -p 'qwe123' ssh-copy-id -o StrictHostKeyChecking=no root@192.168.10.10 >/dev/null 2>&1
for (( i=1; i<=$1; i++  )); do sshpass -p 'qwe123' ssh-copy-id -o StrictHostKeyChecking=no root@192.168.10.1$i >/dev/null 2>&1 ; done

echo "[TASK 11] Clone Kubespray Repository"
git clone -b v2.29.1 https://github.com/kubernetes-sigs/kubespray.git /root/kubespray >/dev/null 2>&1

cp -rfp /root/kubespray/inventory/sample /root/kubespray/inventory/mycluster
cat << EOF > /root/kubespray/inventory/mycluster/inventory.ini
[kube_control_plane]
k8s-node1 ansible_host=192.168.10.11 ip=192.168.10.11 etcd_member_name=etcd1
k8s-node2 ansible_host=192.168.10.12 ip=192.168.10.12 etcd_member_name=etcd2
k8s-node3 ansible_host=192.168.10.13 ip=192.168.10.13 etcd_member_name=etcd3

[etcd:children]
kube_control_plane

[kube_node]
k8s-node4 ansible_host=192.168.10.14 ip=192.168.10.14
#k8s-node5 ansible_host=192.168.10.15 ip=192.168.10.15
EOF

echo "[TASK 12] Install Python Dependencies"
pip3 install -r /root/kubespray/requirements.txt >/dev/null 2>&1

echo "[TASK 13] Install K9s"
CLI_ARCH=amd64
if [ "$(uname -m)" = "aarch64" ]; then CLI_ARCH=arm64; fi
wget -P /tmp https://github.com/derailed/k9s/releases/latest/download/k9s_linux_${CLI_ARCH}.tar.gz >/dev/null 2>&1
tar -xzf /tmp/k9s_linux_${CLI_ARCH}.tar.gz -C /tmp
mv /tmp/k9s /usr/local/bin/
chmod +x /usr/local/bin/k9s

echo "[TASK 14] Install kubecolor"
dnf install -y -q 'dnf-command(config-manager)' >/dev/null 2>&1
dnf config-manager --add-repo https://kubecolor.github.io/packages/rpm/kubecolor.repo >/dev/null 2>&1
dnf install -y -q kubecolor >/dev/null 2>&1

echo "[TASK 15] Install Helm"
curl -fsSL https://raw.githubusercontent.com/helm/helm/main/scripts/get-helm-3 | DESIRED_VERSION=v3.18.6 bash >/dev/null 2>&1

echo "[TASK 16] ETC"
echo "sudo su -" >> /home/vagrant/.bashrc

echo ">>>> Initial Config End <<<<"
HAProxy 설정 상세
# API Server Load Balancer
frontend k8s-api
    bind *:6443           # 모든 인터페이스의 6443 포트 리스닝
    mode tcp              # L4 로드밸런싱 (API는 HTTPS/TCP)
    default_backend k8s-api-backend

backend k8s-api-backend
    mode tcp
    balance roundrobin
    server k8s-node1 192.168.10.11:6443 check check-ssl verify none inter 10000
    server k8s-node2 192.168.10.12:6443 check check-ssl verify none inter 10000
    server k8s-node3 192.168.10.13:6443 check check-ssl verify none inter 10000
| 설정 | 설명 |
|---|---|
balance roundrobin |
라운드로빈 부하 분산 |
check |
헬스체크 활성화 |
check-ssl |
SSL 연결로 헬스체크 |
verify none |
인증서 검증 생략 (self-signed) |
inter 10000 |
10초마다 헬스체크 |
init_cfg.sh
init_cfg.sh (클릭하여 펼치기)
#!/usr/bin/env bash

echo ">>>> Initial Config Start <<<<"

echo "[TASK 1] Change Timezone and Enable NTP"
timedatectl set-local-rtc 0
timedatectl set-timezone Asia/Seoul

echo "[TASK 2] Disable firewalld and selinux"
systemctl disable --now firewalld >/dev/null 2>&1
setenforce 0
sed -i 's/^SELINUX=enforcing/SELINUX=permissive/' /etc/selinux/config

echo "[TASK 3] Disable and turn off SWAP & Delete swap partitions"
swapoff -a
sed -i '/swap/d' /etc/fstab
sfdisk --delete /dev/sda 2 >/dev/null 2>&1
partprobe /dev/sda >/dev/null 2>&1

echo "[TASK 4] Config kernel & module"
cat << EOF > /etc/modules-load.d/k8s.conf
overlay
br_netfilter
EOF
modprobe overlay >/dev/null 2>&1
modprobe br_netfilter >/dev/null 2>&1

cat << EOF >/etc/sysctl.d/k8s.conf
net.bridge.bridge-nf-call-iptables  = 1
net.bridge.bridge-nf-call-ip6tables = 1
net.ipv4.ip_forward                 = 1
EOF
sysctl --system >/dev/null 2>&1

echo "[TASK 5] Setting Local DNS Using Hosts file"
sed -i '/^127\.0\.\(1\|2\)\.1/d' /etc/hosts
echo "192.168.10.10 k8s-api-srv.admin-lb.com admin-lb" >> /etc/hosts
for (( i=1; i<=$1; i++  )); do echo "192.168.10.1$i k8s-node$i" >> /etc/hosts; done

echo "[TASK 6] Delete default routing - enp0s9 NIC"
nmcli connection modify enp0s9 ipv4.never-default yes
nmcli connection up enp0s9 >/dev/null 2>&1

echo "[TASK 7] Setting SSHD"
echo "root:qwe123" | chpasswd
cat << EOF >> /etc/ssh/sshd_config
PermitRootLogin yes
PasswordAuthentication yes
EOF
systemctl restart sshd >/dev/null 2>&1

echo "[TASK 8] Install packages"
dnf install -y git nfs-utils >/dev/null 2>&1

echo "[TASK 9] ETC"
echo "sudo su -" >> /home/vagrant/.bashrc

echo ">>>> Initial Config End <<<<"
실습 환경 배포
파일 다운로드 및 배포
# 실습용 디렉터리 생성
mkdir k8s-ha-kubespray
cd k8s-ha-kubespray

# 파일 다운로드
curl -O https://raw.githubusercontent.com/gasida/vagrant-lab/refs/heads/main/k8s-ha-kubespary/Vagrantfile
curl -O https://raw.githubusercontent.com/gasida/vagrant-lab/refs/heads/main/k8s-ha-kubespary/admin-lb.sh
curl -O https://raw.githubusercontent.com/gasida/vagrant-lab/refs/heads/main/k8s-ha-kubespary/init_cfg.sh

# 실습 환경 배포
vagrant up
배포 프로세스
vagrant up 실행 시 다음 순서로 VM이 생성되고 프로비저닝된다.
- k8s-node1~5: Worker/Control Plane 노드 생성 및
init_cfg.sh실행- VM 클론 생성 (linked_clone)
- 네트워크 설정 (NAT + Host-only)
- SSH 키 교체 (보안)
- 시스템 초기화 (Timezone, SWAP, Kernel 설정 등)
- admin-lb: 관리 노드 생성 및
admin-lb.sh실행- HAProxy, NFS, kubectl 설치
- SSH 키 배포
- Kubespray 클론 및 인벤토리 구성
- 관리 도구 설치 (k9s, helm, kubecolor)
vagrant up 전체 실행 로그 (클릭하여 펼치기)
Bringing machine 'k8s-node1' up with 'virtualbox' provider...
Bringing machine 'k8s-node2' up with 'virtualbox' provider...
Bringing machine 'k8s-node3' up with 'virtualbox' provider...
Bringing machine 'k8s-node4' up with 'virtualbox' provider...
Bringing machine 'k8s-node5' up with 'virtualbox' provider...
Bringing machine 'admin-lb' up with 'virtualbox' provider...
==> k8s-node1: Cloning VM...
==> k8s-node1: Matching MAC address for NAT networking...
==> k8s-node1: Checking if box 'bento/rockylinux-10.0' version '202510.26.0' is up to date...
==> k8s-node1: Setting the name of the VM: k8s-node1
==> k8s-node1: Clearing any previously set network interfaces...
==> k8s-node1: Preparing network interfaces based on configuration...
    k8s-node1: Adapter 1: nat
    k8s-node1: Adapter 2: hostonly
==> k8s-node1: Forwarding ports...
    k8s-node1: 22 (guest) => 60001 (host) (adapter 1)
==> k8s-node1: Running 'pre-boot' VM customizations...
==> k8s-node1: Booting VM...
==> k8s-node1: Waiting for machine to boot. This may take a few minutes...
    k8s-node1: SSH address: 127.0.0.1:60001
    k8s-node1: SSH username: vagrant
    k8s-node1: SSH auth method: private key
==> k8s-node1: Machine booted and ready!
==> k8s-node1: Checking for guest additions in VM...
==> k8s-node1: Setting hostname...
==> k8s-node1: Configuring and enabling network interfaces...
==> k8s-node1: Running provisioner: shell...
    k8s-node1: Running: /tmp/vagrant-shell
    k8s-node1: >>>> Initial Config Start <<<<
    k8s-node1: [TASK 1] Change Timezone and Enable NTP
    k8s-node1: [TASK 2] Disable firewalld and selinux
    k8s-node1: [TASK 3] Disable and turn off SWAP & Delete swap partitions
    k8s-node1: [TASK 4] Config kernel & module
    k8s-node1: [TASK 5] Setting Local DNS Using Hosts file
    k8s-node1: [TASK 6] Delete default routing - enp0s9 NIC
    k8s-node1: [TASK 7] Setting SSHD
    k8s-node1: [TASK 8] Install packages
    k8s-node1: [TASK 9] ETC
    k8s-node1: >>>> Initial Config End <<<<

(k8s-node2~5도 동일한 과정 반복)

==> admin-lb: Cloning VM...
==> admin-lb: Machine booted and ready!
==> admin-lb: Running provisioner: shell...
    admin-lb: >>>> Initial Config Start <<<<
    admin-lb: [TASK 1] Change Timezone and Enable NTP
    admin-lb: [TASK 2] Disable firewalld and selinux
    admin-lb: [TASK 3] Setting Local DNS Using Hosts file
    admin-lb: [TASK 4] Delete default routing - enp0s9 NIC
    admin-lb: [TASK 5] Install kubectl
    admin-lb: [TASK 6] Install HAProxy
    admin-lb: [TASK 7] Install nfs-utils
    admin-lb: exporting *:/srv/nfs/share
    admin-lb: [TASK 8] Install packages
    admin-lb: [TASK 9] Setting SSHD
    admin-lb: [TASK 10] Setting SSH Key
    admin-lb: [TASK 11] Clone Kubespray Repository
    admin-lb: [TASK 12] Install Python Dependencies
    admin-lb: [TASK 13] Install K9s
    admin-lb: [TASK 14] Install kubecolor
    admin-lb: [TASK 15] Install Helm
    admin-lb: [TASK 16] ETC
    admin-lb: >>>> Initial Config End <<<<
상태 확인
vagrant status
Current machine states:

k8s-node1                 running (virtualbox)
k8s-node2                 running (virtualbox)
k8s-node3                 running (virtualbox)
k8s-node4                 running (virtualbox)
k8s-node5                 running (virtualbox)
admin-lb                  running (virtualbox)
배포 후 확인
admin-lb 접속 및 확인
vagrant ssh admin-lb
/etc/hosts 및 SSH 접근성 확인
# /etc/hosts 확인
cat /etc/hosts
192.168.10.10 k8s-api-srv.admin-lb.com admin-lb
192.168.10.11 k8s-node1
192.168.10.12 k8s-node2
192.168.10.13 k8s-node3
192.168.10.14 k8s-node4
192.168.10.15 k8s-node5
# 모든 노드 SSH 통신 확인
for i in {1..5}; do echo ">> k8s-node$i <<"; ssh k8s-node$i hostname; echo; done
>> k8s-node1 <<
k8s-node1

>> k8s-node2 <<
k8s-node2

>> k8s-node3 <<
k8s-node3

>> k8s-node4 <<
k8s-node4

>> k8s-node5 <<
k8s-node5
Python 환경 확인
python -V && pip -V
Python 3.12.9
pip 23.3.2 from /usr/lib/python3.12/site-packages/pip (python 3.12)
Kubespray 디렉토리 구조 확인
tree /root/kubespray/ -L 1
/root/kubespray/
├── ansible.cfg
├── cluster.yml          # 클러스터 배포 메인 플레이북
├── inventory/           # 인벤토리 디렉토리
├── playbooks/           # 추가 플레이북
├── roles/               # Ansible 역할
├── reset.yml            # 클러스터 초기화
├── scale.yml            # 노드 추가
└── upgrade-cluster.yml  # 클러스터 업그레이드
Kubespray 인벤토리 확인
참고: 이 인벤토리는 admin-lb.sh의
[TASK 11] Clone Kubespray Repository에서 미리 설정된 것이다.
cat /root/kubespray/inventory/mycluster/inventory.ini
[kube_control_plane]
k8s-node1 ansible_host=192.168.10.11 ip=192.168.10.11 etcd_member_name=etcd1
k8s-node2 ansible_host=192.168.10.12 ip=192.168.10.12 etcd_member_name=etcd2
k8s-node3 ansible_host=192.168.10.13 ip=192.168.10.13 etcd_member_name=etcd3

[etcd:children]
kube_control_plane

[kube_node]
k8s-node4 ansible_host=192.168.10.14 ip=192.168.10.14
#k8s-node5 ansible_host=192.168.10.15 ip=192.168.10.15
ansible.cfg 확인
Kubespray에서 사용하는 Ansible 설정 파일이다.
cat /root/kubespray/ansible.cfg
[ssh_connection]
pipelining=True
ssh_args = -o ControlMaster=auto -o ControlPersist=30m -o ConnectionAttempts=100 -o UserKnownHostsFile=/dev/null

[defaults]
host_key_checking=False
gathering = smart
fact_caching = jsonfile
fact_caching_connection = /tmp
fact_caching_timeout = 86400
timeout = 300
callbacks_enabled = profile_tasks
| 설정 | 설명 |
|---|---|
pipelining=True |
SSH 연결 효율화 (속도 향상) |
host_key_checking=False |
SSH 호스트 키 확인 비활성화 |
fact_caching |
Fact 캐싱으로 재실행 시 속도 향상 |
timeout = 300 |
연결 타임아웃 5분 |
callbacks_enabled = profile_tasks |
태스크별 실행 시간 표시 |
NFS Server 확인
admin-lb에서 NFS 서비스 상태, 공유 디렉터리, export 설정을 순서대로 확인한다
# 1) NFS 서비스 상태 (Active: active (exited) 이면 정상)
systemctl status nfs-server --no-pager
# ● nfs-server.service - NFS server and services
#      Active: active (exited) since ...

# 2) 공유 디렉터리 — 이번 실습에서는 비어 있음
tree /srv/nfs/share/
# /srv/nfs/share/
# 0 directories, 0 files

# 3) /etc/exports 반영 (이미 적용돼 있으면 "exporting *:/srv/nfs/share" 만 출력)
exportfs -rav
# exporting *:/srv/nfs/share

# 4) 현재 export 설정 확인
cat /etc/exports
# /srv/nfs/share *(rw,async,no_root_squash,no_subtree_check)
| 항목 | 의미 |
|---|---|
| /etc/exports | NFS 서버 설정 파일. 어떤 디렉터리를 어떤 클라이언트에 어떤 옵션으로 공유할지 정의한다. |
| exportfs -rav | -r re-export, -a all, -v verbose. /etc/exports 내용을 적용한다 (서비스 재시작 없이 반영). |
| 옵션 | 의미 |
|---|---|
* |
모든 클라이언트(IP) 허용 |
rw |
읽기/쓰기 |
async |
비동기 쓰기 (성능 우선) |
no_root_squash |
root로 접속 시 root 권한 유지 (실습 편의용) |
no_subtree_check |
서브트리 검사 비활성화 (NFS v4 권장) |
HAProxy 확인
서비스 기동과 리스닝 포트를 확인한다. (설정 오류를 고친 뒤 재기동한 결과다.)
systemctl status haproxy.service --no-pager
● haproxy.service - HAProxy Load Balancer
     Loaded: loaded (/usr/lib/systemd/system/haproxy.service; enabled; preset: disabled)
     Active: active (running) since Thu 2026-02-05 21:24:09 KST; 8s ago
   Main PID: 6216 (haproxy)
     Status: "Ready."
Feb 05 21:24:09 admin-lb haproxy[6216]: [NOTICE] (6216) : Loading success.
Feb 05 21:24:09 admin-lb systemd[1]: Started haproxy.service - HAProxy Load Balancer.
ss -nltp | grep haproxy
LISTEN 0  3000  0.0.0.0:6443  0.0.0.0:*  users:(("haproxy",pid=6219,fd=7))   # k8s API LB
LISTEN 0  3000  0.0.0.0:9000  0.0.0.0:*  users:(("haproxy",pid=6219,fd=8))   # Stats
LISTEN 0  3000  0.0.0.0:8405  0.0.0.0:*  users:(("haproxy",pid=6219,fd=9))   # Prometheus
journalctl -u haproxy.service에는 기동 직후 백엔드 k8s-node1~3에 대한 헬스 체크 실패(Connection refused)와 backend ‘k8s-api-backend’ has no server available! 로그가 나온다. 이번 단계에서는 아직 Kubespray로 API 서버를 배포하지 않았기 때문에 정상이다. 05-02에서 클러스터 배포 후에는 백엔드가 UP으로 바뀐다.
admin-lb의 6443 인입 트래픽이 k8s-node1~3 API 서버로 분산되는지 설정 파일로 확인한다.
cat /etc/haproxy/haproxy.cfg
#---------------------------------------------------------------------
# Global settings
#---------------------------------------------------------------------
global
    log         127.0.0.1 local2
    chroot      /var/lib/haproxy
    pidfile     /var/run/haproxy.pid
    maxconn     4000
    user        haproxy
    group       haproxy
    daemon
    stats socket /var/lib/haproxy/stats
    ssl-default-bind-ciphers PROFILE=SYSTEM
    ssl-default-server-ciphers PROFILE=SYSTEM

#---------------------------------------------------------------------
# common defaults
#---------------------------------------------------------------------
defaults
    mode                    http
    log                     global
    option                  httplog
    option                  tcplog
    option                  dontlognull
    option http-server-close
    option                  redispatch
    retries                 3
    timeout http-request    10s
    timeout queue           1m
    timeout connect         10s
    timeout client          1m
    timeout server          1m
    timeout http-keep-alive 10s
    timeout check           10s
    maxconn                 3000

# ---------------------------------------------------------------------
# Kubernetes API Server Load Balancer Configuration
# ---------------------------------------------------------------------
frontend k8s-api
    bind *:6443
    mode tcp
    option tcplog
    default_backend k8s-api-backend

backend k8s-api-backend
    mode tcp
    option tcp-check
    option log-health-checks
    timeout client 3h
    timeout server 3h
    balance roundrobin
    server k8s-node1 192.168.10.11:6443 check check-ssl verify none inter 10000
    server k8s-node2 192.168.10.12:6443 check check-ssl verify none inter 10000
    server k8s-node3 192.168.10.13:6443 check check-ssl verify none inter 10000

# ---------------------------------------------------------------------
# HAProxy Stats Dashboard - http://192.168.10.10:9000/haproxy_stats
# ---------------------------------------------------------------------
listen stats
    bind *:9000
    mode http
    stats enable
    stats uri /haproxy_stats
    stats realm HAProxy\ Statistic
    stats admin if TRUE

# ---------------------------------------------------------------------
# Prometheus exporter - curl http://192.168.10.10:8405/metrics
# ---------------------------------------------------------------------
frontend prometheus
    bind *:8405
    mode http
    http-request use-service prometheus-exporter if { path /metrics }
    no log
| 섹션 | 역할 |
|---|---|
| global | 프로세스 공통 설정(로그, chroot, maxconn, SSL 정책 등). |
| defaults | 이후 frontend/backend/listen에 공통 적용되는 기본값(mode, timeout, retries 등). |
| frontend k8s-api | *:6443 TCP 수신 → k8s-api-backend로 전달. |
| backend k8s-api-backend | balance roundrobin으로 k8s-node1~3:6443에 순환 분산. check·check-ssl verify none으로 헬스 체크. timeout client/server 3h로 long-lived 연결(예: kubectl exec) 허용. |
| listen stats | *:9000 HTTP, /haproxy_stats 대시보드. |
| frontend prometheus | *:8405 HTTP, /metrics 요청만 Prometheus exporter로 전달. |
# 서비스 상태
systemctl status haproxy.service --no-pager

# 리스닝 포트 확인
ss -tnlp | grep haproxy
# 예상 출력
LISTEN 0  3000  0.0.0.0:6443   0.0.0.0:*  users:(("haproxy",...))  # k8s API LB
LISTEN 0  3000  0.0.0.0:9000   0.0.0.0:*  users:(("haproxy",...))  # Stats dashboard
LISTEN 0  3000  0.0.0.0:8405   0.0.0.0:*  users:(("haproxy",...))  # Prometheus metrics
HAProxy 기동 실패 시 (exit-code 1)
systemctl status가 Active: failed (Result: exit-code) 이고, ss -nltp | grep haproxy에 아무것도 안 나오면 HAProxy 프로세스가 설정 오류로 바로 종료된 상태다. systemd 로그에는 원인이 안 나오므로 HAProxy가 직접 출력하는 에러를 봐야 한다.
systemctl status haproxy.service --no-pager
# Active: failed (Result: exit-code) since ...

journalctl -u haproxy.service --no-pager
# Control process exited, code=exited, status=1/FAILURE  ← 원인은 여기서 안 나옴

ss -nltp | grep haproxy
# (출력 없음 = 리스닝 소켓 없음)
원인 확인: 설정 문법 검사로 HAProxy가 어떤 줄에서 실패했는지 확인한다.
haproxy -c -f /etc/haproxy/haproxy.cfg
[NOTICE]   (6098) : haproxy version is 3.0.5-8e879a5
[WARNING]  (6098) : config : parsing [/etc/haproxy/haproxy.cfg:29]: 'option tcplog' overrides previous 'option httplog' in 'defaults' section.
[WARNING]  (6098) : config : parsing [/etc/haproxy/haproxy.cfg:57] : 'timeout client' will be ignored because backend 'k8s-api-backend' has no frontend capability
[ALERT]    (6098) : config : parsing [/etc/haproxy/haproxy.cfg:58] : 'timeout' supports 'client', 'server', 'connect', ... (got 'se')
[ALERT]    (6098) : config : Error(s) found in configuration file : /etc/haproxy/haproxy.cfg
[ALERT]    (6098) : config : Fatal errors found in configuration.
-
원인: 58번째 줄에
timeout se처럼 되어 있음.timeout다음에는client,server,connect등만 올 수 있는데se가 들어가서 파서가 거부한 것이다. 즉timeout server 3h가 잘려서timeout se(또는 한 줄에timeout se balance roundrobin같이 붙은 상태)로 저장된 경우다. -
해결: 58번째 줄을
timeout server 3h로 수정하고,balance roundrobin이 있다면 그 다음 줄에 따로 두면 된다. 수정 후systemctl restart haproxy한다.
HAProxy 대시보드 확인
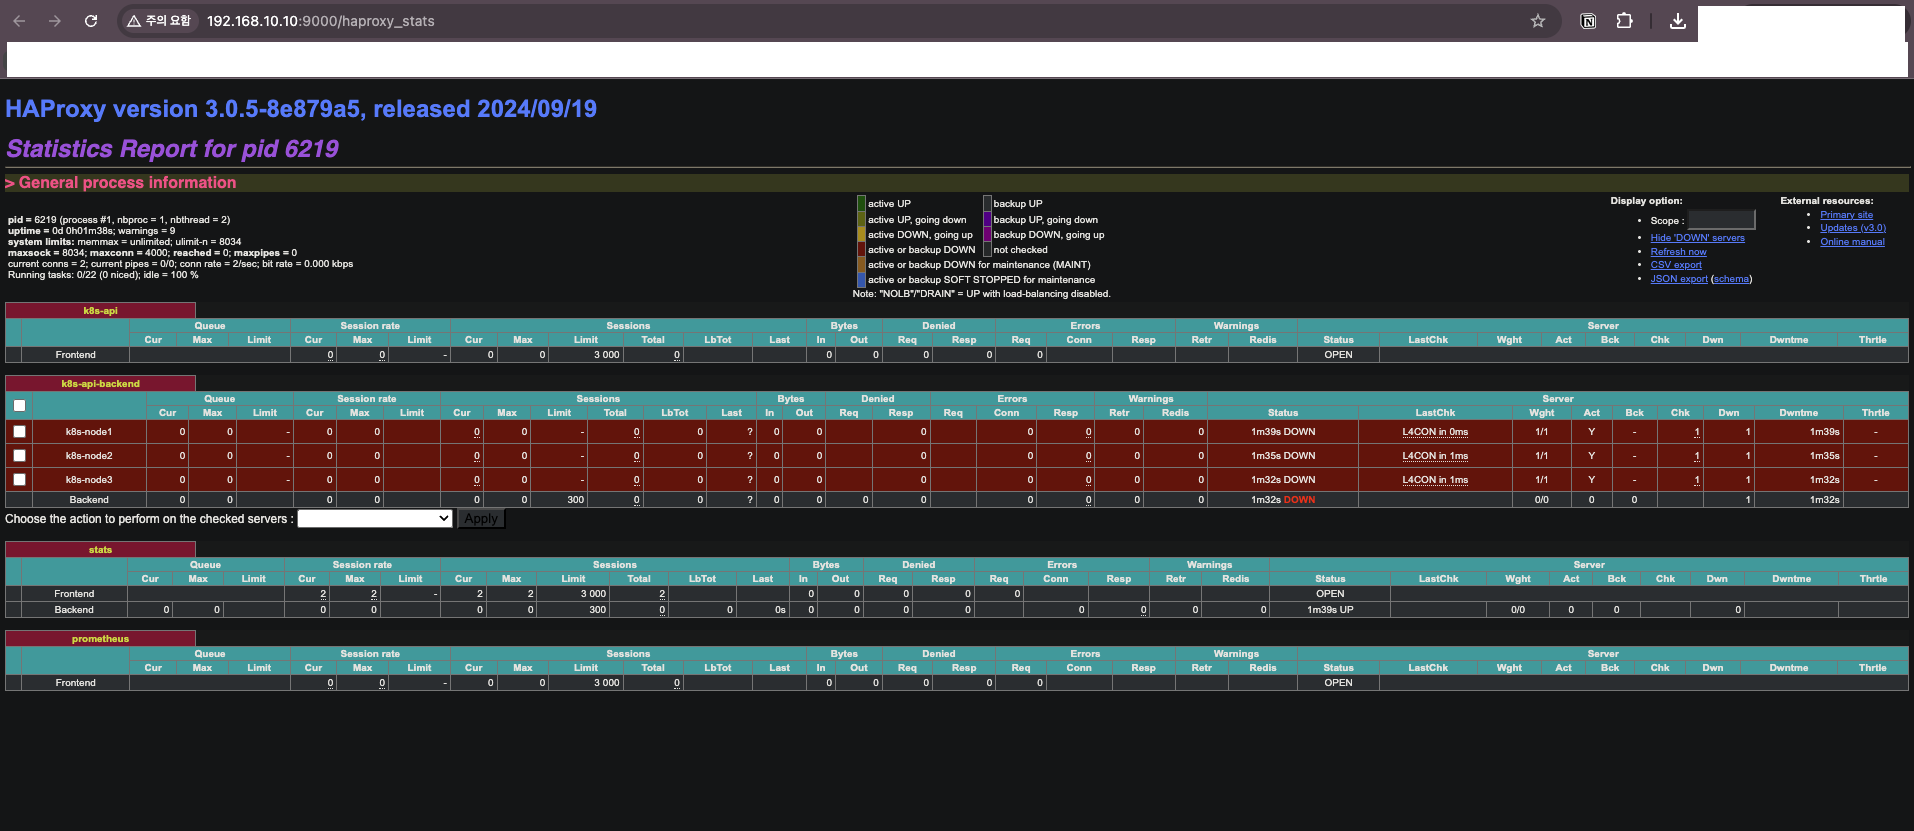
현재 상태: 아직 Kubespray로 클러스터를 배포하지 않았으므로 모든 백엔드 서버가 DOWN 상태다.
Backend: k8s-api-backend
  ├─ k8s-node1:6443  [DOWN]  ← API 서버 미설치
  ├─ k8s-node2:6443  [DOWN]  ← API 서버 미설치
  └─ k8s-node3:6443  [DOWN]  ← API 서버 미설치
결과
HA Control Plane 실습 환경이 준비되었다.
| 구성 요소 | 상태 |
|---|---|
| admin-lb (HAProxy) | 설치 완료, 백엔드 DOWN |
| k8s-node1~3 | VM 생성 완료 |
| k8s-node4~5 | VM 생성 완료 |
| SSH 접근 | 확인 완료 |
| Kubespray 인벤토리 | 구성 완료 |
다음 글에서는 Kubespray를 실행하여 HA Control Plane 클러스터를 배포한다.

댓글남기기